
Sidebar
magento_2:product_feed
Table of Contents
For more details see how the Product Feed extension works.
Guide for Product Feed for Magento 2
Create product feeds for Google Shopping, Nextag, Bing, Amazon and many other comparison shopping engines to attract more customers and drive sales to your Magento store.
- Ready-made feed templates for most popular shopping engines
- Automatic and manual feed generation
- Flexible feed configuration to comply with all shopping engines
- Ability to set particular time for feed generation
- Unlimited number of product feeds
- Include condition-based attributes into your feeds
- NEW: ready-made TikTok, Instagram, Pinterest, Facebook, and eBay feed templates are now available for use
![]() STRUGGLING WITH EXTENSION SETUP?
STRUGGLING WITH EXTENSION SETUP?
Let's collaborate and configure it during a live call!
Unlock an enhanced support experience with the Amasty One support plan and get exclusive perks like 24/7 support, faster SLAs, screen sharing, video calls for configuration questions, Slack support, and more. Only $179 per month.


Creation of product feeds
To create a product feed, please go to Catalog → 'Feeds' section → Profiles.
When you create a feed, you can use ready-made templates. In this case, the feed will contain all the basic settings for a certain shopping search engine. You can do any custom adjustments while creating a feed or you can do them later.
To duplicate, generate and delete feeds in bulk select the feeds you need, click the button Actions, and choose the action.
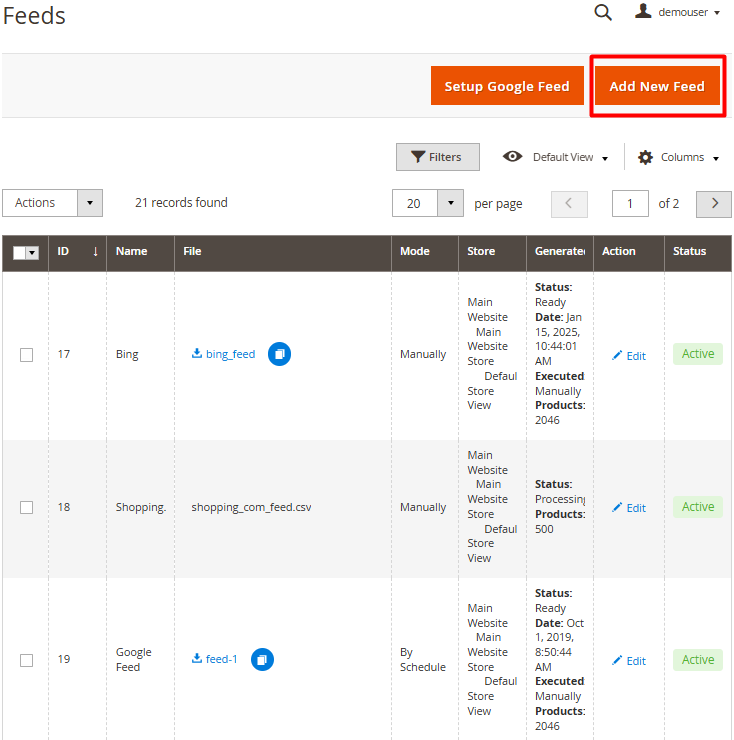

The link to the generated feed is displayed on the grid. Click the Copy Link icon in the File column of the corresponding feed to immediately get it.
In Product Feed FAQ you can find answers to the most popular questions about the extension functionality.
Set up feed for Google and Facebook with Feed wizard
Watch the guide - get your prod feeds verified by Google on the first try:

Since Facebook is using the same feed format and tags as Google, the feed profile we're going to create here will work for both Google and Facebook.
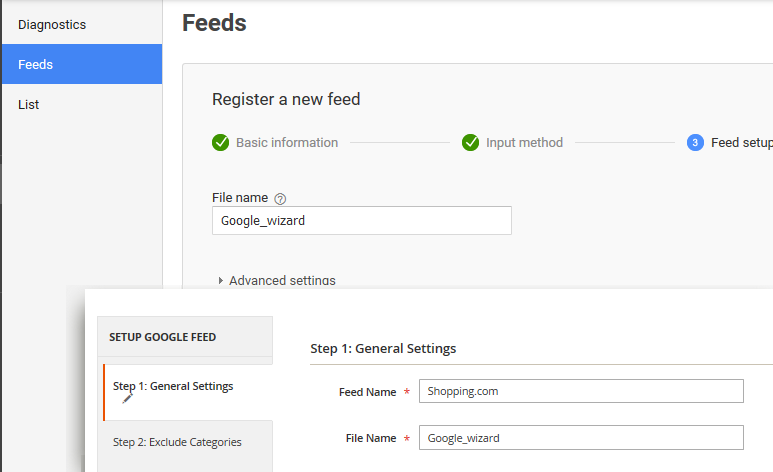
To easily create a feed with a wizard in 7 short steps, go to Feeds and click the Setup Google Feed button.

Step 1: General settings
To start setting up Google Feed, configure the General Settings.

Feed Name - specify feed name.
File name - fill in the feed file name.
Status - here you can activate or deactivate the feed.
Store View - select which store view to take attribute values from. It's very useful when you have a multilingual store, for example, so you can create feeds using the names or descriptions in specific languages.
Customer Group for Tier Prices – select the customer group to filter tier prices. When a specific group is selected, only tier prices associated with that group will be included in the feed. If no group is selected, tier prices will not be filtered.
Price Currency - specify the currency. If you have a multistore configuration with different currencies set for each store, then this setting will make the Feed fetch product prices in the currency assigned to the specific store.

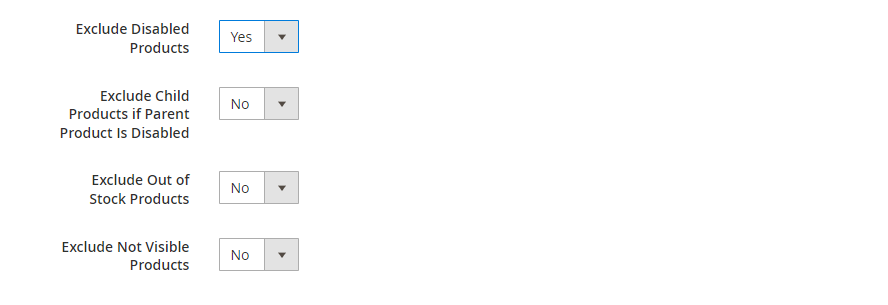
Exclude Disabled Products - set to Yes to exclude products with the disabled status from the feed.
Exclude Child Products if Parent Product Is Disabled - here you can automatically remove enabled child products from the feed if their parent product is disabled.
Exclude Out of Stock Products - enable the option if you don't want to include out of stock products to the feed.
Exclude Not Visible Products - set to Yes to skip not visible products so that they won't be included in the feed.
Exclude Products Without Images - if set to Yes, products without any images will not be included in the feed.
Exclude Child Products if Parent Product has Images - if set to Yes, child products without images will be excluded from the feed. Set to No to include child products without images to the feed if their parent product has an image.
Please note that the Customer Group for Tier Prices, Exclude Products Without Images, and Exclude Child Products if Parent Product has Images are available only as a part of an active support subscription or product subscription. You can find the amasty/module-product-feed-subscription-functionality package for installation in composer suggest.
Step 2: Exclude Categories
Carefully review all the categories listed below and select those you want to exclude from your product feed by checking the corresponding checkbox(es). Excluded categories will not be mapped to Google Taxonomies and won't be included in the generated feed.
To speed up the process, select or deselect all categories at once.

Step 3: Rename Categories
To map your category to category in Google taxonomy, simply click on the category name and insert suitable category path from Google taxonomy.
To match Google requirements, set the necessary Google Taxonomy source and easily rename the categories with the autocomplete function.
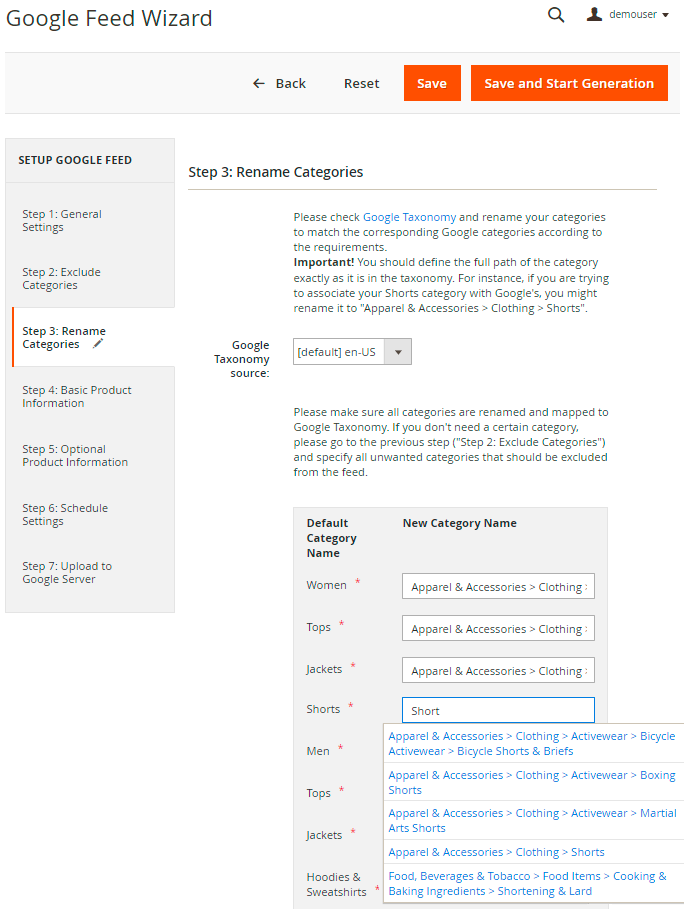
Please, note that in Magento 2.4.4 you need to type at least 3 symbols in the New Category Name field to activate the autocomplete.
Step 4: Basic Product Information
Specify the basic attributes you want to output in the feed.
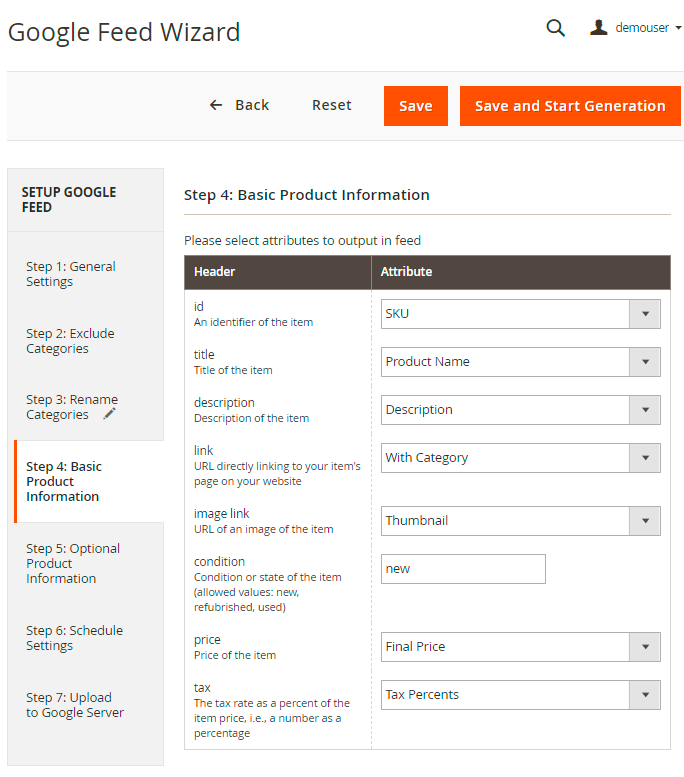
Wizard will have all fields already filled for you so you can skip to the next step if you don't want to make any changes. But in case you want, for example, to use short description instead of the description in your feed, choose it from the dropdown menu:
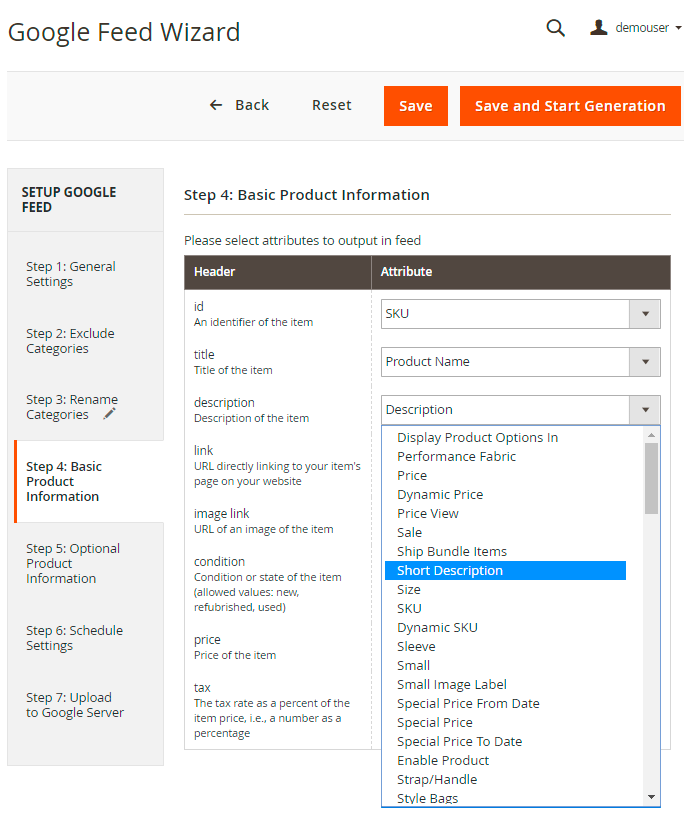
The same can be applied to all other attributes.
Step 5: Optional Product Information
Here specify the optional product attributes to output in the feed.
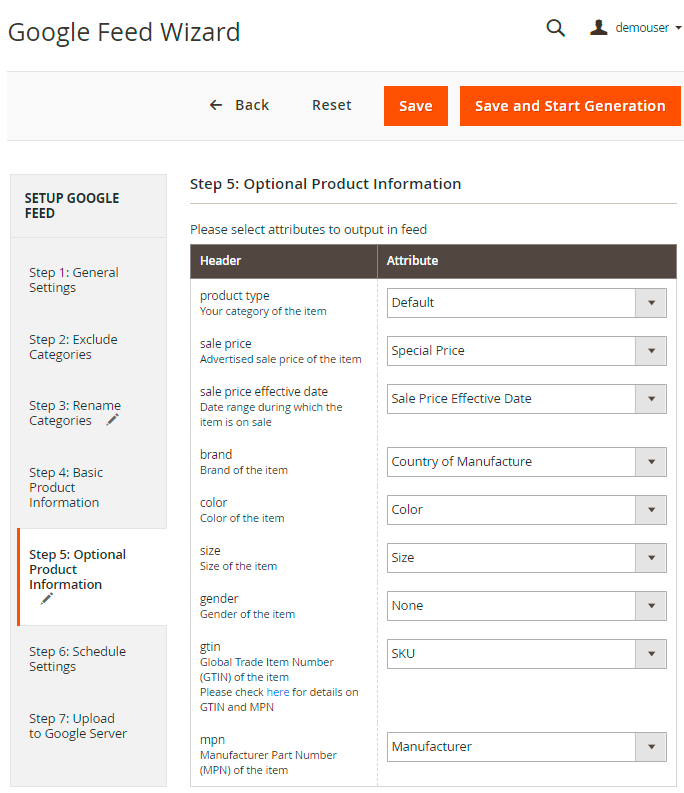
Just as in previous step here we see a list of attributes. But this time which attributes to use greatly depends on what you are selling. Google has different requirements for data that should be included in the feed. The requirements depend on your store location and the type of products you export from Magento in product feed.
For example, if you sell apparel and the Condition tag is set to New in your products, you will need to have attributes gtin, mpn and brand in the feed.
Brand should be set manually. For example, in our case, we have the brand info saved in the manufacturer attribute, so we choose it in the drop-down.
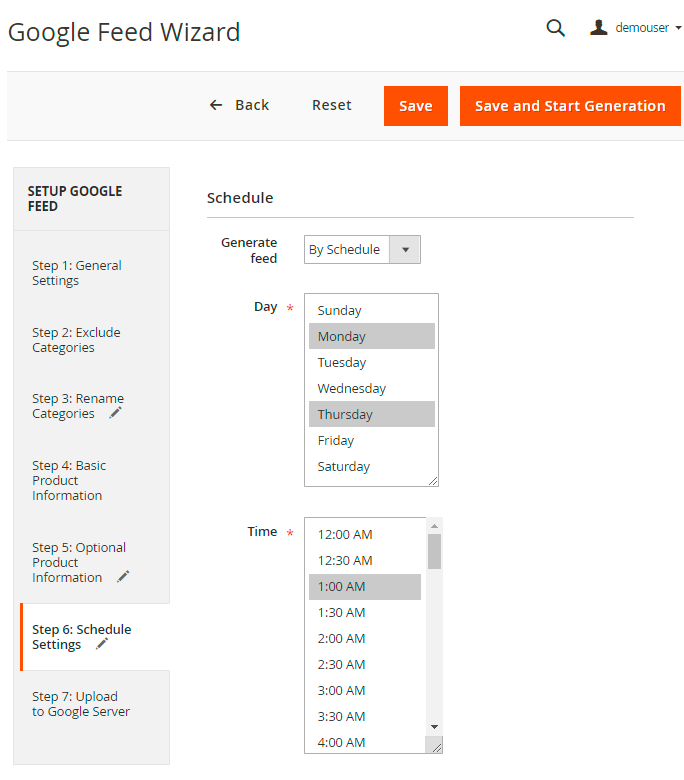
Step 6. Schedule Settings
Choose the automatic feed updating or set the necessary frequency manually. When you choose to generate feed by schedule, also specify the precise day or several days and time of its generation.
Step 7. Destination
Option 1. Upload to Google Server
In the following example we're going to set up a feed to be uploaded to the Google servers daily, once a day, using SFTP in fully-automatic mode. We should start from the Google Merchant account setup. Add a new feed:
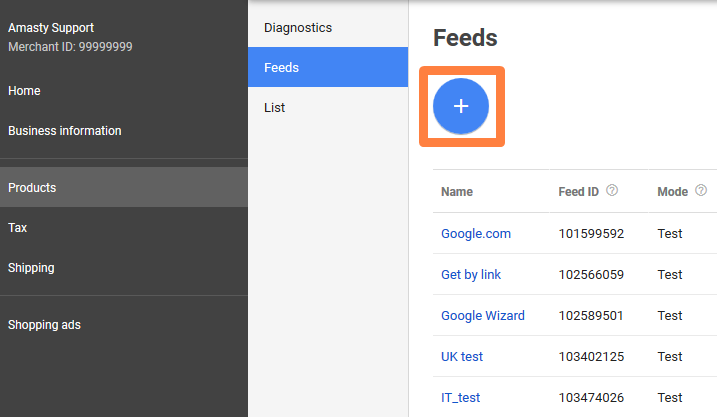
A test feed will do for now, but please keep in mind that test feeds can't be used in AdWords campaigns:
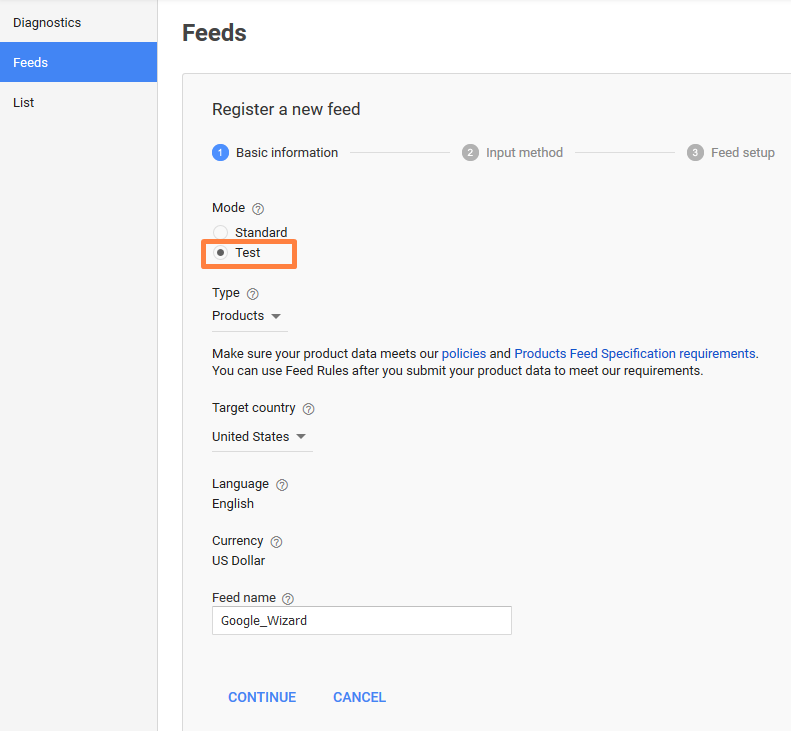
Since we're going to upload our feed files to Google server, Upload is what we need here:

The next one is important because the name of the feed file you set here should match the actual name of the file you're going to upload to Google. File name should correspond the one you specified in the Step 1.
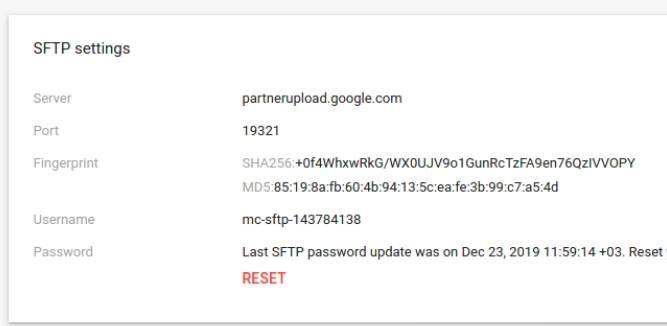
In the Google Merchant dashboard, go to Settings (near your profile avatar) > SFTP / FTP / GCS:
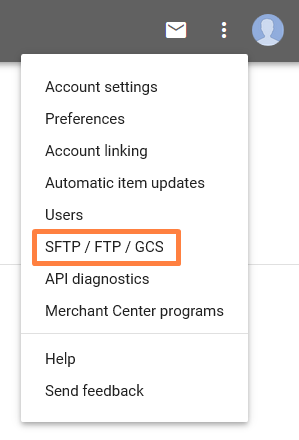
Click Reset password and save the password. Now, on the SFTP settings page we can get the server address and login:

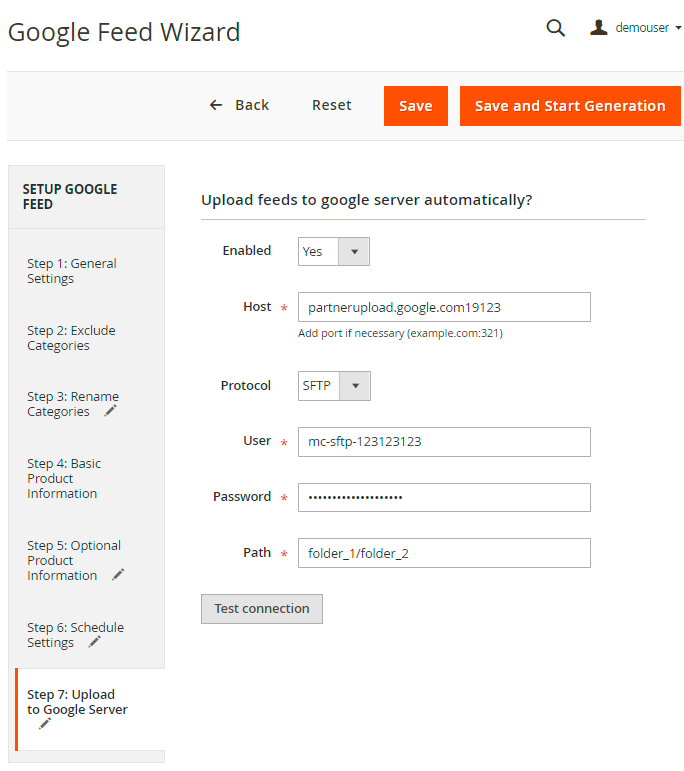
Return to the Product Feed extension, step 7. Set Enable tab to Yes.
Enter the data you have received from the Google Merchant dashboard.
Here also goes the filename you've set in the Google Merchant feed settings.
In the tab Protocol choose the upload method. If FTP is set, you can enable or disable the Passive Mode below. Here’s how the configured step 7 may look like:
As you click Save and Start Generation, the feed profile will open and the feed generation will start, and because we configured the SFTP upload, the feed will go to the Google server, too.
After the file is uploaded to the Google server, it will be automatically processed.
It is also possible to generate feed via CLI. To get the list of profiles, use the following command:
php bin/magento feed:profile:list
To start the generation of the profile, execute this one:
php bin/magento feed:profile:generate PROFILE_ID
Option 2. Use Feed for Google Merchant
Before configuring the extension settings of this tab, you need to enable the API and perform other preparations on the Google side to obtain the necessary data and establish the integration between the extension and Google Merchant Center for further feed transfer and syncing.
Use the following instructions to complete this:
1. Log in to your Google Cloud account
2. Create a new or open an existing project

3. Locate the Content API for Shopping in the API library


4. Select Content API for Shopping and click the Enable button on the opened page
5. Create a service account for authorization


Note: two optional steps can be skipped
6. Generate a Service Account Key (JSON format)


7. After selecting the Create new key option, choose JSON as the key file format. The file will be downloaded automatically. You will need this file later to upload it to the Service Account Key setting of the extension
8. Go back to the created service account settings and copy the email address

9. In your Google Merchant Center account, navigate to Settings → People and access → Add Person, and enter the copied email address


10. Now, navigate to the extension settings and complete the configuration.

This functionality is available only with an active product subscription or support subscription. You can find the amasty/module-product-feed-google-merchant-api package for installing in composer suggest.
Use Feed for Google Merchant - enable this setting to start configuring the connection between the extension (feed) and Google Merchant Center via API.
Please note the google/apiclient-services library must be installed on your instance. Without it, the settings below will not be available for configuration.
The functionality also requires PHP version 8.0 or higher to work.
Service Account Key - upload the service account key (JSON file) you generated and downloaded from your Google Cloud account. Refer to the instructions above (steps 5-7) or Google documentation for more information.
Merchant ID - specify the Merchant ID copied from your Google Merchant Center account.
You can find your Merchant ID in the top right corner of any Google Merchant Center page, located under your account name and next to the account thumbnail.

Feed Label - enter a name that helps you to easily categorize and identify your products in ad campaigns. Use only uppercase letters, digits, hyphens, or underscores (up to 20 characters).
Target Countries - define the target countries of sale. For more details about the Google requirements, refer to the following article.
Language - select the language of your product feed. The selected language does not affect the content of the feed. However, ensure that your product landing pages are in the same language to meet Google requirements. Supported languages are listed in the following documentation.
The Feed Label, Target Countries, and Language settings are optional. If left empty, the extension will automatically detect the locale of the feed storeview and assign the corresponding countries, language, and label.
If the Google Merchant API integration is set up correctly:
- Each time the feed is generated (updated) in the extension, whether manually or via cron, it syncs with Google Merchant Center. In the Data Source tab of Google Merchant Center, you may see a notice stating that feed updates are paused. However, this does not mean the feed is not syncing.
- When a new feed is created in the extension, a data source in Google Merchant Center is automatically added for it. Such a feed is also synced after each generation (updating), regardless of whether it is done manually or via cron.
- During the new data source creation via API, the Free Listings option is set for the Marketing Methods setting by default. If needed, you can modify this setting in your Google Merchant Center account after the data source is created.
Add New Feed
To choose a ready-made template or to create a custom feed, go to the Catalog → 'Feeds' section → Profiles and click Add New Feed.

The full list of available ready-made feed templates that can be chosen from the dropdown:
- Custom Feed
- Shopping
- Bing
- Google
- Amazon Product
- Amazon Inventory
- Amazon Price
- Amazon Image
- NEW: eBay Product XML
- NEW: eBay Product CSV
- NEW: eBay Inventory XML
- NEW: eBay Inventory CSV
- NEW: Instagram Catalog XML
- NEW: Instagram Catalog CSV
- NEW: TikTok XML
- NEW: TikTok CSV
- NEW: Pinterest XML
- NEW: Pinterest CSV
- NEW: Facebook XML
- NEW: Facebook CSV
The pre-created templates for Instagram, Pinterest, TikTok, Facebook and eBay are available as part of an active product subscription or support subscription. You can find the amasty/module-product-feed-templates package for installing in composer suggest.
General
Specify the General Information about a new feed.
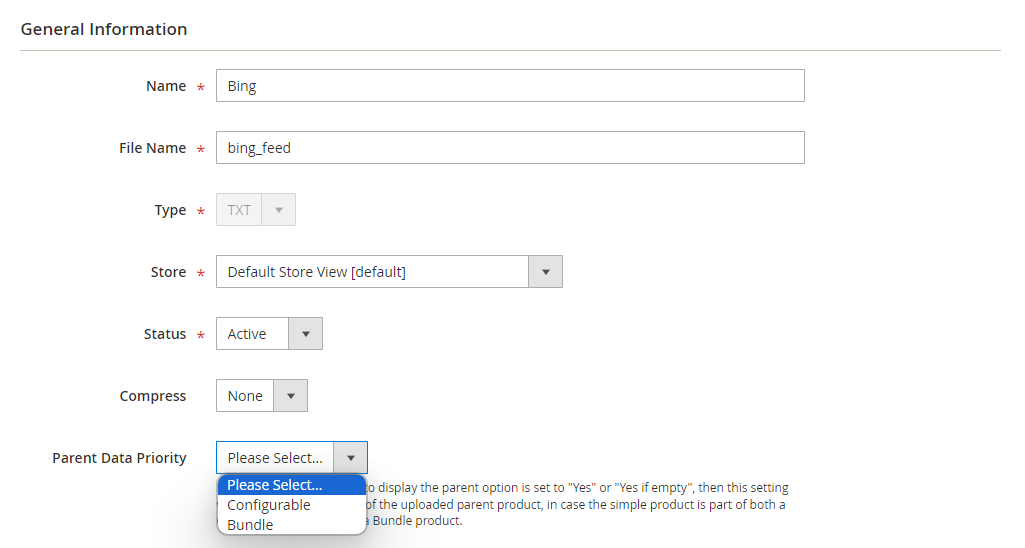
Name - specify feed name.
File name - fill in the feed file name.
Type - choose product feed format (XML, CSV or TXT).
Store - select for which store view you want to create the feed.
Customer Group for Tier Prices – select the customer group to filter tier prices. When a specific group is selected, only tier prices associated with that group will be included in the feed. If no group is selected, tier prices will not be filtered.
Status - here you can activate or deactivate the feed.
Compress - you can set to compress the feed to Zip, Gz or Bz format when it generates and uploads to the server.
Parent Data Priority - If the feed content setting to display the parent option is set to “Yes” or “Yes if empty”, then this setting will determine the priority of the uploaded parent product, in case the simple product is part of both a Configurable product and a Bundle product.
Exclude Disabled Products - set to Yes to exclude products with the disabled status from the feed.
Exclude Child Products if Parent Product Is Disabled - here you can automatically remove enabled child products from the feed if their parent product is disabled.
Exclude Out of Stock Products - enable the option if you don't want to include out of stock products to the feed.
Exclude Not Visible Products - set to Yes to skip not visible products so that they won't be included in the feed.
Exclude Products Without Images - if set to Yes, products without any images will not be included in the feed.
Exclude Child Products if Parent Product has Images - if set to Yes, child products without images will be excluded from the feed. Set to No to include child products without images to the feed if their parent product has an image.
Please note that the Customer Group for Tier Prices, Exclude Products Without Images, and Exclude Child Products if Parent Product has Images are available only as a part of an active support subscription or product subscription. You can find the amasty/module-product-feed-subscription-functionality package for installation in composer suggest.
Content
The Content tab allows configuring product data that are included in the product feed. The functionality of the tab depends on the format you select at the ‘General’ tab. If you choose CSV or TXT format, you will get fields for entering the feed header, attribute, format and parent information.
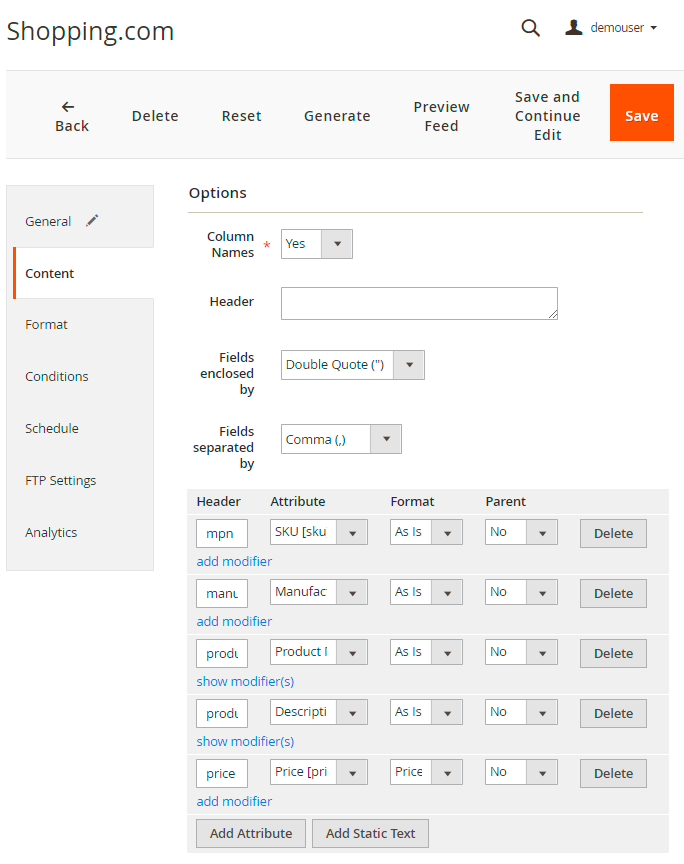
Columns Names - set to Yes to show columns names.
Header - fill in the information about the header.
Fields enclosed by - choose the symbols to enclose the fields (Double Quote (“), Quote (‘), Space, None).
Fields separated by - specify the symbols to separate the fields (Comma (,), Semicolon (;), Pipe (|), Tab).
Attribute - when you configure product data, you can add a new attribute, image and other entity. For example, add a Price with TAX(VAT) attribute to get more relevant information on the product prices.
Format - here you choose a format of the attribute field (as it is, data format or price format).
Parent - when enabled, simple products which are associated with configurable products will output attribute value from the parent product.
It is also possible to add various modifiers, show or hide them. For example, if the value of the selected attribute is not specified, you can apply 'If Empty' modifier. In this case, the value from this field will be filled in.

If the values of the attribute are specified, but you want to replace them, choose 'If Not Empty' modifier.

Keep in mind, that two different modifiers can't be applied as they will replace each other. So, if you want to replace the values in both cases, choose 'If Empty/Not Empty' modifier.

If you choose XML format, you will get fields for entering the feed header, footer and product information.
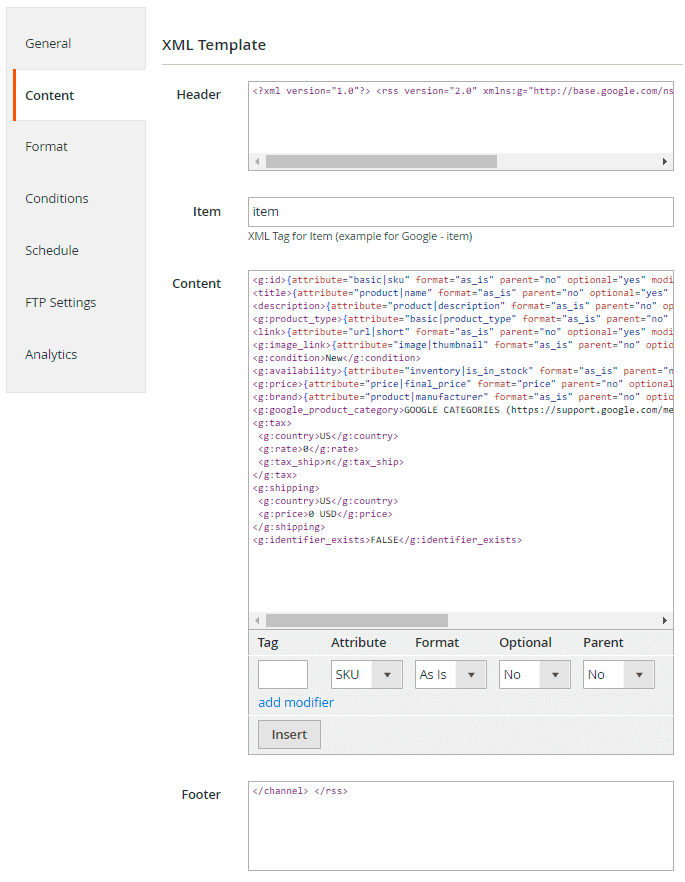
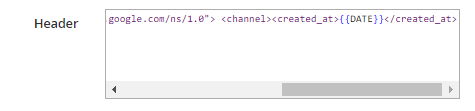
Header - used to place some info into the XML header.
The time of the feed generation automatically adds to the header. If you don't need it, you can remove it from the header at any time.
Item - a tag which will wrap each product in the feed.
Content - an XML editor where XML tags and attribute codes are inserted.
Tag - XML tag for the entity set up below. To add a line of data to a feed, please enter the attribute XML tag according to the specification of a particular shopping search engine (e.g. for google.com XML tag will be g:price).
Optional (available only for XML feeds) - use the option to exclude an attribute which have an empty value for a product from the feed. When set to Yes: the attribute will not be added to the feed for a product for which it has an empty value.
Footer - used to place some info into XML footer.
Also specify the Attribute, Format, and Parent.
With an active product subscription or support subscription, you can include the available quantity of goods from a specific source in your feed. This can be done by selecting the needed attribute (the name of the existing source) from the MSI Sources Qty group.
The new attribute, Grouped Total Price, enables you to include the sum of prices for options within a grouped product in your feed. Please note that utilizing the Grouped Total Price attribute with a large number of grouped products may result in a slowdown of the feed generation process.
It is possible to add modifiers for cases when you need to modify the original values of an attribute. To do this, use ‘Add modifier’ action; select one action from the available range:

- Strip tags - delete HTML and PHP tags from the line;
- HTML escape - escape special symbols from the product description;
- Google HTML Escape - remove ‘style’, ‘canvas’, ‘script’ tags, along with the attributes of other tags, from the content (e.g., <a href=“url.com”>abc</a> will become <a>abc</a>);
- Remove Widget Html - strip the widget code if it is included in the product description;
- Uppercase - convert all attribute letters to upper case;
- Capitalize - make the first uppercase letter;
- Capitalize Each Word - make the first letter of each word uppercase;
- Lowercase - convert all attribute letters to lower case;
- Integer - display only the integer part of a number (e.g., 2.2 or 2.8 will be displayed as 2);
- Length - limit the maximum length of a line;
- Prepend - fill in the value you want to add before the attribute's value;
- Append - fill in the value you want to add after the attribute's value;
- Prepend (if not empty) - specify the value you want to add before the current attribute's value (note: this modifier works only if the attribute has a value);
- Append (if not empty) - specify the value you want to add after the current attribute's value (note: this modifier works only if the attribute has a value);
- Replace - replace all occurrences of the ‘from’ value with the ‘to’ value (e.g., in the line 'abcd acd ab', set ‘from’ as 'ab' and ‘to’ as '2'; the result will be '2cd acd 2');
- Round - round the number down to a whole following the mathematical rounding rules (0.5 - upwards to 1);
- If Empty - specify the value to use instead of an empty attribute's value;
- If Not Empty - fill in the value that will replace the original attribute's value;
- If Empty/Not Empty - set the algorithm according to which both empty and specified values will be replaced;
- To secure URL - replace http with https;
- To unsecure URL - replace https with http.
When you've chosen the modifier, click the Insert button to apply it.
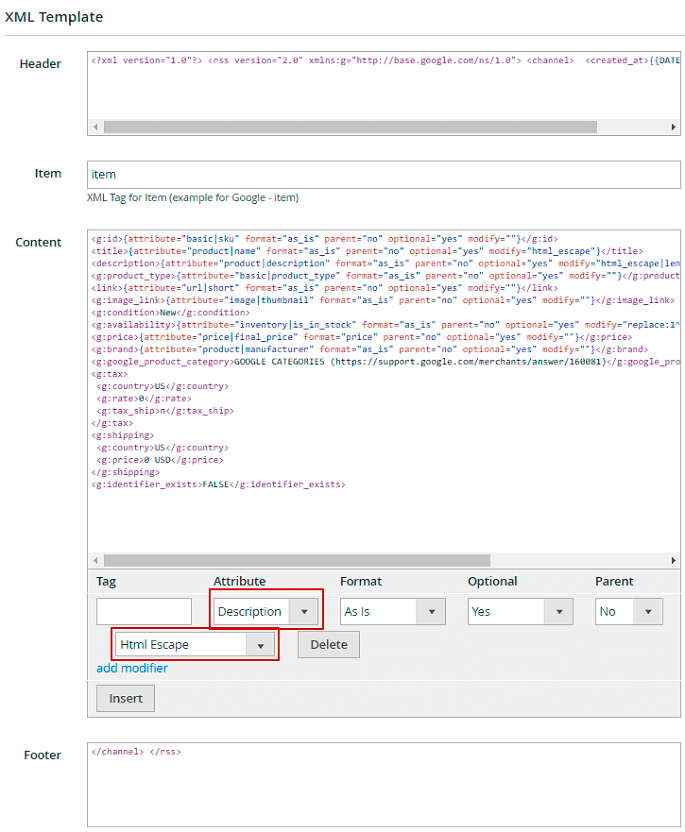
In this example, we apply “HTML Escape” modifier to escape special symbols from the product description. It is important for XML format as special symbols can be treated as part of XML markup and break feed file.
For your convenience, attributes' codes are displayed when selecting an attribute to insert into the product feed.
You can also use a category mapping for any shopping platform. All you need to do is to add a new attribute from the list:
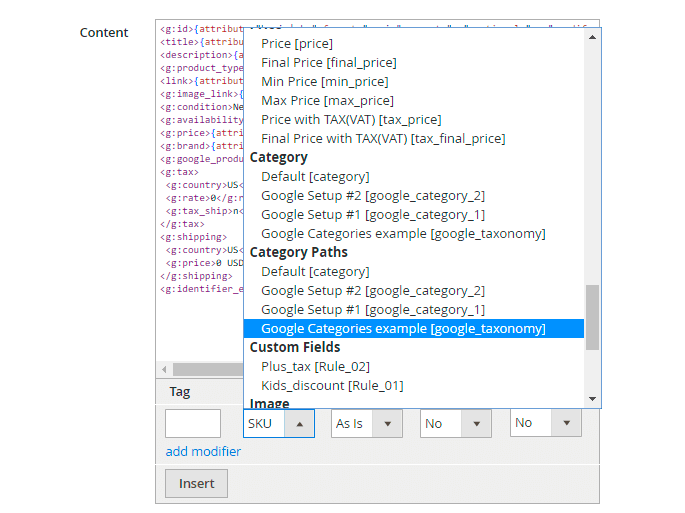
To learn more about category mapping, please, go to the Configure Category Mapping for shopping platforms section.
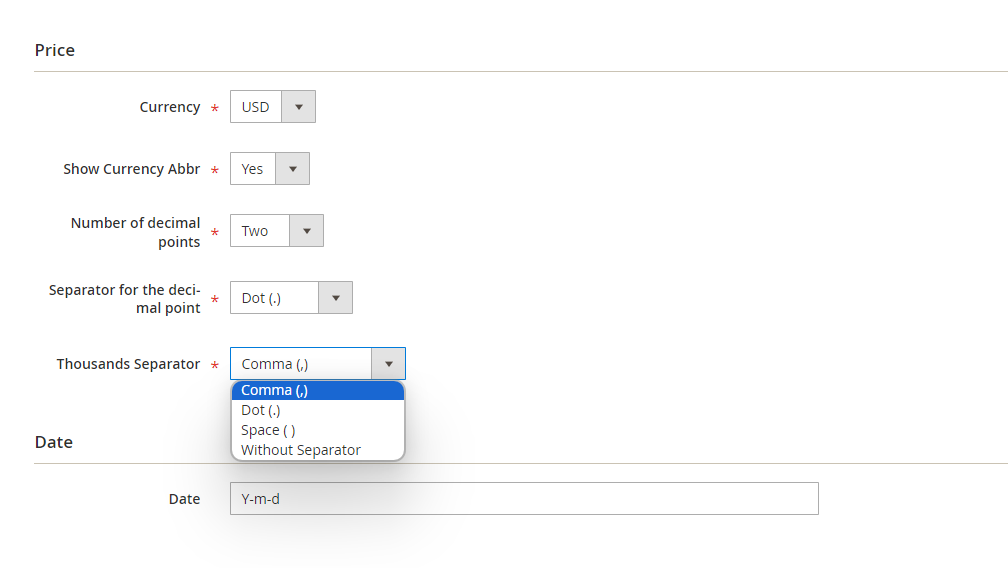
Format settings
In the Formats section, you can specify the date format for the feed file, choose how many digits should be displayed after delimiter for decimal prices. You can also specify price currency and abbreviation for it.
Conditions
It's also possible to create a feed for specific products. For example, you can add configurable products in one feed, and simple products to another. At the Conditions tab, you can specify the products that will be included into the feed you are editing.
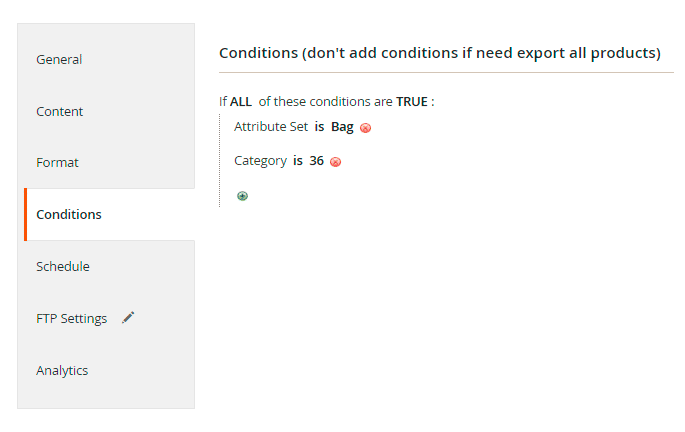
In our example, we specified the conditions to generate the feed only for the products from the Category 36 and with the Attribute Set 'Bag'.
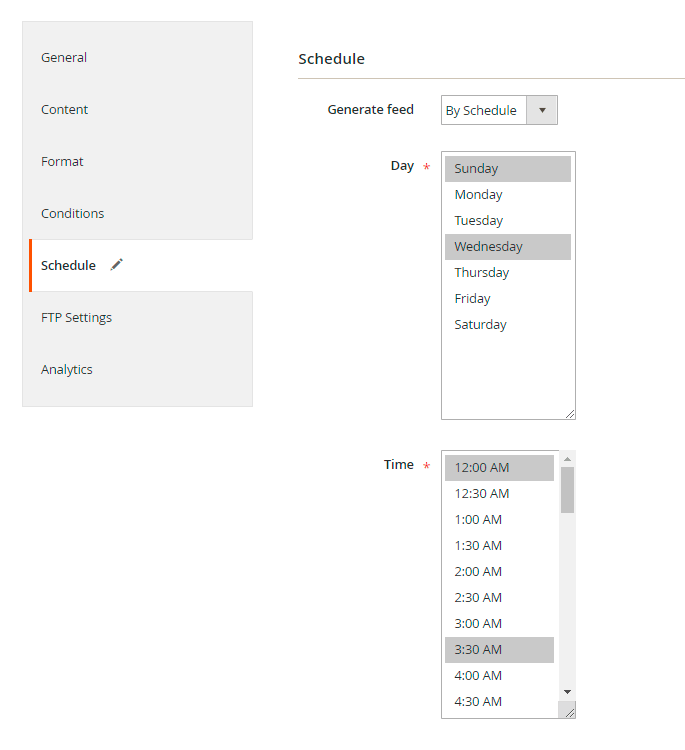
Schedule
Decide whether to generate feed manually or by schedule. When you choose to generate feed by schedule, also specify the precise day or several days and time of its generation.
FTP Settings
Enable feed download on the ‘FTP Settings’ tab and enter FTP account credentials where the feed will be uploaded.
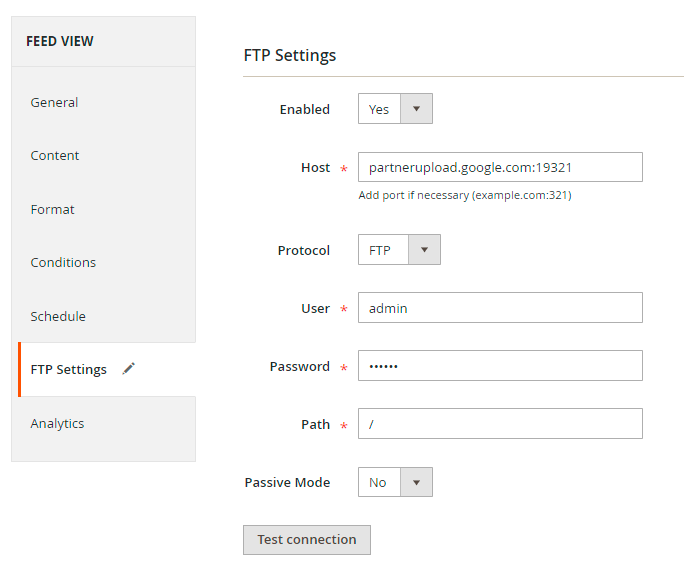
Host - FTP\SFTP server hostname or IP address.
User - FTP\SFTP username.
Password - FTP\SFTP password.
Path - path to directory on FTP\SFTP server. The path indicates the directory where this particular feed will be uploaded to, so for the Merchant Center you could try to use the default root path / along with the details provided in the GMC's SFTP settings:
Passive Mode - can enable Passive mode for FTP connections. More on FTP modes here.
Click the Test connection button to check whether the data for the FTP\SFTP connection is correct.
Google Merchant API
Check the Use for Google Merchant section of the user guide for detailed instructions on configuring the Google Merchant API.

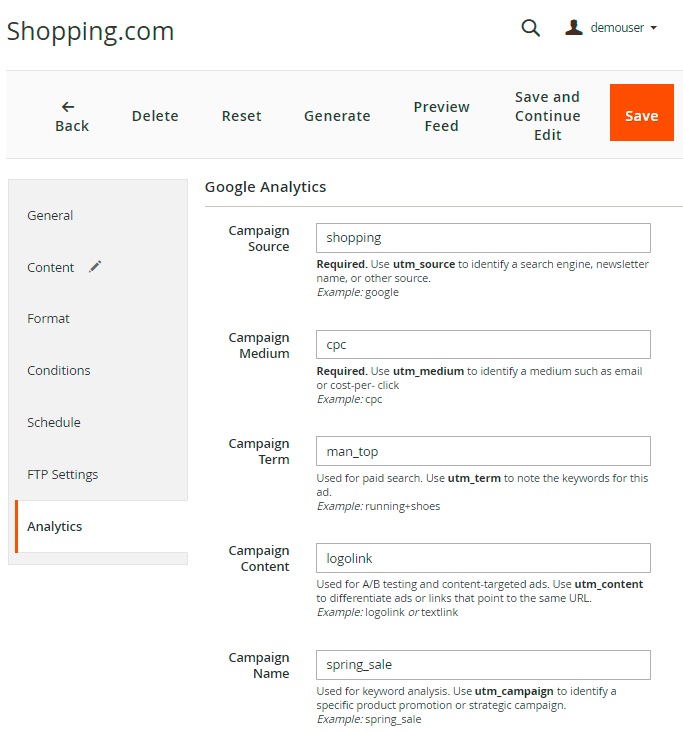
Analytics
These settings allow you to set utm-parameters, that will be added to the urls in your feed. Thus, you can collect all the sales statistics to your Google Analytics account.
The fields Campaign Source, Campaign Medium and Campaign Name are REQUIRED.
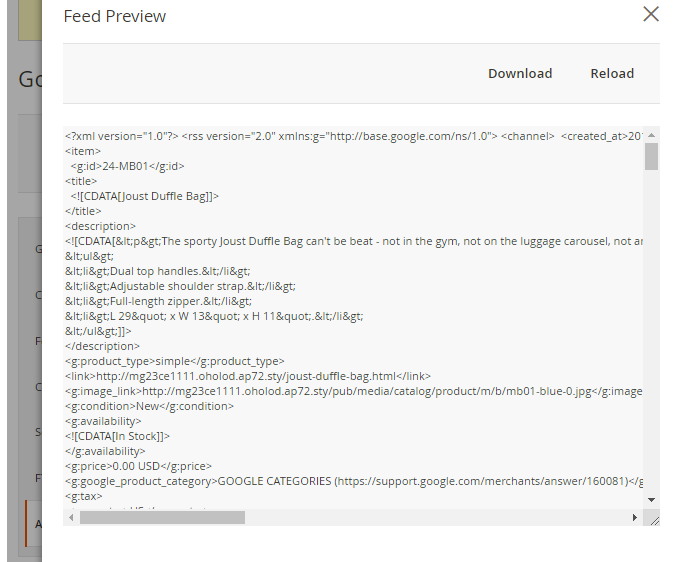
When the feed is configured, press the Preview Feed button to preview the feed before its generation:
Amazon Feeds
Note, that you'll need several feeds to upload and manage your products on Amazon. Please go to Catalog → 'Feeds' section → Profiles and find 4 ready-made Amazon feed templates.
Product feed - contains descriptive information about the products in your catalog. Establishes the mapping between your unique identifier (the SKU) and the Amazon unique identifier (the ASIN: Amazon Standard Identification Number). This is always the first feed to send when listing a new item.
Inventory feed - communicates the current stock levels of the products you are listing on Amazon. Includes values for restock dates as well as your fulfilment latency (the time it will take you to process the order before shipping it).
Pricing feed - sets the current prices for your products, whether the regular (standard) prices or temporary (sale) prices.
Image feed - supplies URLs (on your server) from which Amazon can pull images to associate with your products.
To add a new Amazon feed please follow the same steps as described in the Add New Feed section.
Please view this guide for more information about selling on Amazon.
Configure Category Mapping for shopping platforms
If you need to make changes to your store’s categories to suit the requirements of the platform where you would like to upload your feed (for example, Amazon), please go to сategories section.
Go to Catalog → 'Feeds' section → Categories Mapping
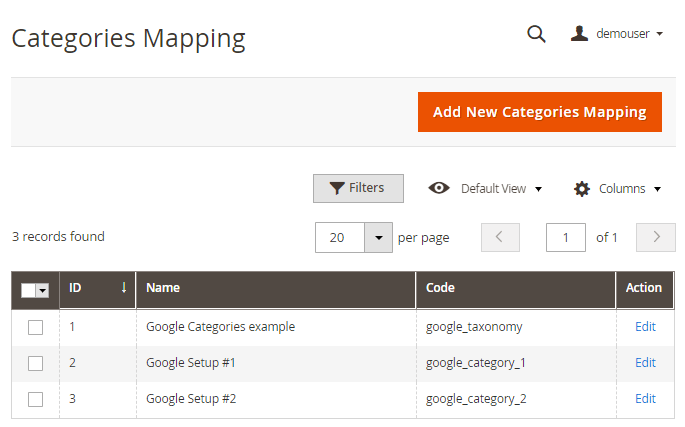
To create new category mapping, please hit on the Add New Categories Mapping button and specify the name and code here.
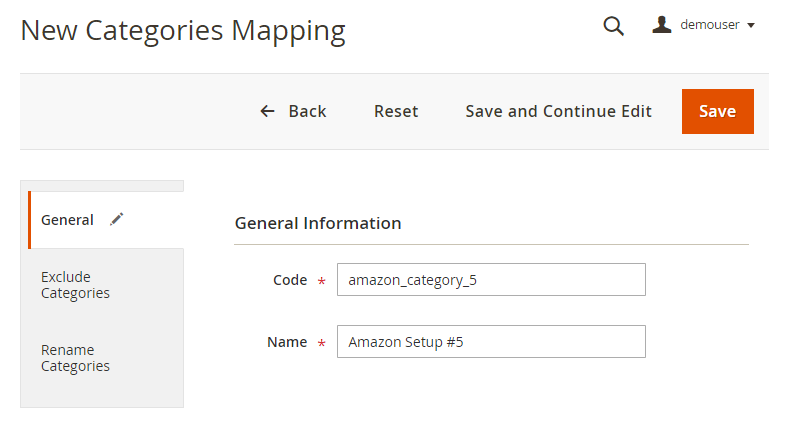
Exclude Categories and Rename Categories to add them in one click while creating the custom feed. Then click Save.
How does it work?
To IGNORE and exclude particular categories from the feed, CHECK the necessary boxes.
For example, if a product is assigned to the categories “Bags” and “Sale”, the extension will choose the category with the biggest value by default. In our case, it can be “Sale”. If you want to assign the product only to the “Bags” category - select the “Sale” checkbox to ignore it.
If you want to manage a category that will be selected for the product in the feed by yourself, select the categories that you would like to ignore. In this case, if the product is assigned to more than 1 category, the extension will ignore the checked checkboxes.
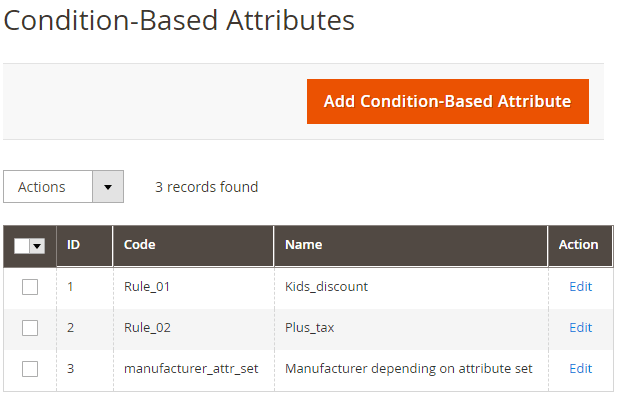
Condition-Based Attributes
To create a new condition-based attribute, please, go to Catalog → 'Feeds' section → Condition-Based Attributes → Add Condition-Based Attribute button.
Condition-Based Attributes are used to cover special cases: for example, when you need to change some attributes values or replace prices when meeting special conditions. You have the ability to create rule-based values for these fields.
In the example below, we've configured the rule-based attribute: when the product's Size attribute value is XS, the Price attribute for this product will be discounted for 10%.
Let's check the configuration steps:
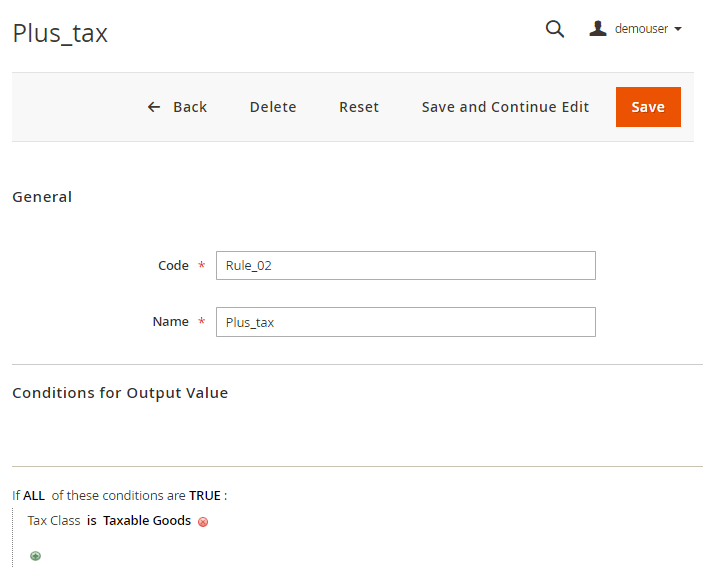
In the General section, specify the Code and the Name for your condition-based attribute.
Then, determine Conditions for Output Value. On this step, choose attributes and their values that will be a trigger for applying the Output Value, configured below, instead of the original.
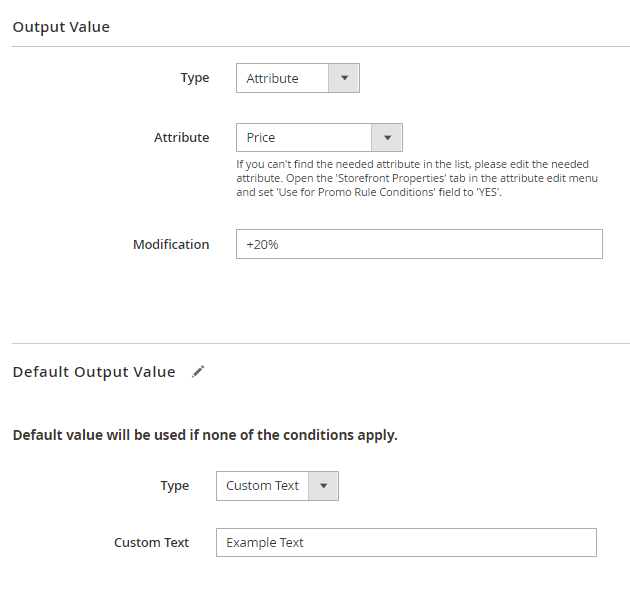
To configure the Output Value, choose the attribute option on the Type field. You can choose a certain attribute or specify a custom text. The value in this field should be changed when conditions apply. Specify the Modification to the attribute (text, percentage or fixed value). If the Modification field contains text, the value of the attribute will be replaced with this text.
You can also specify the Default Output Value, that will be used if none of the conditions applies.
When a condition-based attribute is configured, you can insert it to your product feed (available for all formats: xml, csv, txt):

Here are some more examples of the condition-based attributes you can configure:
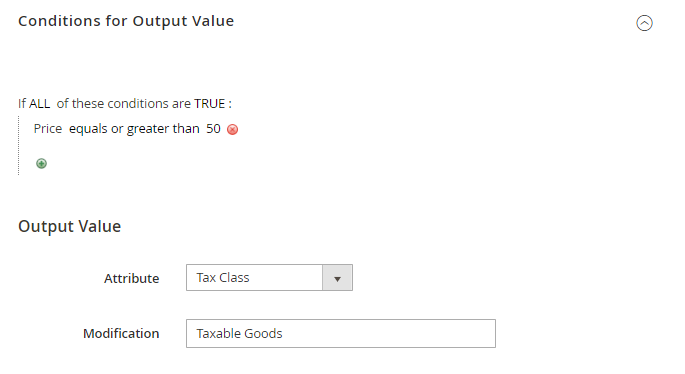
Example #1
When the “Price” value equals or greater than 50, replace the “Tax Class” value to “Taxable Goods”.
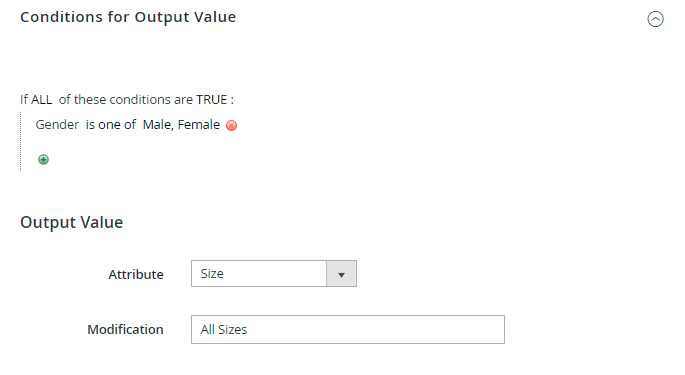
Example #2
Replace the “Size” attribute value for “All Sizes”, when the “Gender” attribute is either “Women” or “Girls”.
Merge Attributes
You can also merge different attributes into a custom one to make feeds more compact. To do this, choose the Merged Attributes type.
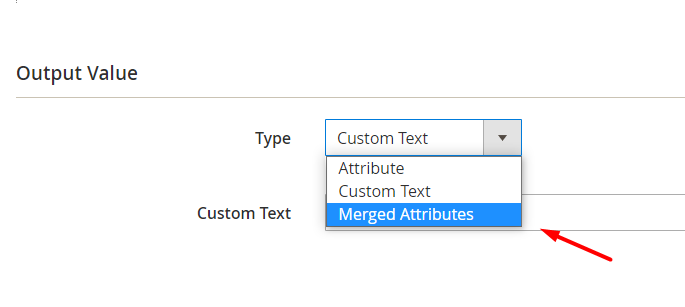
Choose the attributes you want to unite and insert them one by one using 'and' between them.
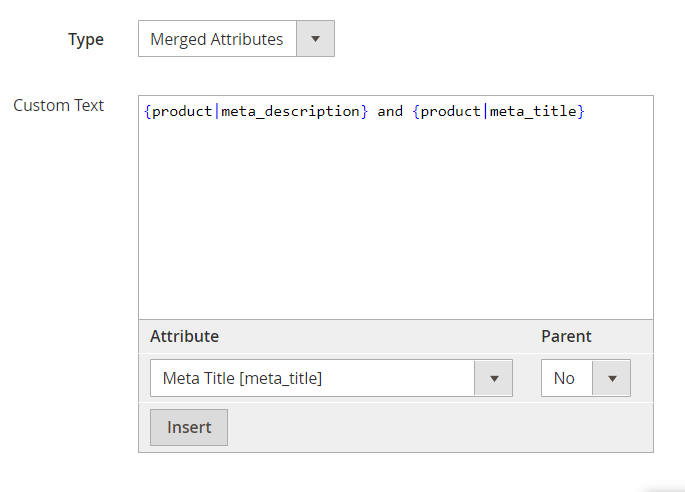
Keep in mind, that spaces before and after the 'and' conjunction are not obligatory, but if you don't use them, the attributes will be displayed as a merged text.
If you add this composite attribute to the content during the feed creation, the feed will display all the values given.
General Settings
Go to Admin Panel – Stores – Configuration – Amasty Extensions – Product Feed
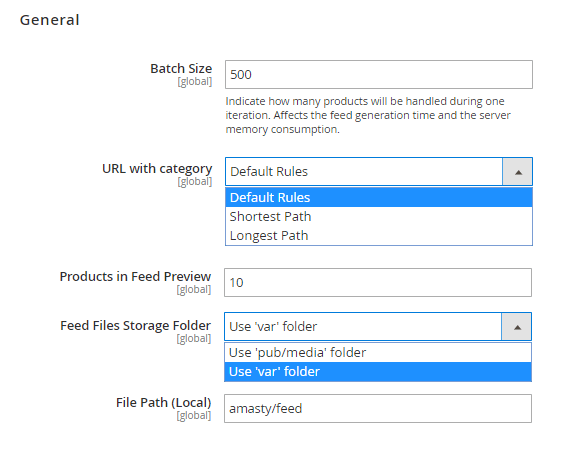
Batch Size - specify how many products will be handled during one iteration.
URL with category - to generate an appropriate product feed, switch between shortest and longest URL paths.
Shortest Path — uses the shortest possible path in product URL;
Longest Path — uses the longest possible path in product URL;
Default Rule — utilizes the default Magento 2 rule for URLs, deactivates the extension.
For example, you have a product that is listed in 2 categories, therefore, it's available via two links:
1) store.com/category1/product.html
and
2) store.com/category2/subcategory2/product.html
If you choose the Shortest Path, the extension will use the first link, if you select the Longest Path - the second URL will be used.
Tier Price Attributes in Feed - specify how many tier price attributes and their min. quantities will be available in the feed's Content tab (Tier Prices).

Products in Feed Preview - specify the number of products you want to be displayed in the feed preview.
Feed Files Storage Folder - please, choose the folder where your generated feeds will be saved: var or media
File Path (Local) - specify the file path.
Number of Additional Images in Feed Profiles - specify the number of additional images available within feed attributes (Gallery).

It's not recommended to add more images than specified, as excess images may display incorrectly. For more details, please refer to the documentation.
Please note that the ability to manage the number of tier prices and images included in the feed (the Number of Additional Images in Feed Profiles and Tier Price Attributes in Feed features) is available only as a part of an active support subscription or product subscription. You can find the amasty/module-product-feed-subscription-functionality package for installation in composer suggest.
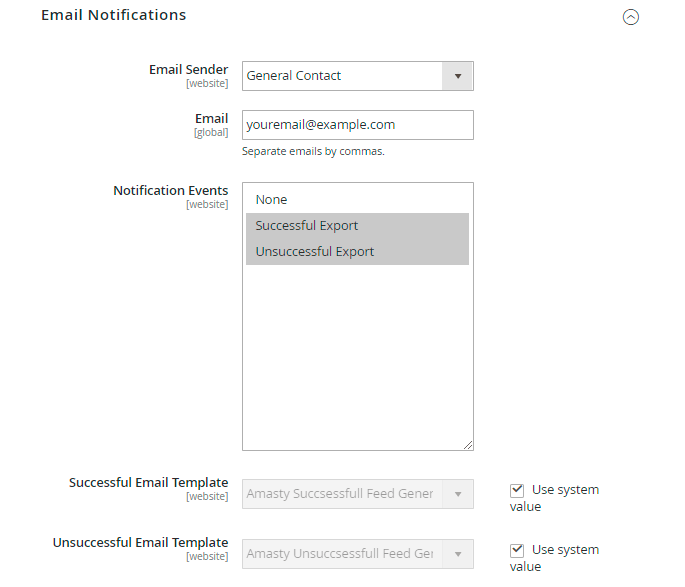
In the Email Notifications section, specify:
- Email Sender - choose an email sender from a list of configured email senders in Magento;
- Email - specify an email to which notifications should be sent. If there are several e-mails, separate them by a comma;
- Notification Events - select events to send notifications upon;
- Successful/Unsuccessful Email Template - choose email templates to use for notifications on successful/unsuccessful feed generation by cron.
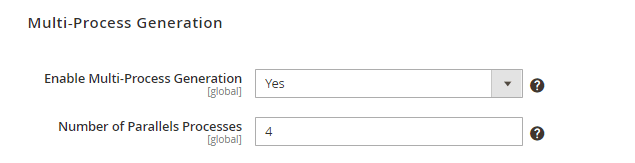
Enable Multi-Process Generation - Multi-Process Generation significantly boosts the feed generation speed. But it generates extra load to the server as well. We recommend first to run the test feed generation process with the 'multi-process' ON and monitor your server performance. The 'Multi-Process Generation' feature needs the php extension 'pcntl' to be installed on the server. If you enable the feature and no performance boost happens, please ask your hoster/system administrator to check if the 'pcntl' extension installed.
Number of Parallel Processes - adjust the number of parallel processes for the Multi-Process Generation. Note, that the more parallel processes are set, the faster is the feed generation process, as well as the higher is the server load.
In the Cronjob Information section, check the information on the latest cron jobs.
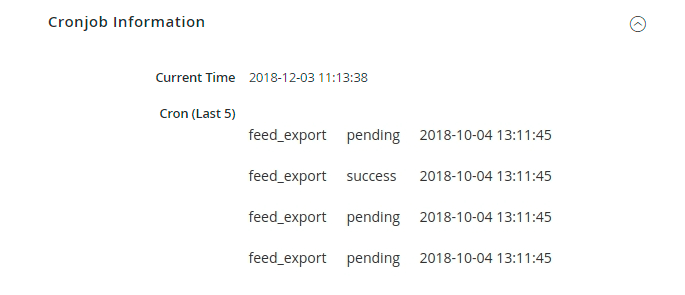
To prevent affecting the execution of other cron tasks, the feed cron job is moved to a separate cron group. It is possible to launch feed cron job by the bin/magento cron:run – group=“amasty_feed” command.
Popular use cases
1. How to add custom condition-based attributes to a product feed
Let’s imagine a big web store with a great variety of products. Some products were newly added, and some of them were added a long time ago. At the stage of feed creation, the store owner finds out that the products have two different attributes for manufacturer info. Some products have the Manufacturer attribute filled in, and others have the Brand attribute filled in. The store owner can’t include just one of the attributes in the feed because a part of the products will have it unfilled. The issue will remain the same even if he includes both attributes. In such a case, a smart solution is needed to automatically define which attribute should be added to the feed depending on the product specifics. You can easily solve this problem by adding condition-based attributes.
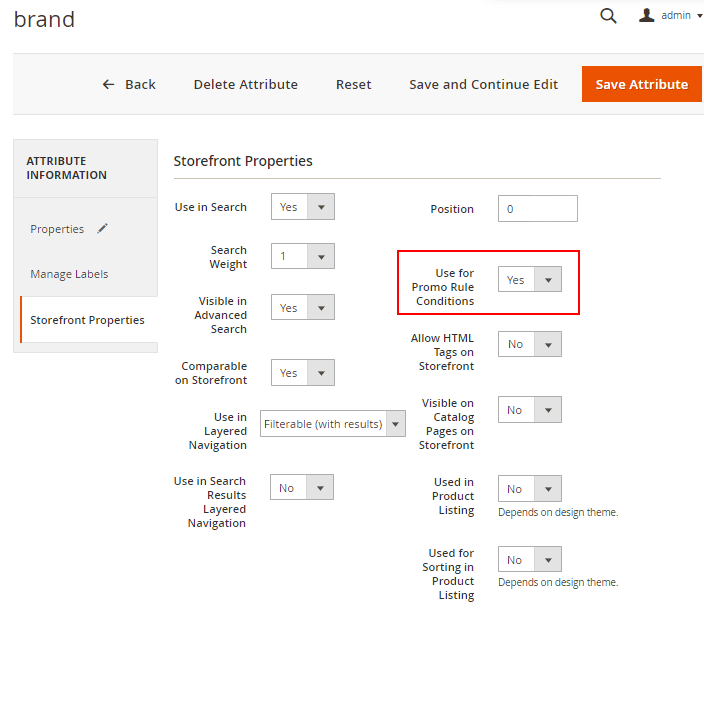
Step 1.First of all we should check required attributes settings. Please, go to the attribute grid: Stores → Product. Let's start with the Brand Attribute. Choose it from the grid or create it.
Configure the main attribute settings.
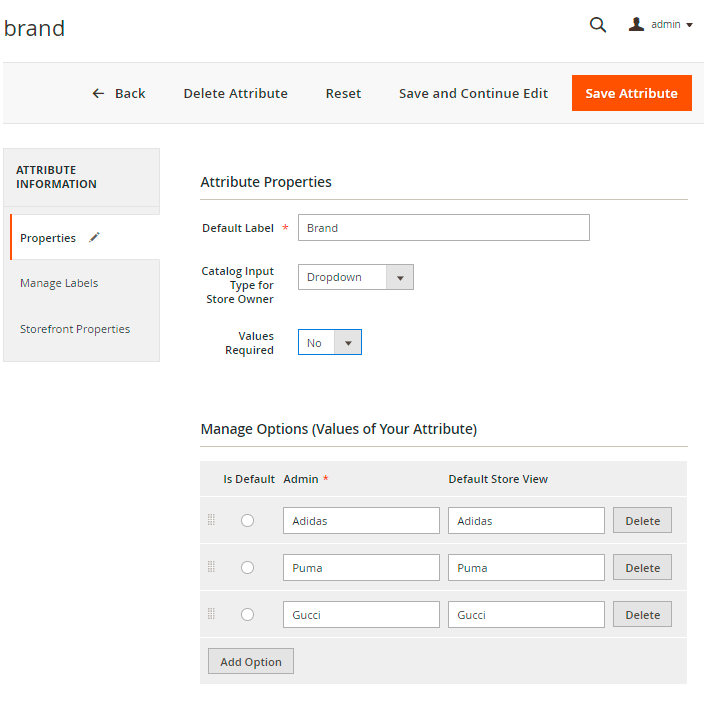
Adjust the attribute storefront settings. Note to set 'Yes' at 'Use for Promo Rule Conditions' field.
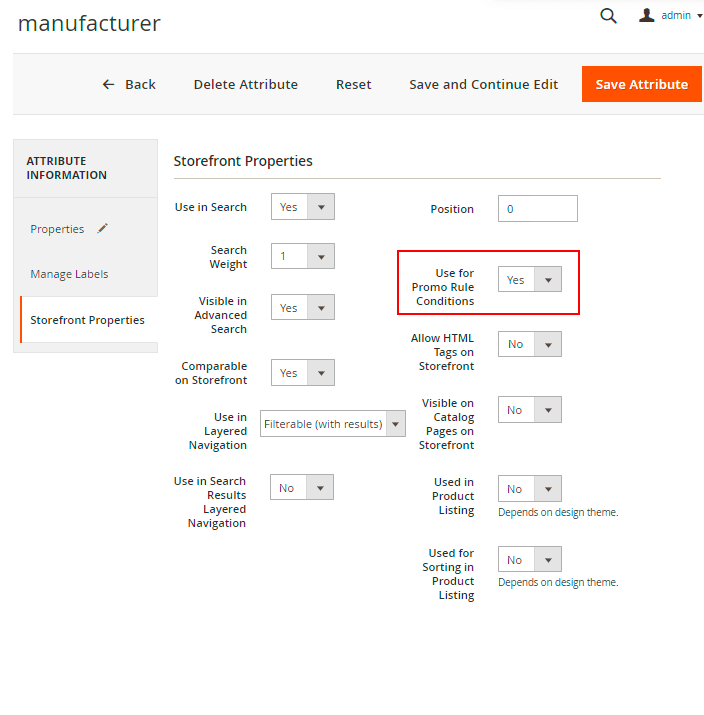
Now we should configure the Manufacturer Attribute settings.

Step 2. Now you should create a Condition-Based Attribute. Please, go to Catalog → Condition-Based Attributes → Add Condition-Based Attribute.
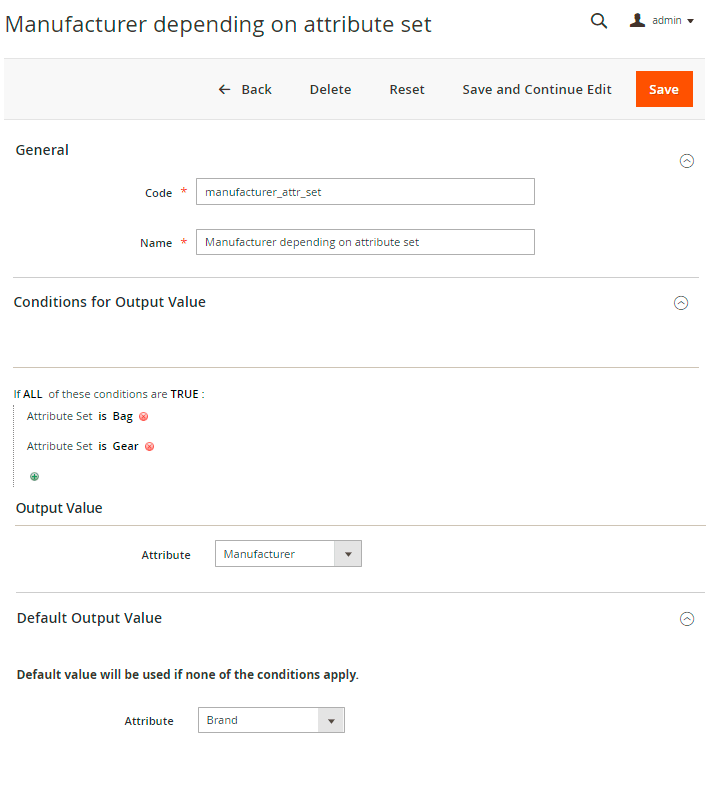
Fill in the Condition-Based Attribute code and Name. Specify conditions. In this example, we chose the attribute set Bags and the attribute set Gear. Set Output Value and Default Output Value. This way, for the products, which match the conditions the attribute Manufacturer will be included in a product feed. If the products don't match the conditions, the attribute Brand will be included in a feed.
Step 3. Now let's add the Condition-Based Attribute in a product feed. Please, go to the feeds grid Catalog → Feeds → Profiles. Choose the needed feed from the grid. In our example, we chose the Google product feed. Go to Content Section.

Choose <g:brand> in the Content window.
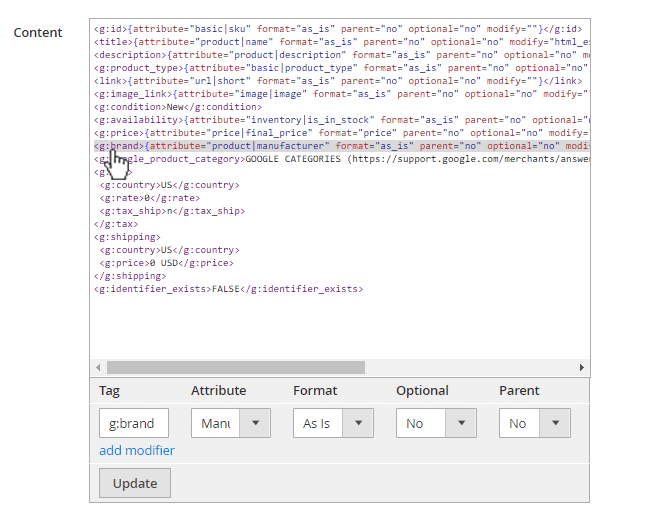
In the Attribute dropdown choose Condition-Based Attributes → Manufacturer depending on attribute set.

Click the 'Update' button. And then save your product feed.
2. How to submit configurable products to Google Merchant
Related help article on Google support site.
To let Google know that simple and configurable products you submit in the feed are related, you should use g:item_group_id tag. Add this tag to your feed profile, set it to output SKU attribute and enable Parent option.
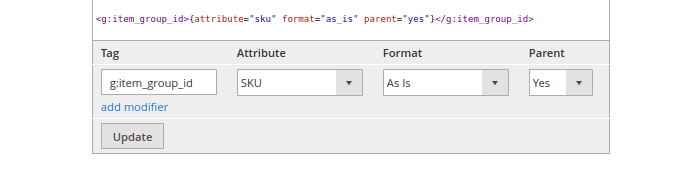
With this setup, Feed extension will export products with same g:item_group_id if they are related, i.e. if they are associated products of the same Configurable Product. Then Google will check g:item_group_id value and treat these products as a variant of the same product.
Best practices:
These are best practices that can help you go beyond the basic requirements to optimize your product data for performance.
- Use the parent SKU as the item_group_id for all variants of the same product. Don't submit a parent SKU as a separate product. If you'd like to group variants using a parent SKU, use the parent SKU as the value for item_group_id for all products in the variant group.
- Don’t mix up item_group_id and id attributes. Use the id attribute to uniquely identify a single product, and use item_group_id to group together several products as variants.
- Don’t submit item_group_id if your product is not a variant. If your product is similar to other products, but not specifically a variant, don’t submit item_group_id. Some examples of products that are not variants include assorted items (a suit consisting of a jacket and pants) or any other set of dissimilar items that are sold together (a set of bath accessories).
- Use a stable item_group_id for each group of product variants. Once you've assigned an item_group_id to a product, don't change it. If item_group_id changes often, it could cause inconsistency in they way variants are grouped and shown to users.
- Don’t use item_group_id for unsupported variants. If your product varies by an unsupported attribute (such as car make and model), or if your product is a build-to-order custom good with a large number of variants (more than 30), then don't use item_group_id to indicate your variants.
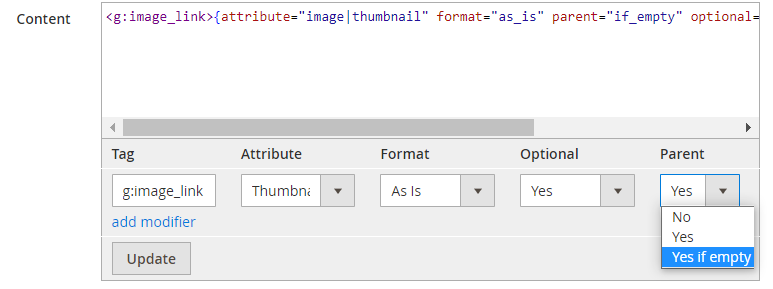
Also, if Google Merchant displaying an error on an invalid image link for simple products, you can use the image of a parent product for a child simple product.
3. How to add the g:item_group_id tag only for simple products that have parent items
To fully adhere to best practices for using the g:item_group_id tag, include this tag and values of the SKU attribute to a feed exclusively for simple products that have parent items (typically refers to configurable/grouped/bundle product types). For this, you need to insert the tag and attribute into a feed with the Yes (strict) option in the Parent setting.
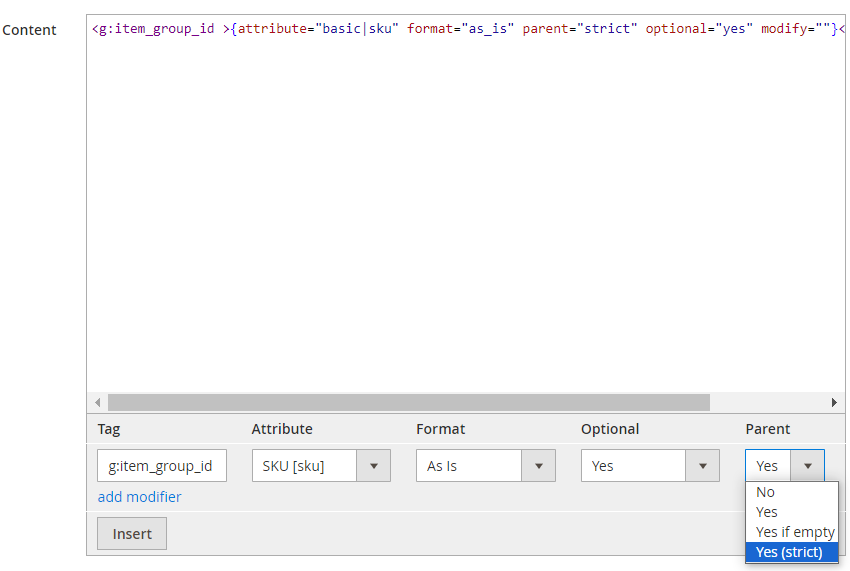
In this case, for simple products that have parent items, both the g:item_group_id tag and the parent values of the SKU attribute will be added. For simple products without parent items and parent items themselves, neither the mentioned tag nor the values of the SKU attribute will be added.
4. XML formatting error
In the most cases, this error appears when your feed has special characters inside tags. Please note the line number in the error message, then open your XML feed file and check the aforementioned line. Note the tag used in this line, then open feed profile, find the tag and add a modifier “HTML Escape”
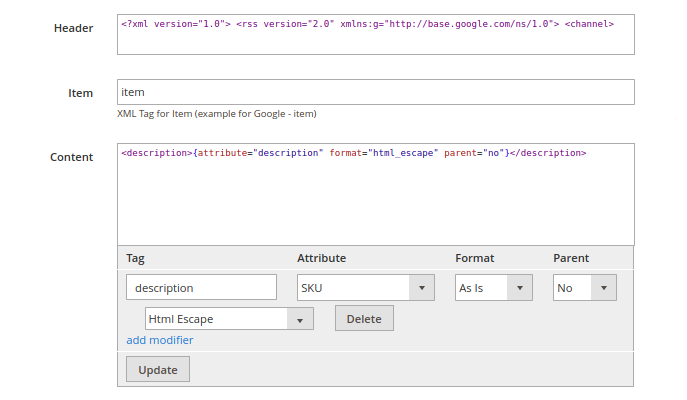
Click Update, save and generate the feed.
5. How to add tier price information to product feeds (Google, Facebook)
The extension allows admins to include tier price information in product feeds. For this, the following features need to be configured:
1. In the general extension configuration:
Find the Tier Price Attributes in Feed setting and specify the number of tier price attributes and their minimum quantities that will be available for configuration in the feed profile.

2. In the General Settings tab of the feed profile configuration:
Find the Customer Group for Tier Prices setting and select the customer group whose tier prices you want to add to the feed. If no customer group is selected, all tier prices will be added without filtering by groups.

Tier Prices, their minimum quantities, and the customer groups they belong to are configured in the Advanced Pricing tab on the edit page of a particular product. Example:

3. In the Content tab of the feed profile configuration:
Here, you can add tier price attributes to the feed. The number of available attributes depends on the value specified earlier in the Tier Price Attributes in Feed setting.

Each tier price attribute allows you to specify the tier price in the currency selected in the Currency setting under the Format tab of the feed profile configuration.

The tier price currency (its abbreviation) will be included in the feed only if the Price option is selected for the Format attribute.

Min. Quantity attributes are responsible for adding the minimum quantity along with tier prices to the feed. The number of min. quantity attributes correspond to the sequence of tier prices related to the product, filtered by the settings for Store and Customer Group for Tier Prices. Therefore, attributes labeled with #1 should correspond to the first tier price, #2 to the next, and so on.
For the XML format:

The g:min_quantity and g:price tags are output by the extension, while the g:bulk_price (<g:bulk_price></g:bulk_price>) tag should be manually added by the admin.
Preview (example):

For the CSV format:
You can create the attribute in the appropriate format using the Merged Attributes type in the Condition-Based Attributes functionality (Catalog → 'Feeds' section → Condition-Based Attributes → Add Condition-Based Attribute button).


The Append modifier can be used to add the currency abbreviation (e.g., USD) next to a tier price.
Preview (example):

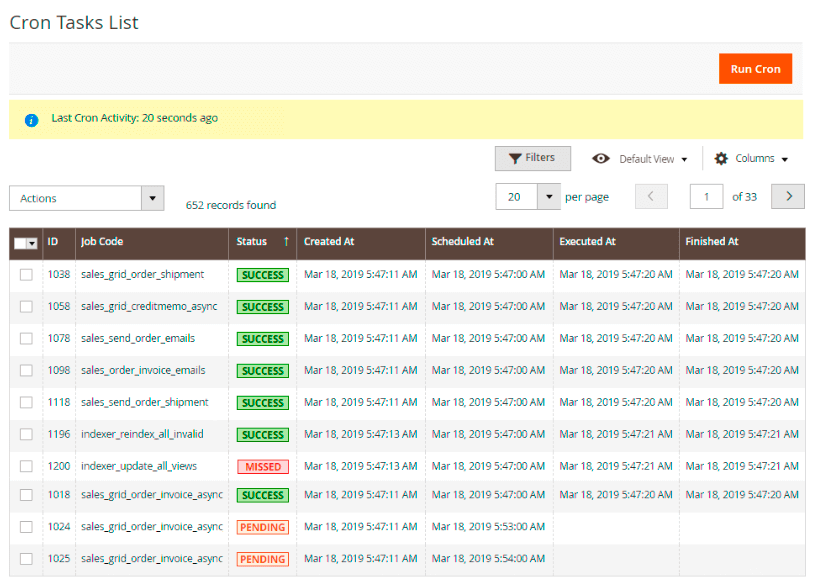
Cron Tasks List
Magento 2 Product Feed extension is preintegrated with Cron Tasks List to provide store owners with an opportunity to track and manage all cron tasks running in the website background.
To view all scheduled and executed cron tasks, go to System → Cron Tasks List
Run all cron tasks and generate their schedule by clicking the ‘Run Cron’ button. Also you can delete separate tasks in bulk, apply filtering and sorting options when it is needed.
Additional packages (provided in composer suggestions)
To make additional functionality available, please install the suggested packages you may need.
Available as a part of an active product subscription or support subscription:
amasty/module-product-feed-msi- Install this package for MSI Sources Qty compatibility. With this functionality, you can display the product quantity for each source separately.
amasty/module-product-feed-templates- Install this package for TikTok, eBay, Pinterest, Facebook, and Instagram templates compatibility.
amasty/module-product-feed-subscription-functionality- Install this package:
1. to manage the number of additional images within feed attributes;
2. to control the inclusion of tier prices in the feed, including specifying their number (Tier Price Attributes in Feed) and the customer groups they belong to (Customer Groups for Tier Prices);
3. to exclude products without images from the feed (using the Exclude Products without Images and Exclude Child Products if Parent Product has Images).
amasty/module-product-feed-google-merchant-api- Install this package for compatibility with Google Merchant API.
FAQ
* The feed is not generated by schedule, Cron Job status is "Missed". How to fix this?
* How to add an attribute to the list of attributes in the feed?
Find out how to install the Product Feed for Magento 2 via Composer.
magento_2/product_feed.txt · Last modified: 2025/05/06 17:59 by kkondrateva