
Sidebar
magento_2:subscriptions-recurring-payments
Table of Contents
See how the Magento 2 Subscriptions & Recurring Payments extension works:
Guide for Subscriptions & Recurring Payments for Magento 2
Boost sales of regular products using subscription options. Get more recurring purchases with Magento 2 Subscriptions & Recurring Payments extension.
- Sell regular products on a subscription basis
- Set initial fees and enhance customers loyalty with free trials
- Get recurring payments via PayPal and Stripe
- Send notifications to customers about the changes in their subscription status
- Let customers manage all subscriptions in a separate tab
- Hyva-ready storefront
- Hyvä Checkout ready
This extension in now compatible with the Hyvä Theme and Hyvä Checkout. You can find the 'amasty/module-subscriptions-and-recurring-payments-hyva' and 'amasty/module-subscriptions-and-recurring-payments-hyva-checkout' packages for installing in composer suggest (Note: this compatibility is available as a part of an active product subscription or support subscription).
In Subscriptions & Recurring Payments FAQ you can find answers to the most popular questions about the extension functionality.
Payment Methods Configuration
Configure Integration with PayPal
For a correct performance of the payment integration with PayPal please install “paypal/rest-api-sdk-php” composer package first.
Please note that When placing subscription orders through PayPal, customers will be notified to complete the process on PayPal as well: 
To ensure the correct operation of notifications regarding issues with PayPal transactions, please make sure the “Billing subscription payment failed” event is enabled in your PayPal Developer Dashboard.
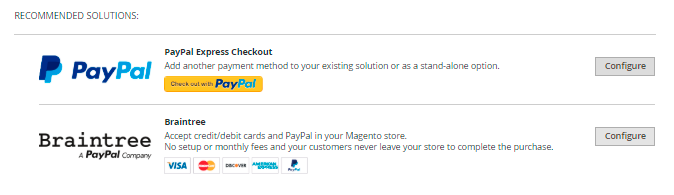
To configure the integration with PayPal, please go to Stores → Configuration → Sales → Payment Methods → PayPal Express Checkout → Configure.
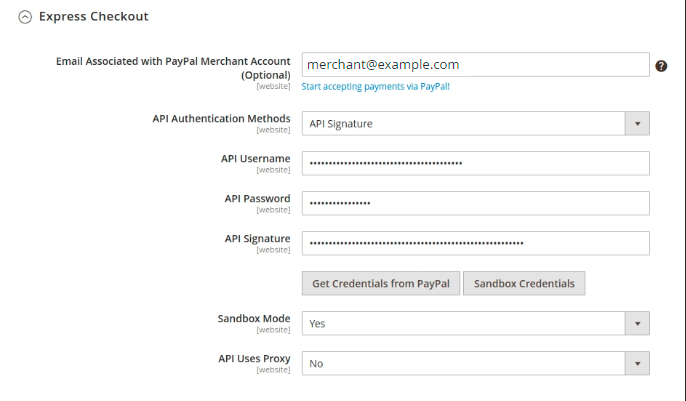
Fill the following fields below with the data from your PayPal business account:
- Email Associated with PayPal Merchant Account (Optional)
- API Username
- API Password
- API Signature
Sandbox Mode - set ‘Yes’ in the Sandbox Mode field. To get this info, you should navigate to your PayPal developer account, login with your credentials or create a PayPal developer account if you don’t have one.
Enable this solution - set to 'Yes' to enable the PayPal payment method.
Then press ‘Save Config’ button and flush the Magento Cache for a correct display of the configurations on the front.
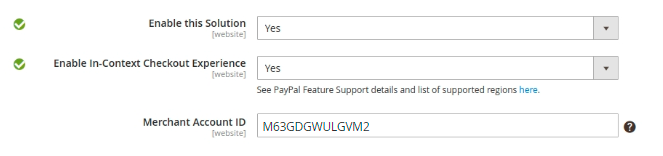
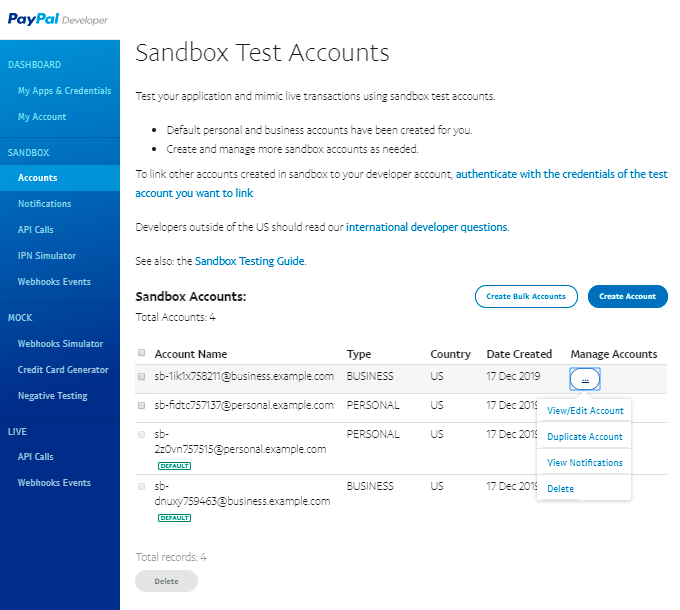
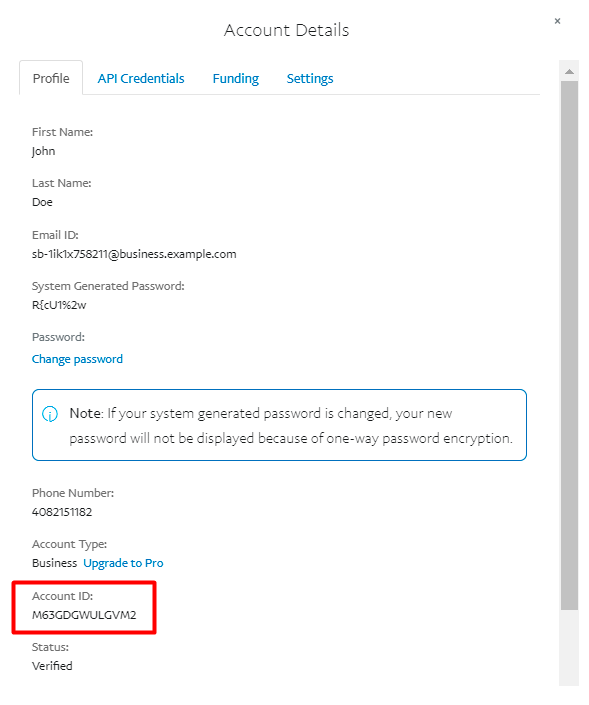
Merchant Account ID - For this info navigate to Sandbox → Accounts → View/Edit Account.
Copy info from the field Account ID in the tab Account Details and fill in the Merchant Account ID field with it.
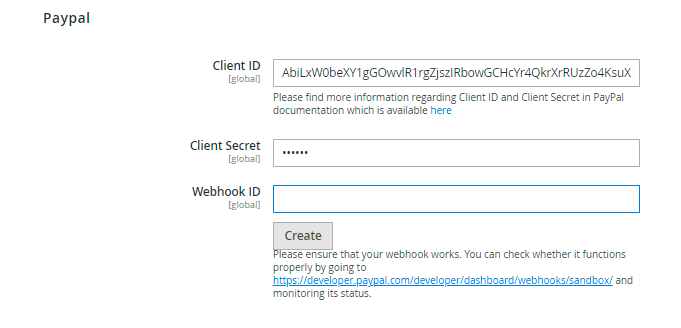
To authorize and link your store with the PayPal account please navigate to Subscriptions & Recurring Payments → Configuration → PayPal.
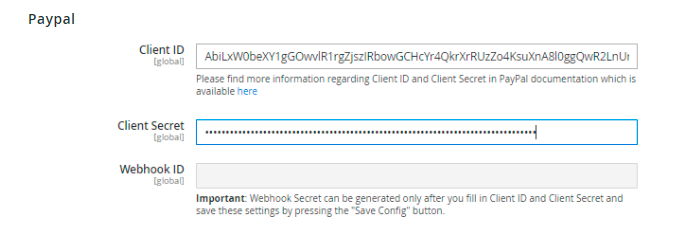
Here you need to fill in Client ID and Client Secret fields. To get the info for these two fields, please navigate to your PayPal developer account, login with your credentials or create a PayPal developer account if you don’t have one.
When you get in, navigate to the My Apps & Credentials tab and click the Create App button.
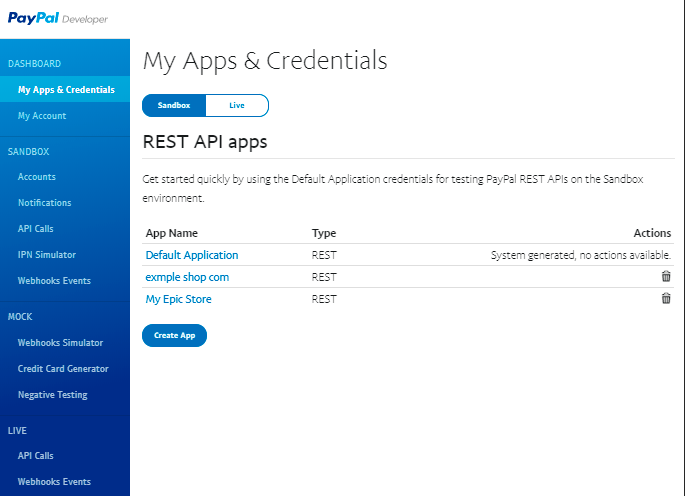
Name the application and associate the sandbox test account. Click the Create App button.
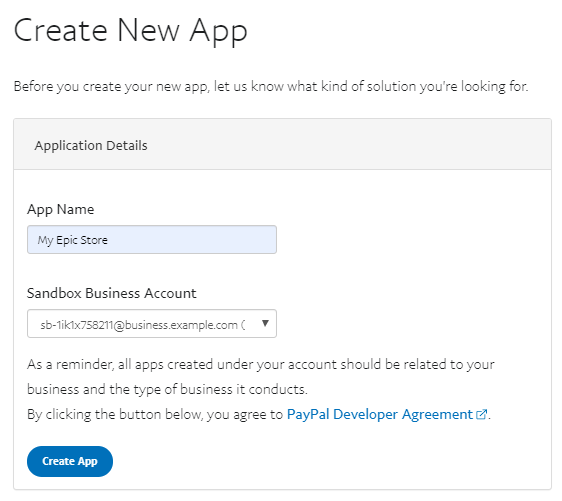
Thus the App will be created and the administrator can copy the Client ID and Secret from this page.

Paste the copied values into the Client ID and Client Secret fields in PayPal Configuration section and press ‘Save Config’ to enable the Webhook ID generation.
Click ‘Create’ under the Webhook ID field to generate it.
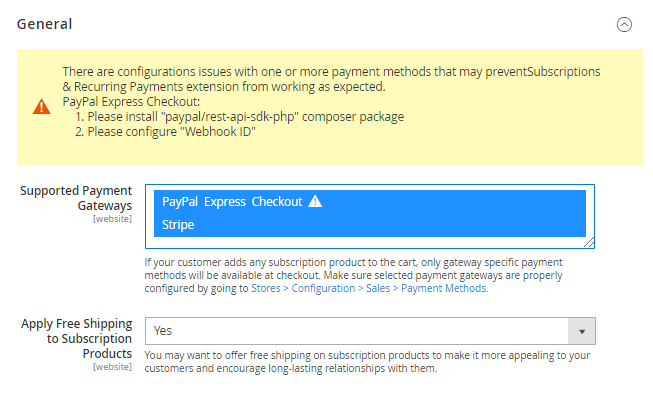
Then navigate to Subscriptions & Recurring Payments → Configuration → General and make PayPal Express Checkout active by selecting it in the list of Supported Payment Gateways. Press ‘Save Config’ and flush the Magento Cache for a correct display of the configurations on the front.
In case you need some help in PayPal payment gateway configuration itself, we recommend visiting the Magento User Guide for PayPal Express Checkout for more details.
Configure Integration with Stripe
As the extension works with Stripe payment method, it demands Stripe TLS of at least v1.2 , HTTPS and stripe/stripe-php library. Please see the details here.
To configure the integration with Stripe, please go to Stores → Configuration → Sales → Payment Methods → Stripe by Amasty.
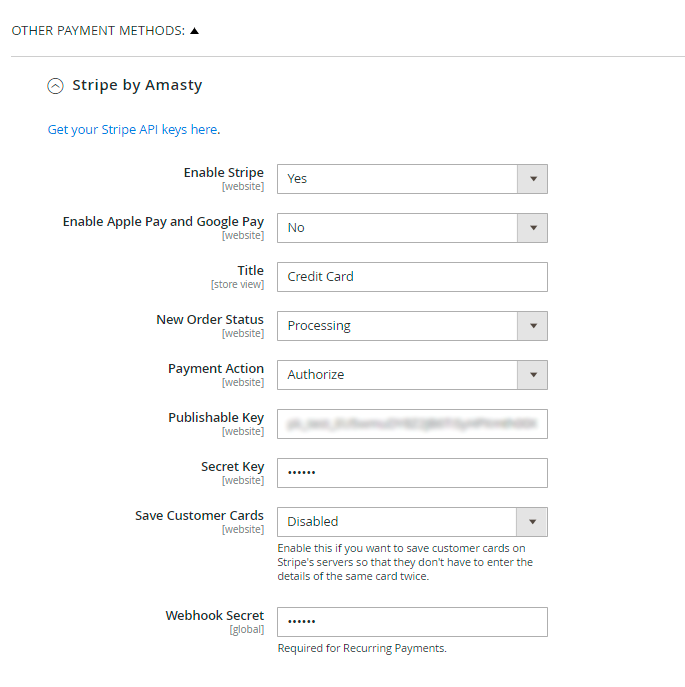
Enable Stripe - set to Yes to enable the payment method.
Enable Apple Pay and Google Pay – select Yes to activate payments via Apple Pay and Google Pay.
Title - specify the custom name of the Stripe payment to be displayed on the checkout page.
New order status – you can select an order status after payment is captured. There are 2 available order statuses: Processing and Pending.
Define the type of the Payment Action:
- Authorize - to check a card validation without charging until the order is invoiced and approved.
- Authorize and Capture - to debit money immediately after order submission.
To get a Publishable Key and a Secret Key, please go to your Stripe account and sign in.
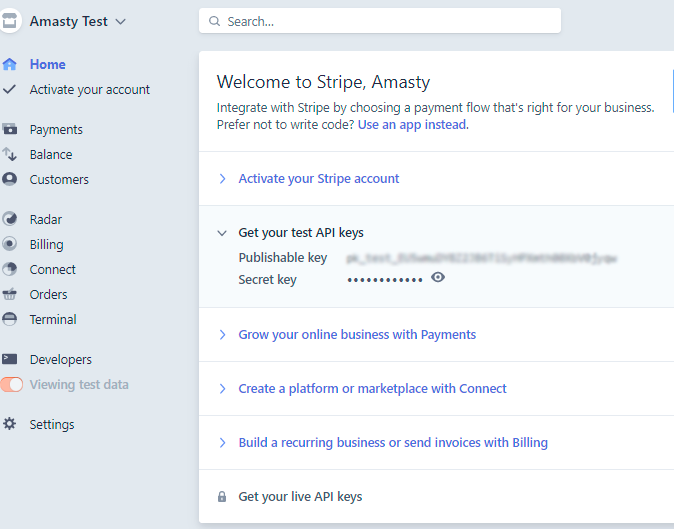
Get your test or live API keys, copy them and paste into the appropriate configuration fields.
For more information, please, visit Stripe documentation.
Save Customer Cards – disable or set to Ask the customer to save customers' card details on Stripe's servers so that they don't have to enter them when purchasing again.
Create your Webhook secret right in the module's backend.
Please note that in case you are using Stipe in Sandbox mode (including our live demo) this mode would allow you to generate only 16 Webhook secrets per the one set of API keys. This limitation is applicable only for the live demo of our product (as it uses Stripe in Sandbox mode), the real product does not impose any limitations.
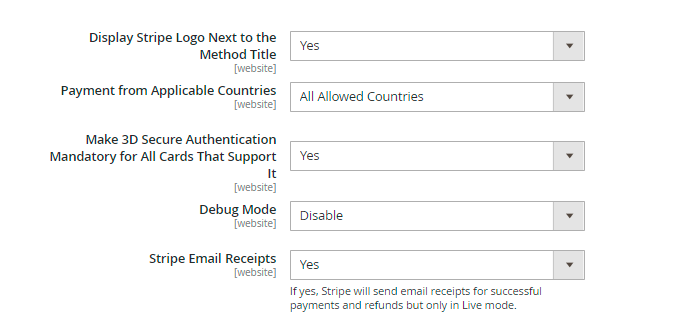
Display Stripe Logo Next to the Method Title – set to Yes to display Stripe Badge. It helps to increase trust and make your customers feel more secure.
Payment from Applicable Countries - accept payments made via Stripe from All Allowed Countries or from Specific Countries.
Payment from Specific Countries - select the countries for which the Stripe payment method will be allowed.
Make 3D Secure Authentification Mandatory for All Cards That Support It – set to Yes to surely prevent malicious actors from stealing any sensitive information.
Debug Mode - enable this option if you want to track payment processes.
Stripe Email Receipts - set to Yes to let Stripe send email receipts for successful payments and refunds. It works only in Live mode.
To test the module, see this information.
Configure Integration with Amazon Pay
To use this functionality, please add Amazon Payment Add-On for Subscriptions & Recurring Payments for Magento 2.
Please kindly note that Amazon Payment for Subscriptions & Recurring Payments Add-On works only with amzn/amazon-pay-module which is in the Magento Core up to version 2.4.3.
To configure the integration with Amazon Pay, please go to Stores → Configuration → Sales → Payment Methods → Amazon Pay → Configure.
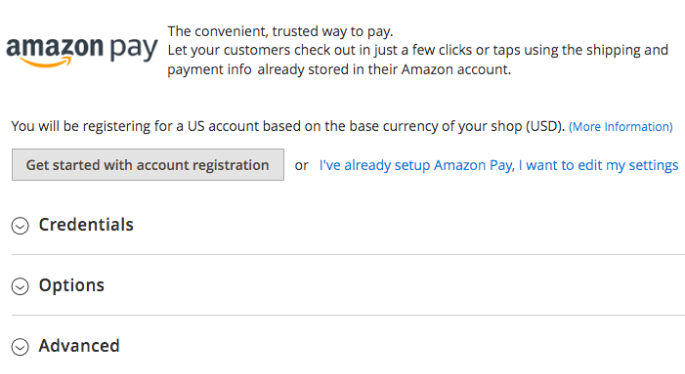
Click Get started with account registration.
Do not use your personal Amazon account for Amazon Pay.
If you do not yet have an Amazon seller account, choose Create a new sign-in and click Select. Then, follow the onscreen instructions to create a new account.
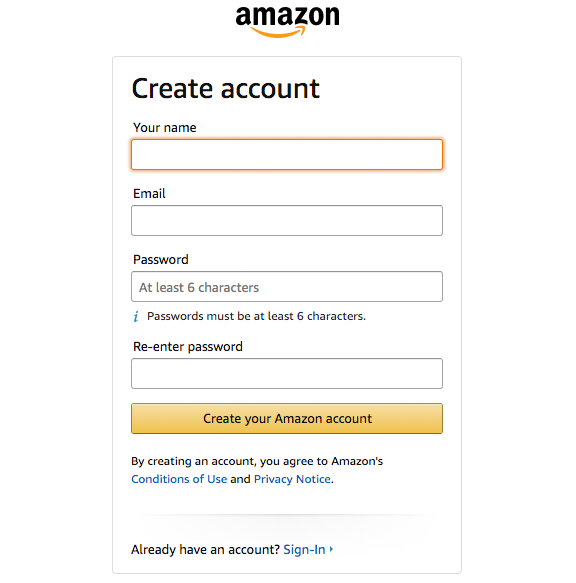
If you already have an Amazon merchant account, choose Use existing Amazon sign-in and click Select.
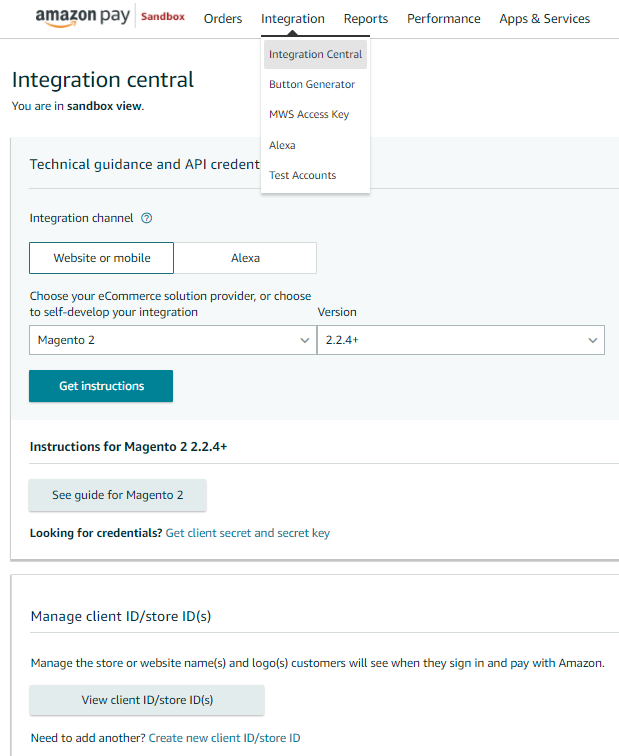
Then proceed to the Integration Central to view API credentials.
When you have all the needed account credentials, please fill in the following sections in your Magento admin panel.
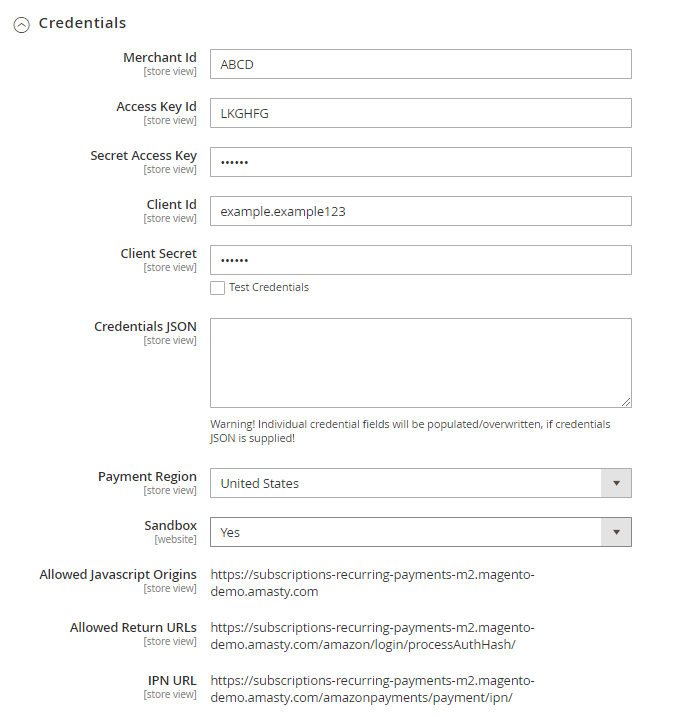
Payment Region - this setting indicates where your Amazon merchant account was created, and determines the currency that is used for the transaction.
Sandbox - this option determines if Amazon Pay is running in a sandbox environment for testing.
Allowed Javascript Origins - this value is entered automatically from your Amazon account.
Allowed Return URLs - this URL is entered automatically from your Amazon account.
IPN URL - if Instant Payment Notification is used as the Update Mechanism, notification of order status changes is sent to this URL. This value is also entered automatically from your Amazon account.
Expand the Options section.
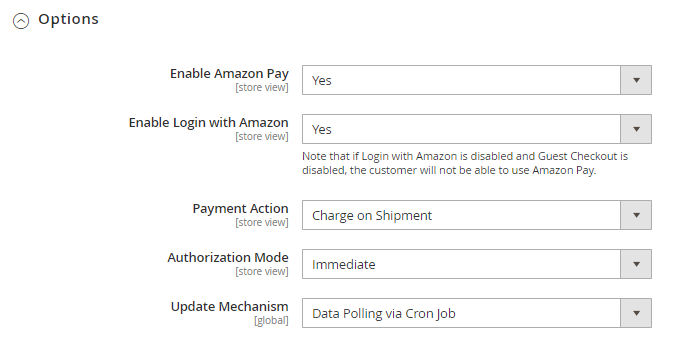
Enable Amazon Pay - set to Yes to enable the method for the current store view.
Enable Login with Amazon - choose Yes to enable Login with Amazon for the current store view.
Payment Action - this setting determines when Amazon Pay processes the transaction and charges the customer.
- Charge on Shipment - Amazon receives a capture request and charges the customer when an invoice is created in Magento.
- Charge on Order - Amazon creates the invoice and charges the customer when the order is placed.
Authorization Mode - specify the method to be used to transmit authorization data.
- Immediate - (Default) The disposition of authorization is available within a couple of seconds.
- Automatic - (Recommended) Uses synchronous authorization if possible, and switches to asynchronous processing as needed, for some declines.
Update Mechanism - set the update method that will be used to send notifications about changes to the order status.
- Data Polling via Cron Job - Uses the standard Magento notification process that is scheduled by Cron job.
- Instant Payment Notifications - (IPN) Sends notifications to the Instant Payment Notification URL.
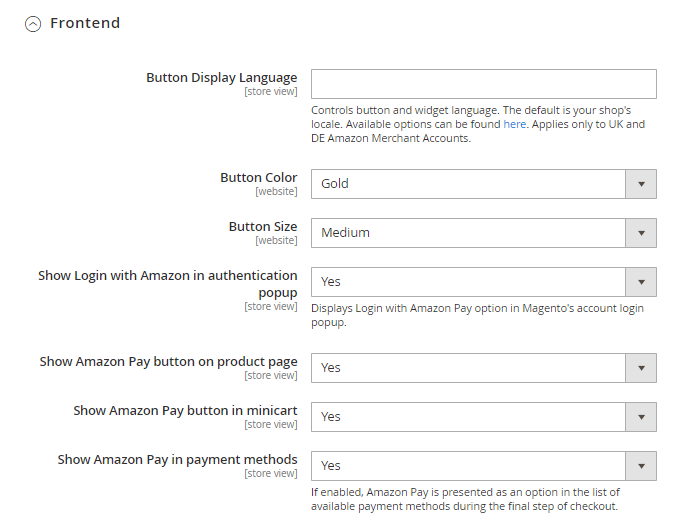
Adjust the Frontend Options to correctly display the payment method for customers. Here you can specify where to show the Amazon Pay button, as well as its size and color, etc.
Also, you can adjust the Sales Options and Developer Options.

Store Name - determines how Amazon refers to the store internally and in notification emails. If left blank, the store view name is used by default.
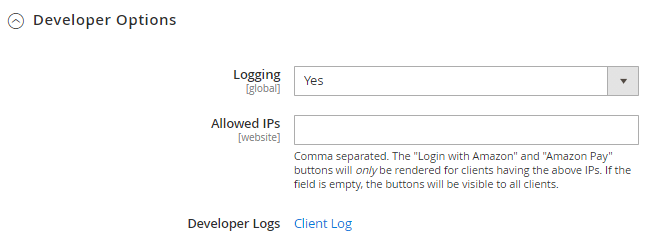
Logging - Determines if Amazon log files are generated. Make sure that Logging is set to Yes. After the setup is complete and logs are generated, you can return to this location and select a link in Developer Logs to download to view Client and IPN logs.
Allowed IPs - Specify the Allowed IPs to limit the availability of the Amazon Pay method. Enter the IP address of each, separated by a comma. The specified IP addresses will be added to an allow list. When this field is blank, the buttons are available for all IP addresses.
Developer Logs - Provides a list of available Amazon logs collected when Logging is enabled.
When the settings are complete, click Save Config.
Now, you need to adjust the Amazon Pay method availability in the General Configuration. Please go to Stores → Configuration → Amasty Extensions → Subscriptions & Recurring Payments → General.
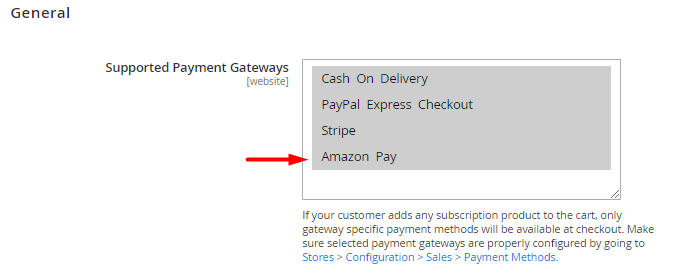
Select Amazon Pay to add it to the list of supported payment methods.
Also, in the general settings, you can configure the Amazon payment method limit.
For most accounts, Amazon imposes a monthly limit of $1000 on the amount of funds you can spend on recurring payments. Our Magento Amazon Pay add-on allows you to timely inform customers of this limitation and make this method unavailable after they reach it.
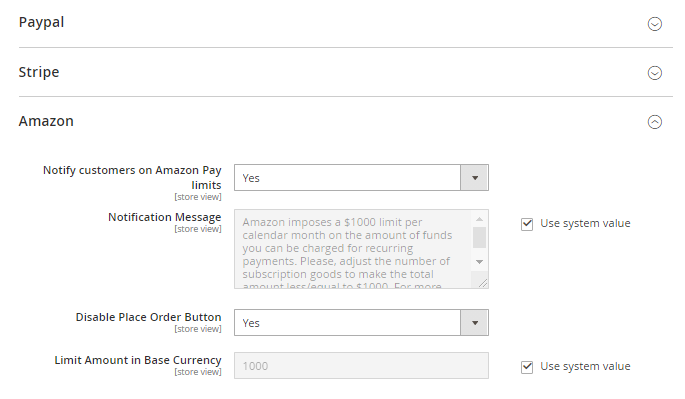
Notify customers on Amazon Pay limits - set to Yes to notify customers when they reach the limit amount.
Notification Message - here you can add the notification message for customers.
Disable Place Order Button - specify whether to disable or not the Place Order button when a customer reaches the indicated amount.
Limit Amount in Base Currency - in this field, you can specify the monthly limit amount for the Amazon Pay method.
Configure Integration with Cash on Delivery
To configure the integration with Stripe, please go to Stores → Configuration → Sales → Payment Methods → Cash on Delivery
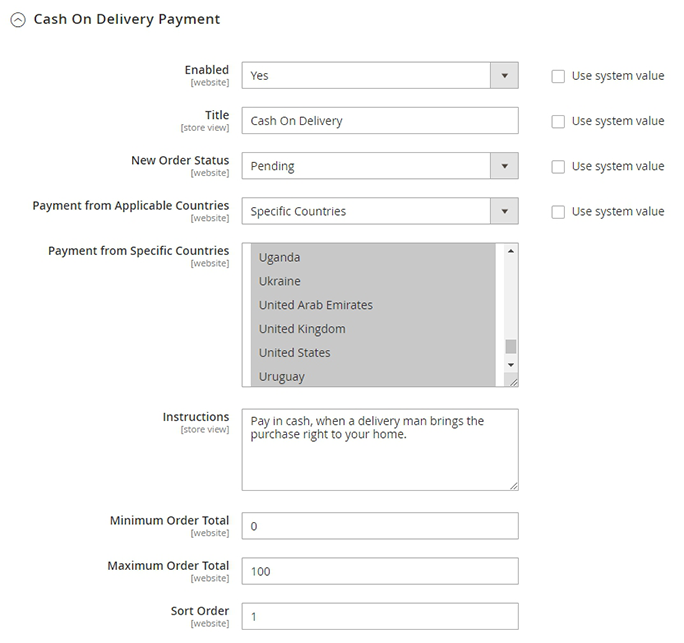
Enabled - set to Yes to activate the extension.
Title - specify the payment method title on the checkout page. Cash On Delivery is set by default.
New Order Status - choose the status of the new order until the payment is completed.
Payment from Applicable Countries - set to All Allowed Countries if you want to offer ‘Cash on Delivery’ payment method for customers from all countries. If not, choose the Specific Countries option in this tab.
Payment from Specific Countries - select the countries for which cash on delivery will be allowed.
Instructions - fill in the guide or conditions for your customers to make a payment or provide them with some additional information about the COD method in your store.
Minimum Order Total - specify the minimum order amount required for the method to be applied.
Maximum Order Total - set the maximum order amount acceptable for cash on delivery payment method.
Sort Order - specify the position of the ‘Cash on Delivery’ in the payment methods list on the checkout page. Here 0 is the first position.
After configuring all the necessary settings, click the Save button in the upper-right corner.
Unlike other payments methods accepted by the Subscriptions and Recurring Payments for Magento 2 extension, the Cash on Delivery method works only with Magento Cron jobs to schedule and generate subscriptions and send emails. If Magento Cron is not configured or configured incorrectly, the extension won't create any subscriptions with the Cash on Delivery payment method.
General Settings
To configure the extension settings, navigate to Stores → Configuration → Amasty Extensions → Subscriptions & Recurring Payments. Expand the General tab.
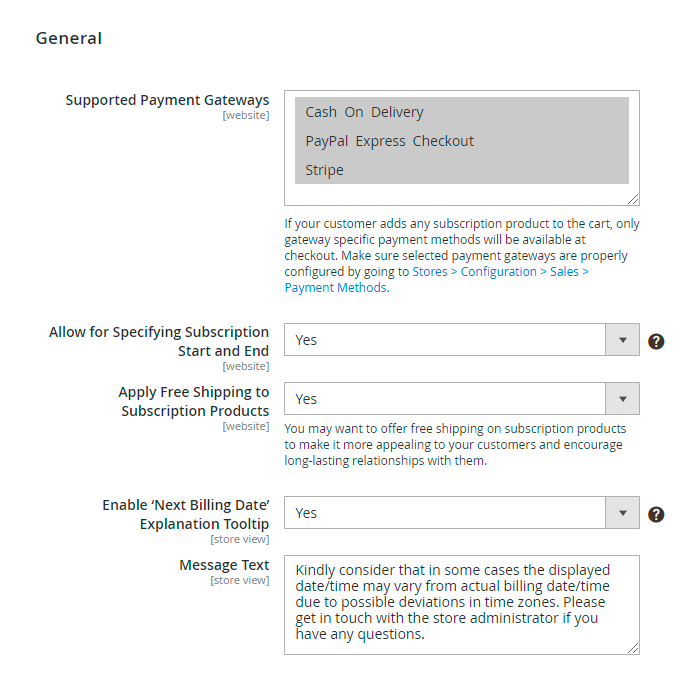
Supported Payment Gateways - specify the gateway payment methods that will be available at checkout when your customer adds any subscription product to the cart.
Allow for Specifying Subscription Start and End - enable this option to let your customers choose when to start and end their subscriptions for extra convenience. Set 'No' to restrict this ability to instantly start an infinite subscription after the order is placed and keep it active until failed or canceled.
Check here how it works.
Apply Free Shipping to Subscription Products - set to Yes to offer free shipping on subscription products to make it more appealing to your customers and encourage long-lasting relationships with them.
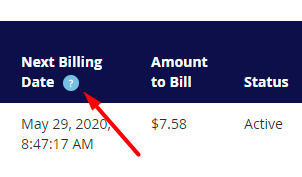
Enable ‘Next Billing Date’ Explanation Tooltip - if enabled, It displays the '?' icon with the tooltip in the Subscriptions grid on the customer's Storefront. The option is applicable for the stores having the only Website for several time zones.
Message Text - specify the text to provide customers with. For example, you may warn shoppers about possible time zones issues.
On the storefront the tooltip is displayed in the following way:
Subscription Editing Settings
In this section, the admin can modify subscription settings for subscriptions with the Cash on Delivery payment method only.
Please note that Subscription Editing Settings is compatible only with Luma theme.

Allow to Switch Plan - when enabled, it allows editing the Delivery Plan.
This module highlights the next billing date based on the selected plan and the start date chosen by the customer. 
Allow to Change Shipping Address - when enabled, it allows editing the Shipping Address.
When updating the shipping address, please note that the selected shipping method for the subscription may not be available in certain regions or countries. If the new address is not supported, the module will prevent saving and display an error message: 

After enabling this setting, edit field icons will be displayed on the front end for Cash on Delivery subscriptions: 

Allow to Pause Subscription - When enabled, the Pause button is added to the subscription window.

When this setting is enabled, a new subscription status will appear:  The same information will appear on the admin panel:
The same information will appear on the admin panel:
For subscriptions, the following adjustments will take effect when changing the Delivery plan:
- Trial – Provided once. If the plan is changed, a new trial is not granted. If an active trial is in place at the time of the change, it continues until expiration.
- Discounts – Applied based on the selected plan. When a plan is changed, the discounts associated with the new plan become active.
- Fee – Charged only at the time of subscription purchase, not when switching plans. If the initial plan did not include a fee but the new plan does, the fee remains applicable.
Global Subscription Settings
In this tab, you can configure the global subscription terms.
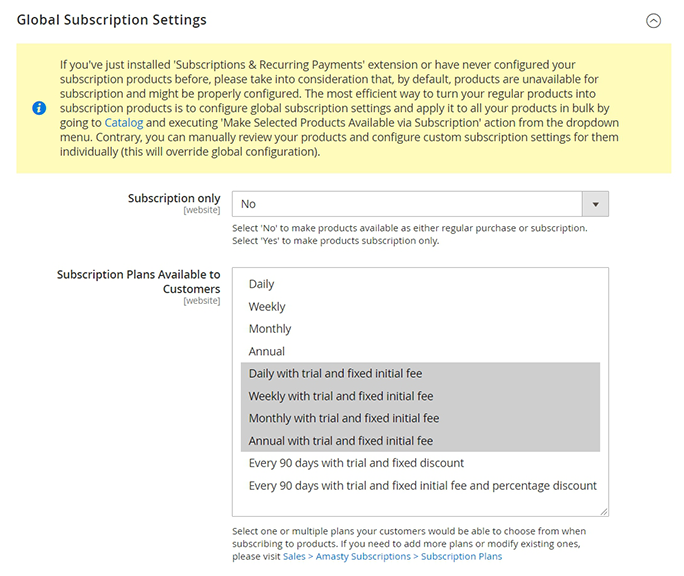
Subscription only - select No to make products available as either regular purchase or subscription. Select Yes if you want to make products available for purchase via subscription only.
Subscription Plans Available to Customers - choose the subscription plans that will be visible on the frontend.
In case you upgrading the Amasty Subscriptions and Recurring Payments module to 1.6.0 or higher, the previous subscription settings will be migrated and displayed in this section.
If you are installing the module for the first time, the extension will create several default subscription options like Daily, Weekly, Monthly, Annual.
You can add as many subscription plans as you'd like. To do that, please go to Sales → Amasty Subscriptions → Subscription Plans. Then, on the Subscription Plans grid, you can manage existing plans and add new ones according to your business needs.
Labels & Comments
In this tab, you can customize labels to make them more catching or understandable. The labels are displayed next to the radio button for adding a product to the cart as a single purchase (displayed on the subscription product page).
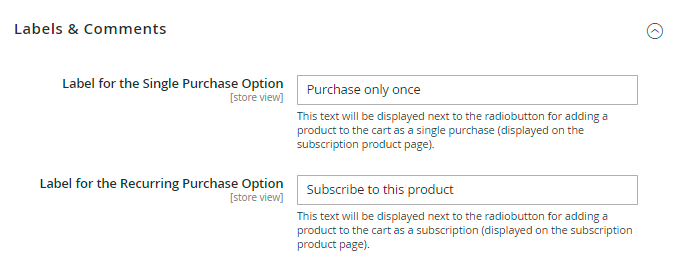
Set the label for the Single Purchase Option and the Recurring Purchase Option.
Email Notifications
Adjust this tab if you want to notify your Admins and Customers upon important events concerning their subscriptions.
Customer Notifications:

Send Emails as - choose the email from which the notifications will be sent.
You can enable the following notifications:
- When a subscription is purchased;
- When the trial period ends;
- When a subscription is canceled;
- About the Remaining Trial Period (days);
- when 3D Secure Authentication required;
- With PayPal Subscription Completion (the email will be sent to the customer within 30 minutes) ;
- When PayPal Subscription Terms Changed.
In the Email Template tabs select the suitable templates for the emails.
Admin Notifications:

Send a Payment System Transaction Failure Alert - when this setting is enabled, the administrator will receive a newsletter, based on the selected template, whenever a subscription transaction fails on the payment system's side.
If a transaction fails due to payment provider issues, its status will be recorded as “Failure” in the Transaction Log grid. (Sales → Amasty Subscriptions → Transaction Log). Orders can also be filtered by status:

The functionality of Send a Payment System Transaction Failure Alert is available as part of an active product subscription or support subscription.
Email Template - choose the template that will be used for Send a Payment System Transaction Failure Alert.
Send a Transaction Failed Due to Item Unavailability Notification - If this setting is enabled, the admin will be notified that the subscription remains open and needs to be closed, along with contacting the customer (the customer will not be informed about the subscription closure).
If the item is out of stock, disabled, or deleted, the order will not be created, and no error will appear in the Transaction Log. The customer's payment will be debited but immediately refunded, with a “Failed” status recorded in the Transaction log.
The functionality of Send a Transaction Failed Due to Item Unavailability Notification is available as part of an active product subscription or support subscription.
Send Notification of Subscription Change by Customer - If this setting is enabled, any changes to the subscription information will trigger an email notification to the admin, using the designated email template, and sent to the address specified in the Admin Email Address field.
Save the configuration.
Subscription Plans
The extension allows store owners to create an unlimited number of custom subscription plans based on one's needs. You can flexibly adjust plans, and create a highly tailored plan with unique subscription terms for a specific product.
To manage subscription plans, please go to Sales → Amasty Subscriptions → Subscription Plans. After that, you'll get to see a Subscription Plans grid. An example of such grid is presented on the screenshot below.
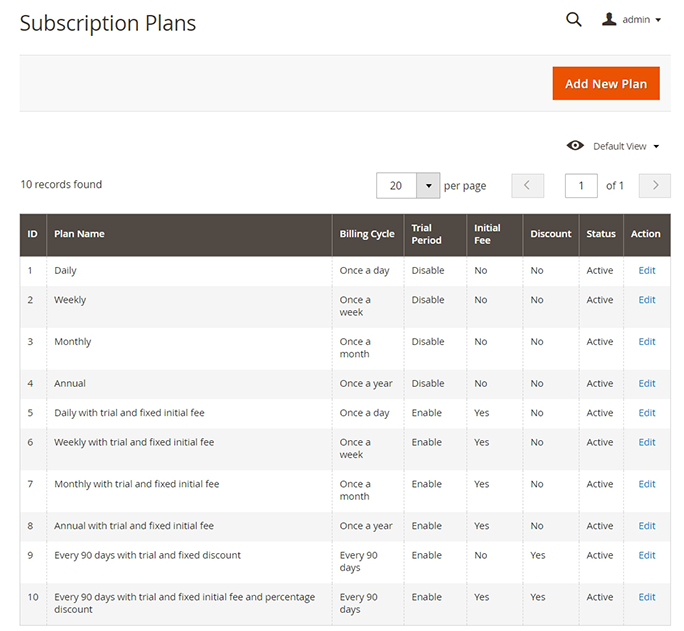
To manage an existing subscription plan, click on the Edit action for a selected plan in the Actions column.
To create a new subscription plan, click the Add New Plan button in the top-left corner.
How to create new subscription plan
After pressing the Add New Plan button, the extension allows admin to adjust options for new subscription plan.
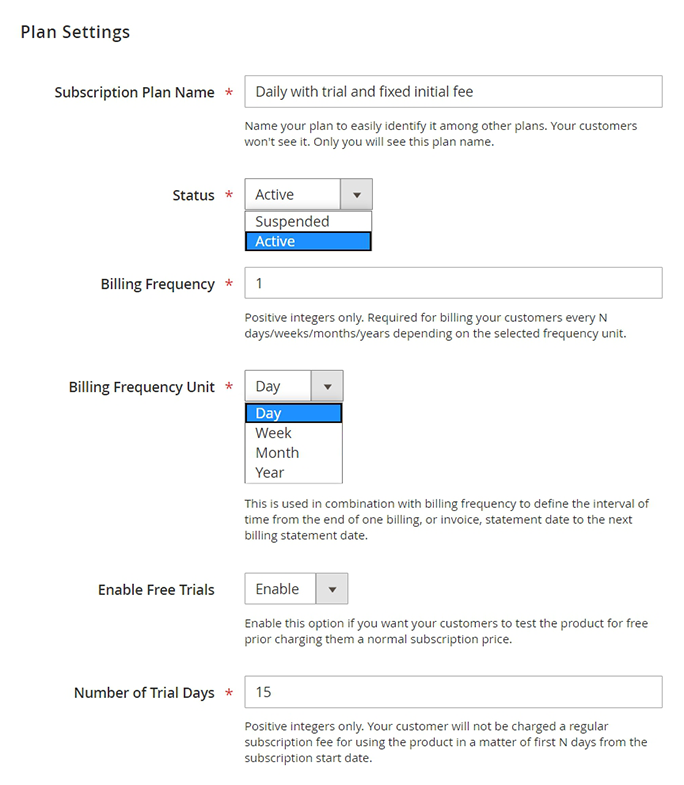
Subscription Plan Name - Set the name for the subscription option. Kindly note that it is for internal use only, and customers won't see it. The best practice is to name a new plan in an easy-to-read manner so that later you could easily find needed plans on the grid.
Status - choose if this plan will be Active or Suspended. If set to Active, customers will be able to see it on the frontend.
Billing Frequency - set the needed custom billing frequency. Billing will be made every N days/weeks/months/years depending on the selected frequency unit.
Billing Frequency Unit - define the interval of time from the end of one billing, or invoice, statement date to the next billing statement date.
Enable Free Trials - enable this option if you want your customers to test your products and services for free prior charging them a normal subscription price.
Number of Trial Days - specify the number of days from the moment of order placement during which your customer will not be charged a subscription fee for using your product.
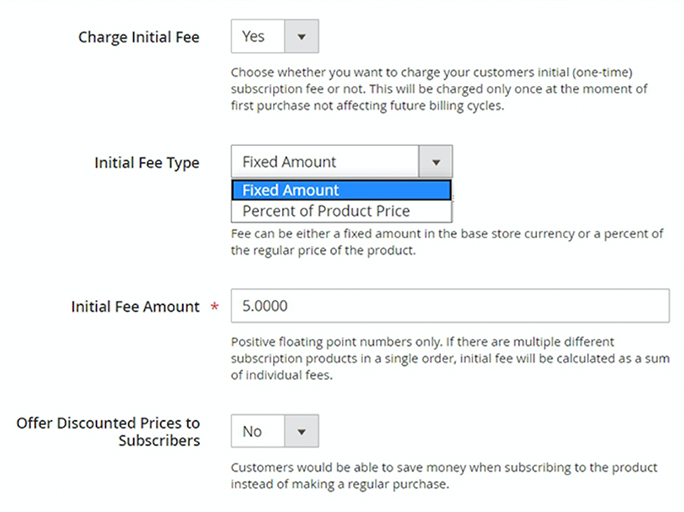
Charge Initial Fee - choose whether you want to charge your customers with initial subscription fee or not. This will be charged only once at the moment of first purchase not affecting future billing cycles.
Initial Fee Type - fee can be either a fixed amount in the base store currency or a percent of the regular price of the product.
Initial Fee Amount - specify the amount of the fee. If there are multiple different subscription products in a single order, the initial fee will be calculated as a sum of individual fees.
Offer Discounted Prices to Subscribers - set to Yes to provide customers with discounts and stimulate them to subscribe.
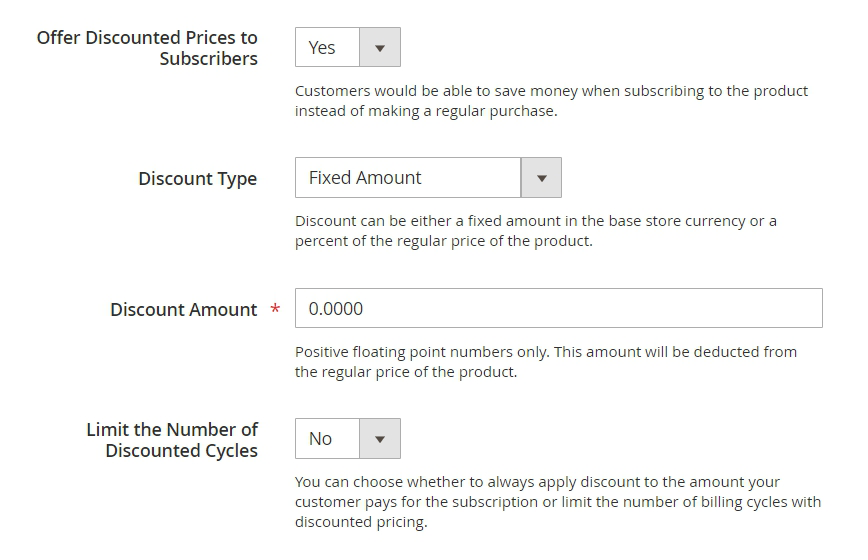
If the Offer Discounted Prices to Subscribers is set to Yes, another section of configuration options will appear.
Discount Type - discount can be either a fixed amount in the base store currency or a percent of the regular price of the product.
Discount Amount - the specified amount will be deducted from the regular price of a subscription product.
Limit the Number of Discounted Cycles - with the extension you can choose whether to always apply a discount to the amount your customer pays for the subscription or limit the number of billing cycles with discounted pricing.
Number of Discounted Cycles - if you want to limit discounted cycles, set the number of cycles during which the price will be lower.
Subscriptions
Navigate to Amasty > Subscriptions & Recurring Payments > Subscription Plans in order to view the list of all subscriptions.

Subscription ID - this column displays the values that are taken from the payment system.
Refresh Data - click on this button to update the data that is displayed in the subscription table.
Please note: If some information is missing from the grid or is outdated, it is necessary to refresh the data.You can update only the necessary records using mass actions, or refresh all the data at once; in this case, the process may take some time.
Subscription products
If you've just installed 'Subscriptions & Recurring Payments' extension or have never configured your subscription products before, please take into consideration that, by default, products are unavailable for subscription and need to be properly configured.
To make products available via subscription, go to Admin Panel → Catalog → Products.
Mass Actions
To apply global subscription settings to products, just tick the necessary items and Make Selected Products Available via Subscription in the Actions dropdown menu. Use the same algorithm to make them unavailable via subscriptions.
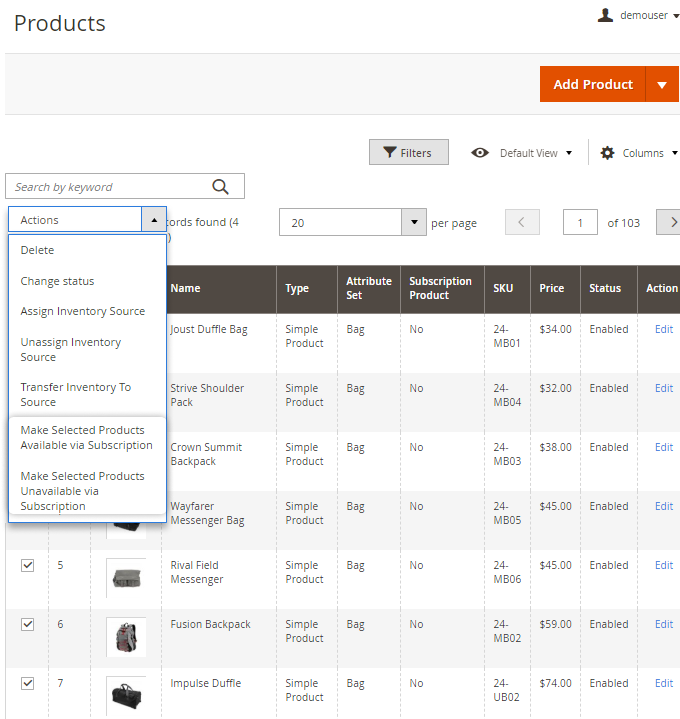
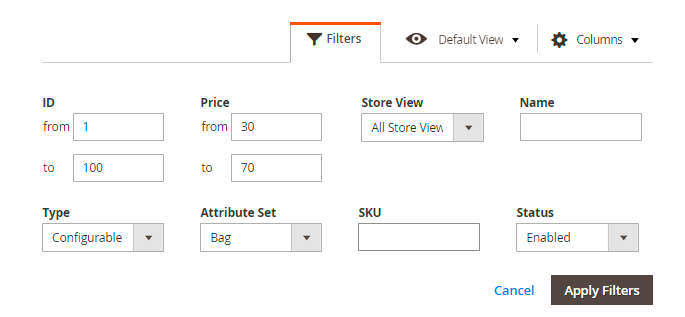
Use the Filters to find the products you need faster.
Subscription Customization
With the extension, it is possible to configure subscription settings for particular products separately.
Find the necessary product and click the Edit button.
Go to Subscriptions Settings tab.

In the Available by Subscription field you may apply the global configuration to the product or create a custom one. In case of customization, set all subscription settings manually according to your needs.
Subscription Only - set to Yes, if you want to sell this product via recurring payments.
Subscription Plans Available for Customers - choose the subscription plans that will be displayed on the frontend. This setting overrides the options set in Global settings.
Create custom subscription plans with special terms for certain goods to motivate users to buy this product. For example, offer a bigger discount to subscription products from a certain brand. This way, buyers will see that this offer is more valuable and will be much more likely to purchase an advertised product.
After the changes are made, hit the Save button.
Additional packages (provided in composer suggestions)
To make additional functionality available, please install the suggested packages you may need.
Available as a part of an active product subscription or support subscription:
* amasty/module-recurring-payments-subscription-functionality - Install this package:
- For Subscription Plans grid compatibility;
- To use payment System Transaction Failure notification functionality;
- To view subscriptions in a customer account(Action = View);
- To enable Send Notification of Subscription Change by Customer feature.
* amasty/module-subscriptions-and-recurring-payments-hyva - Install this package to insure Amasty Subscriptions & Recurring Payments extension works with Hyva Theme.
* amasty/module-subscriptions-and-recurring-payments-hyva-checkout - Install this package to insure Amasty Subscriptions & Recurring Payments extension works with Hyva Checkout.
Frontend View
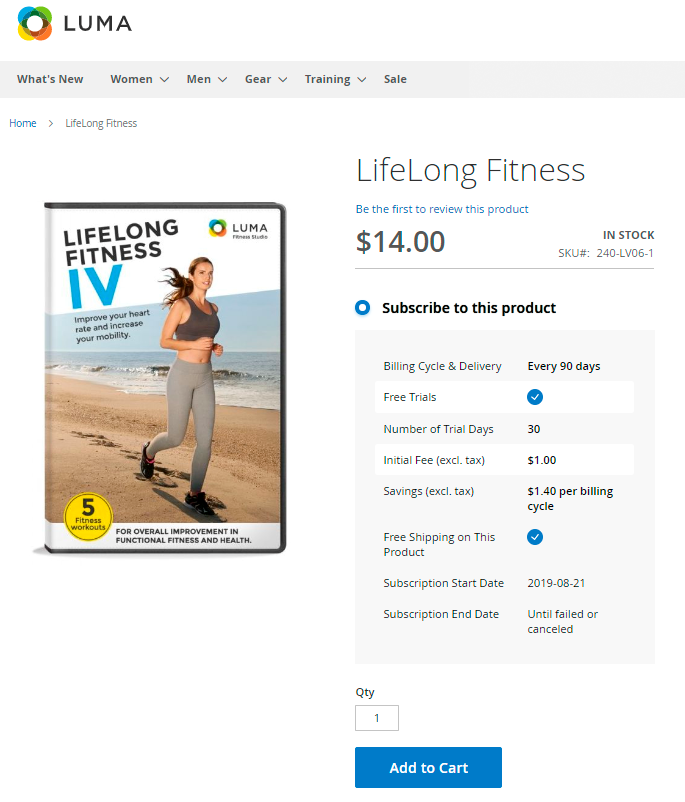
Let customers choose the billing cycle suitable for them. Apply free trials and initial fees to products.
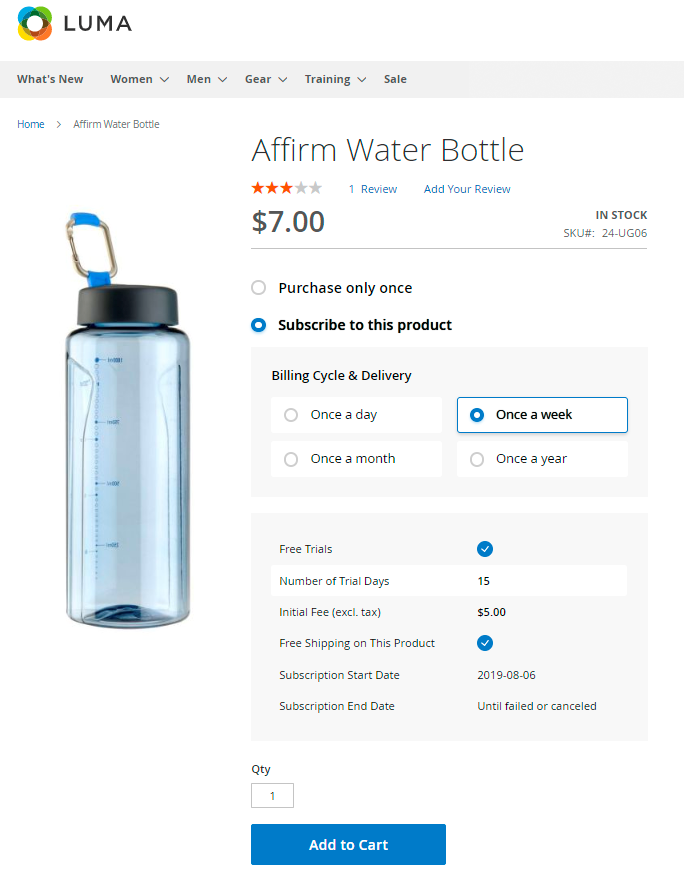
If you enable the 'Allow for Specifying Subscription Start and End' option, shoppers can also select the subscription period convenient for them. They may choose the date to start subscriptions and specify the necessary end time.
There are 3 available variants to end a subscription:
- set it as Infinite - in this case subscription can be closed manually by a customer;
- end by a date;
- end by a cycle - user can choose the amount of repeated times to close the subscription.

Set custom subscription options for particular products according to your business needs. Provide customers with tempting discounts.
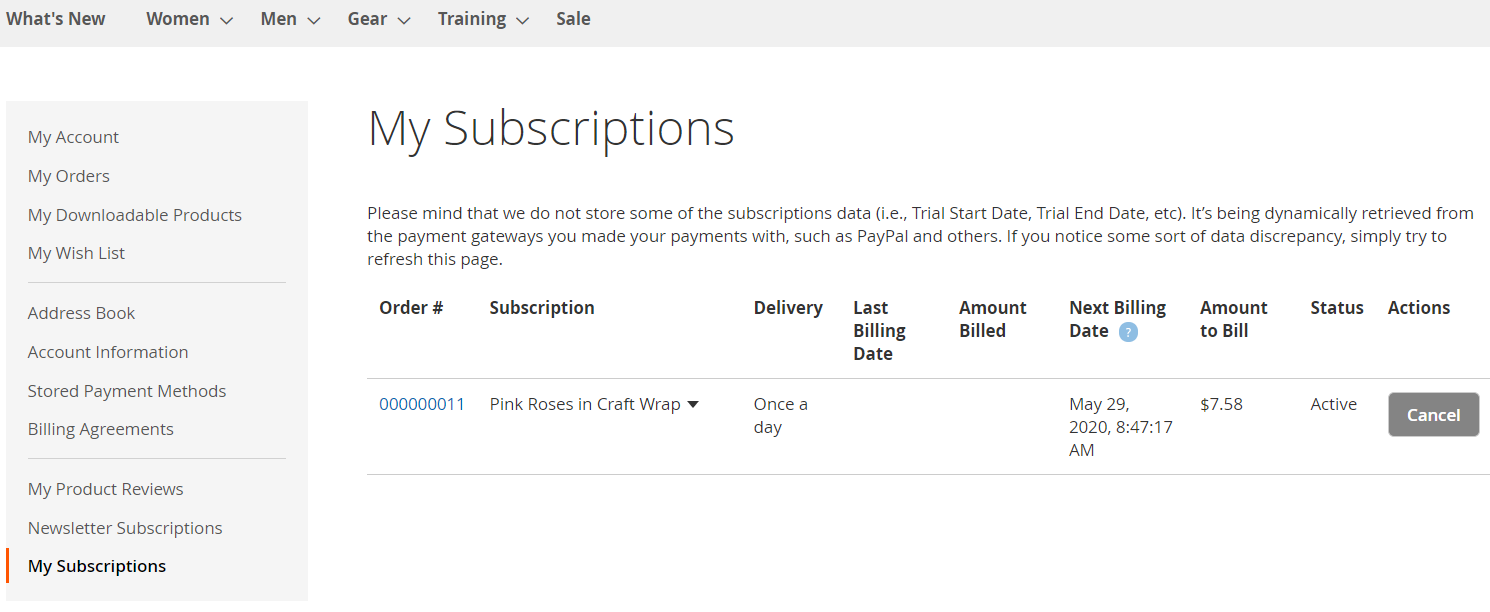
Display all customer's subscription in a separate account tab.
Improve your checkout page with advanced Magento 2 One Step Checkout extension.
FAQ
magento_2/subscriptions-recurring-payments.txt · Last modified: 2025/03/11 13:59 by avronskaya