
Sidebar
magento_2:product_attachments
Table of Contents
For more details see the Product Attachments extension demo.
Guide for Product Attachments for Magento 2
Provide customers with additional details about the products they purchase in your store. The extension allows you to add manuals, licenses, warranties and other downloadable information right on product pages. Equip your attachments of any format with catchy icons to attract customers' attention.
- Upload the unlimited number of attachments
- Support for any file types
- Track attachments downloads
- Equip files with catchy icons
- Compliant with WCAG 2.1 level AA requirements (for Luma Theme)
- Compatibility with the Magento Enterprise Remote Storage functionality
Magento 2 Product Attachments and Product Attachments Pro extensions are compatible with Hyvä themes. You can find packages for installing in composer suggest: 'amasty/module-product-attachment-hyva' for Lite version and additionally 'amasty/module-product-attachment-pro-hyva' for Pro version (Note: the compatibility is available as a part of an active product subscription or support subscription).
In Product Attachments FAQ you can find answers to the most popular questions about the extension functionality.
Configuration
To configure general extension settings please go to Stores → Configuration → Amasty Extensions → Product Attachments.
General Settings
Expand the General tab.
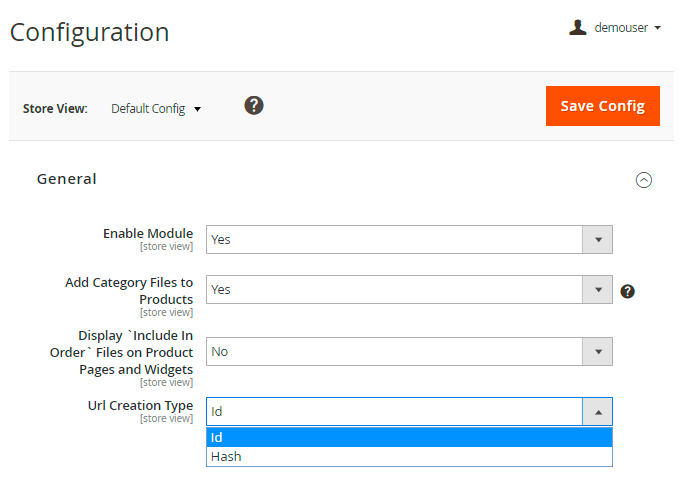
Enable Module - enable or disable the extension by clicking 'Yes' or 'No'.
Add Category Files to Products - if YES, the files will be attached to all category products. If NO, the files will not be attached to the products of the category. But you can display the category attachments with the help of widget.
Display `Include In Order` Files on Product Pages and Widgets - enable this option if you want to show files regarding ordered products on product pages and widgets.
Url Creation Type - select the type of URL that will be applied to the attachments: ID or Hash.
ID type URL example:
http://domain.zone/amfile/download/file/22
Hash type URL example:
http://domain.zone/amfile/download/file/8a9e07bad0166438b0
Links Accessibility Check
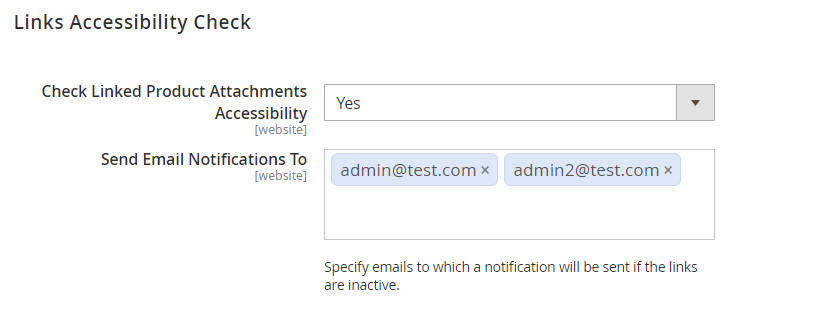
Check Linked Product Attachments Accessibility - set to Yes if you want to:
- have the accessibility of all linked attachments (‘web page’ and ‘link’ types) in your store automatically checked once a day via cron;
- get email notifications in case inactive attachments are found.
Send Email Notifications To - specify emails to which notifications will be sent if the links are inactive.
Product Tab
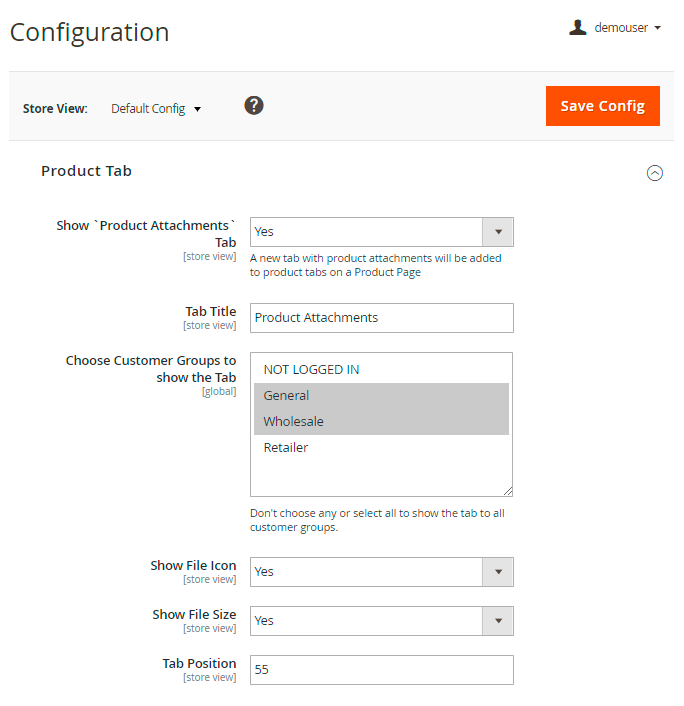
Show `Product Attachments` Tab - enable display of a new tab with product attachments in the description block on a Product Page.
Tab Title - specify the name for the tab with product attachments.
Choose Customer Groups to show the Tab - specify customer groups for which the attachments will be visible.
Show File Icon - make attachments more noticeable by showing file icons or turn off this option if needed.
Show File Size - enable this option to let your customers know about the size of the attachment.
Tab Position - specify the position for the product attachments among the other tabs.
To maintain the correct tabs display, please do NOT set the multiples of 10 (0,10,20, etc.). You may choose the following ranges: 11-19, 21-29 , etc. or use the numbers that contain 5 (5, 15, 25, etc.).
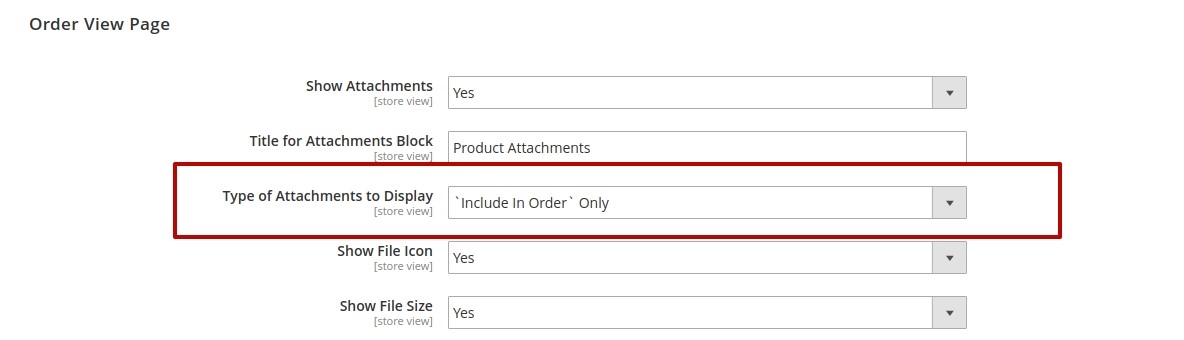
Order View Page
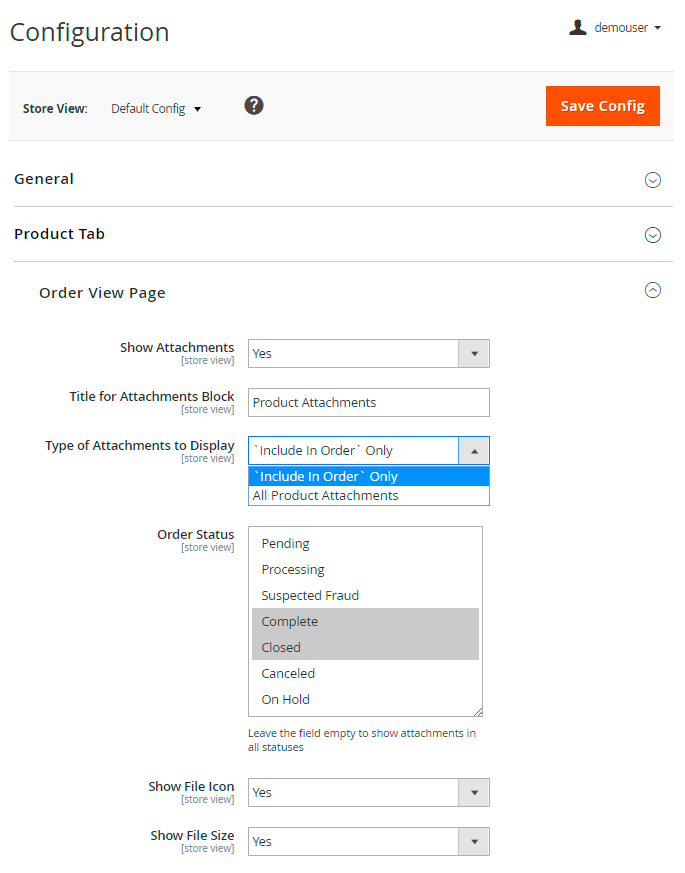
Show Attachments - enable this option if you want to show attachments for ordered products.
Title for Attachments Block - specify the title for attachments block on the Order View Page.
Type of Attachments to Display - show all product attachments or include them to the order only.
Order Status - choose order status according to which the attachments will be displayed. It is useful if you want to show files only when a purchase is completed.
Show or Hide File Icon and File Size.
Order Email
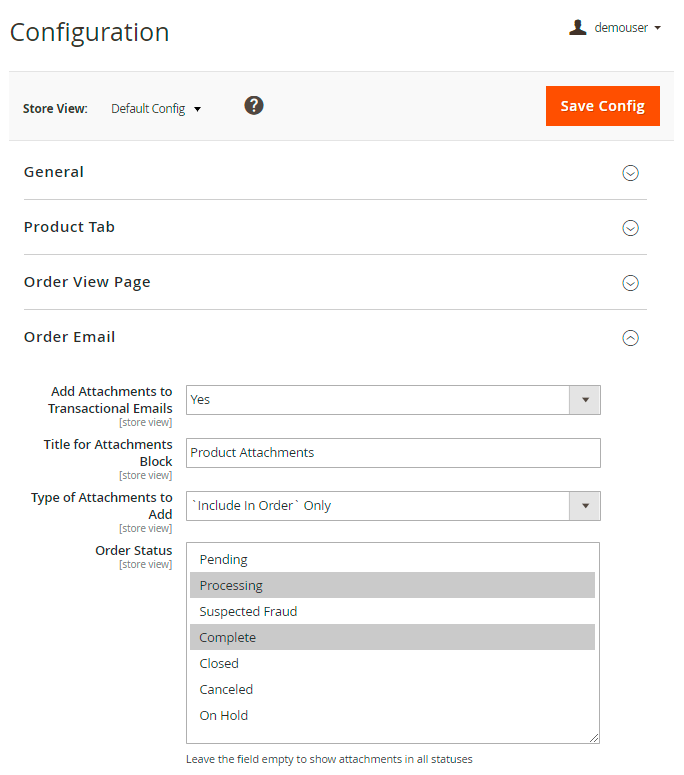
Add Attachments to Transactional Emails - include files to transactional emails to provide customers with the maximally detailed product description.
Title for Attachments Block - specify the title of the block that will be displayed in emails.
Type of Attachments to Add - add all the attachments or ‘Include in Order’ only to your transactional emails.
Order Status - select the status(es) that the orders must have to show attachments. Leave the field empty to show attachments in all statuses.
Additional Settings
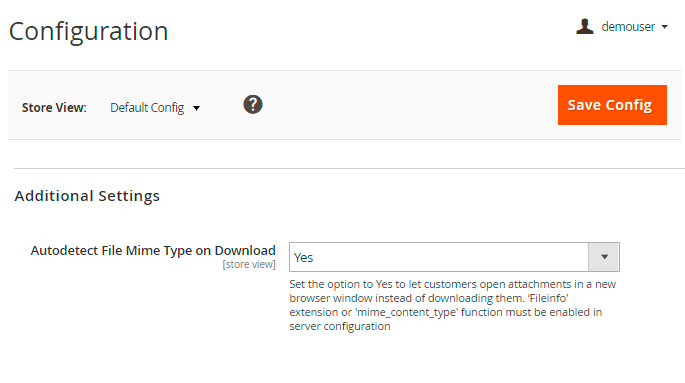
Autodetect File Mime Type on Download - set the option to 'Yes' to let customers open attachments in a new browser window instead of downloading them.
Adding Files to the Product
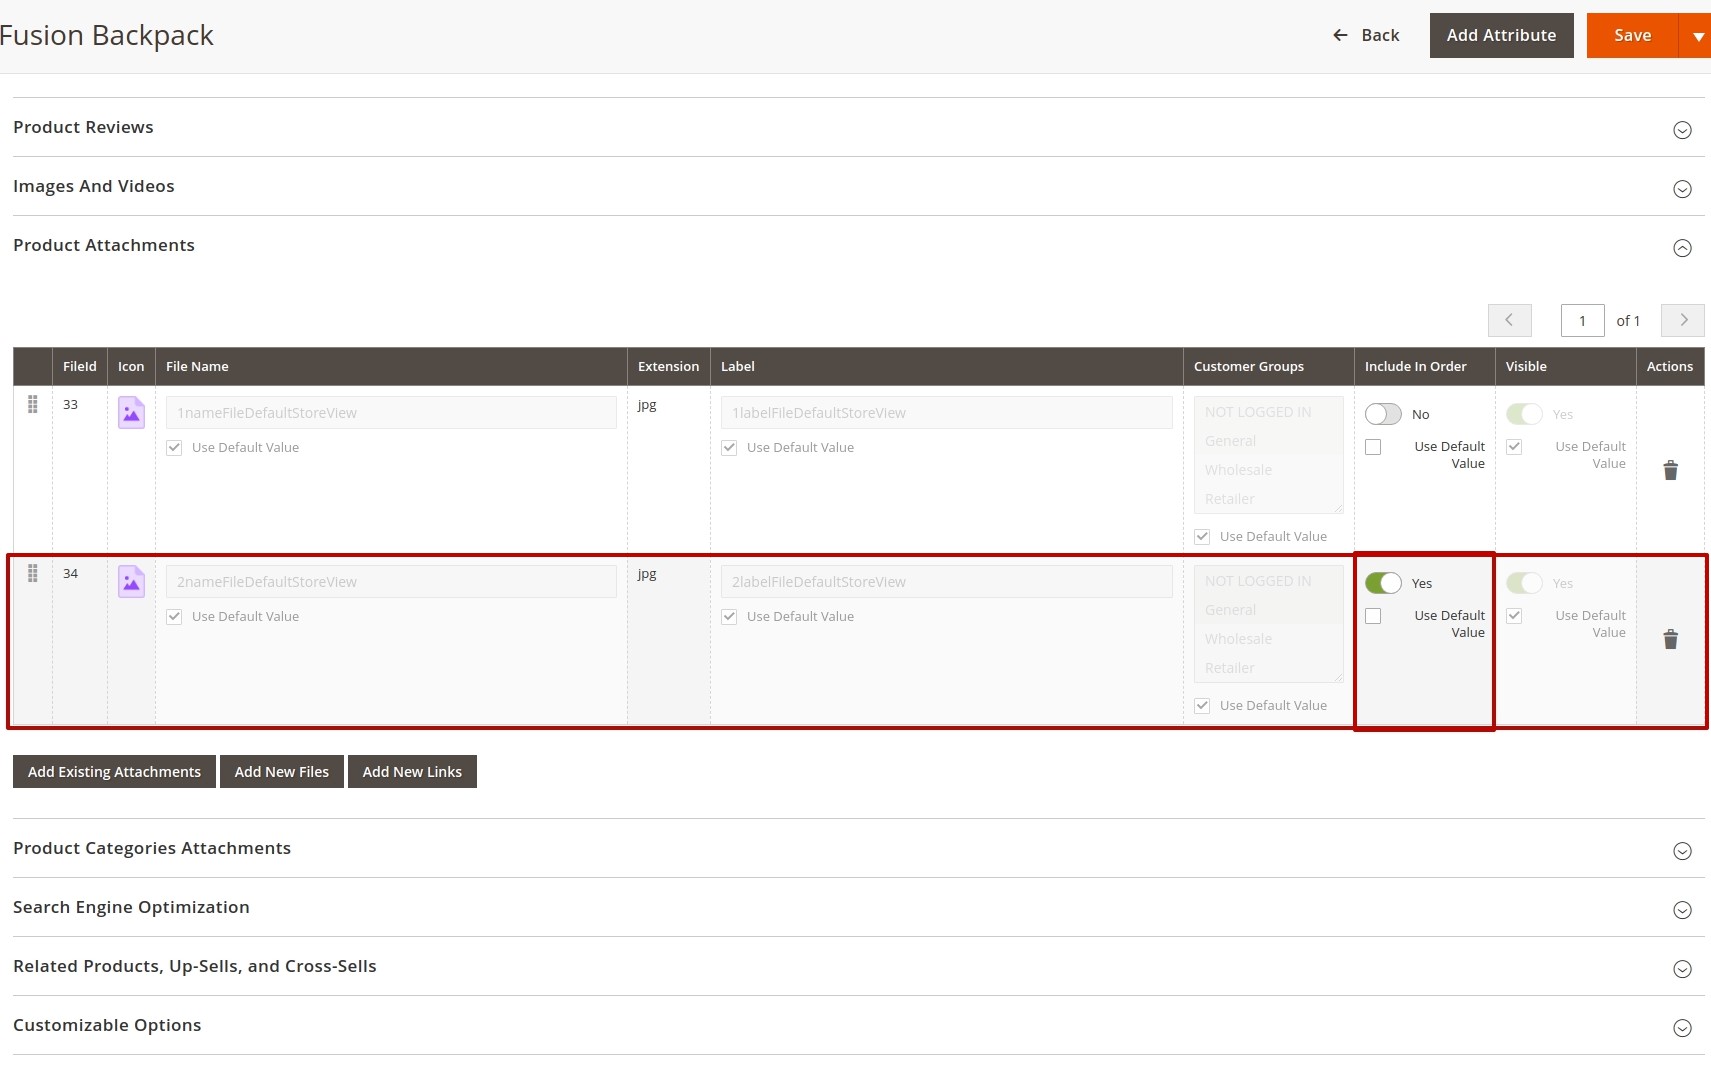
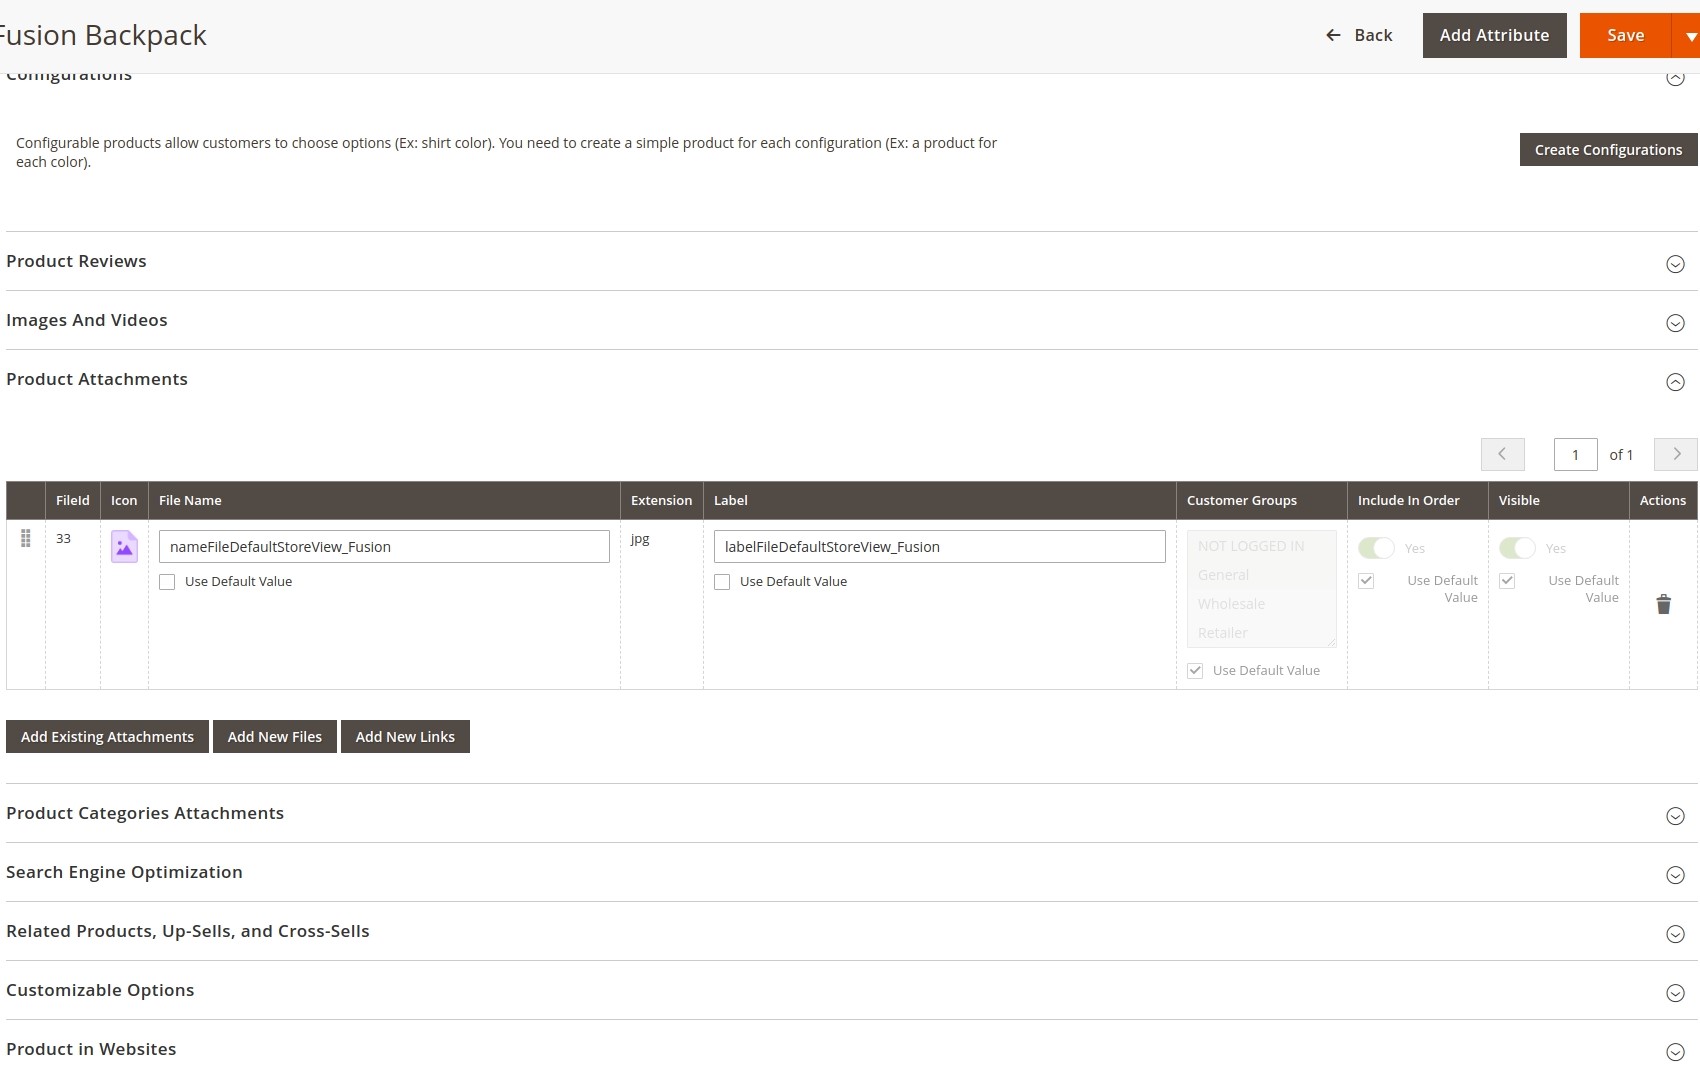
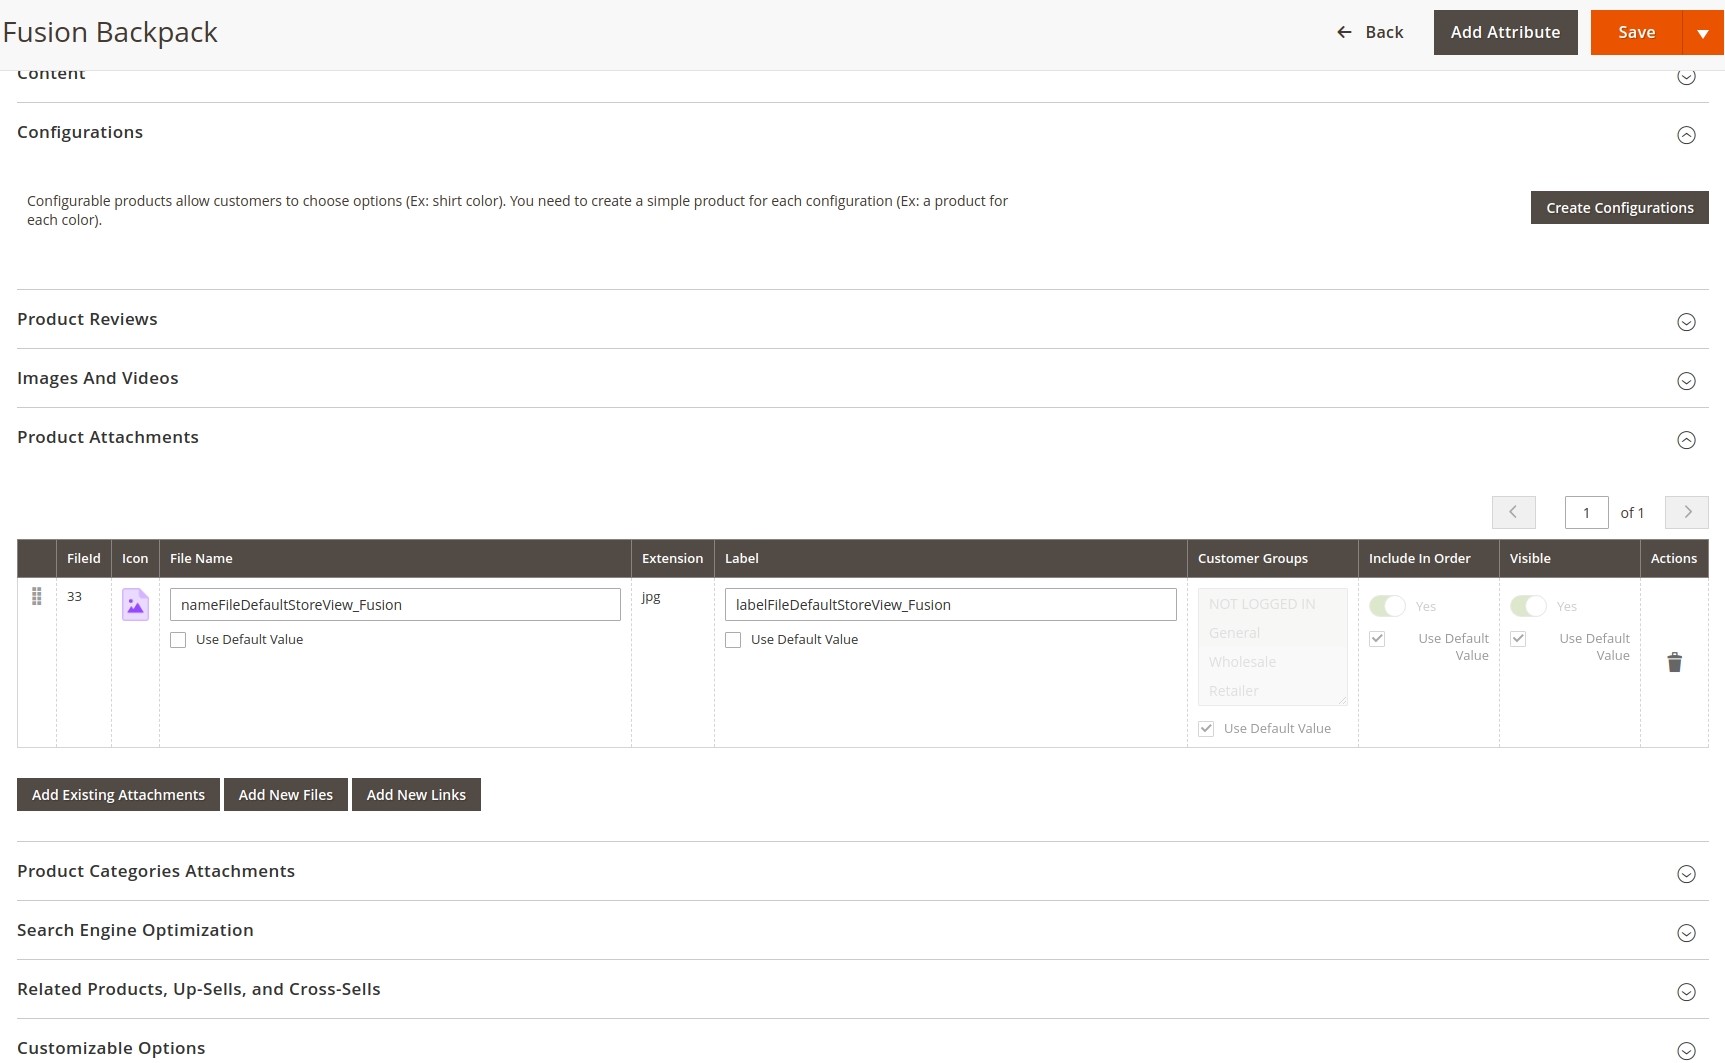
To add new files for a specific product please go to Catalog → Products and open the necessary product. Then expand the Product Attachments tab.
You can specify custom name for this tab by modifying the Tab Title option on the General Settings page.
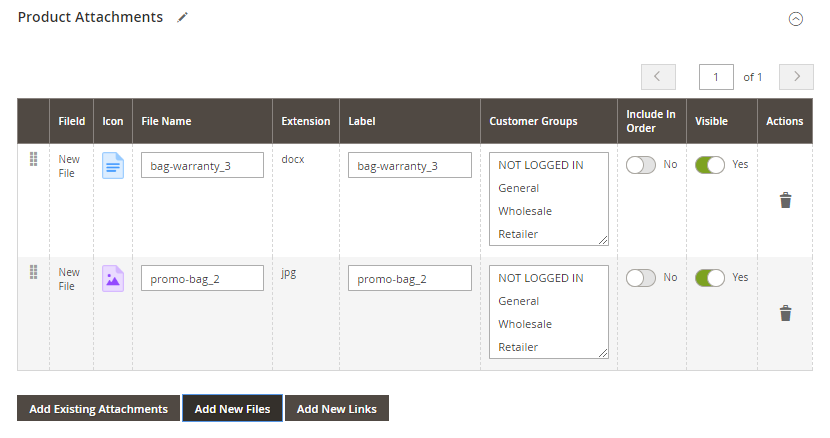
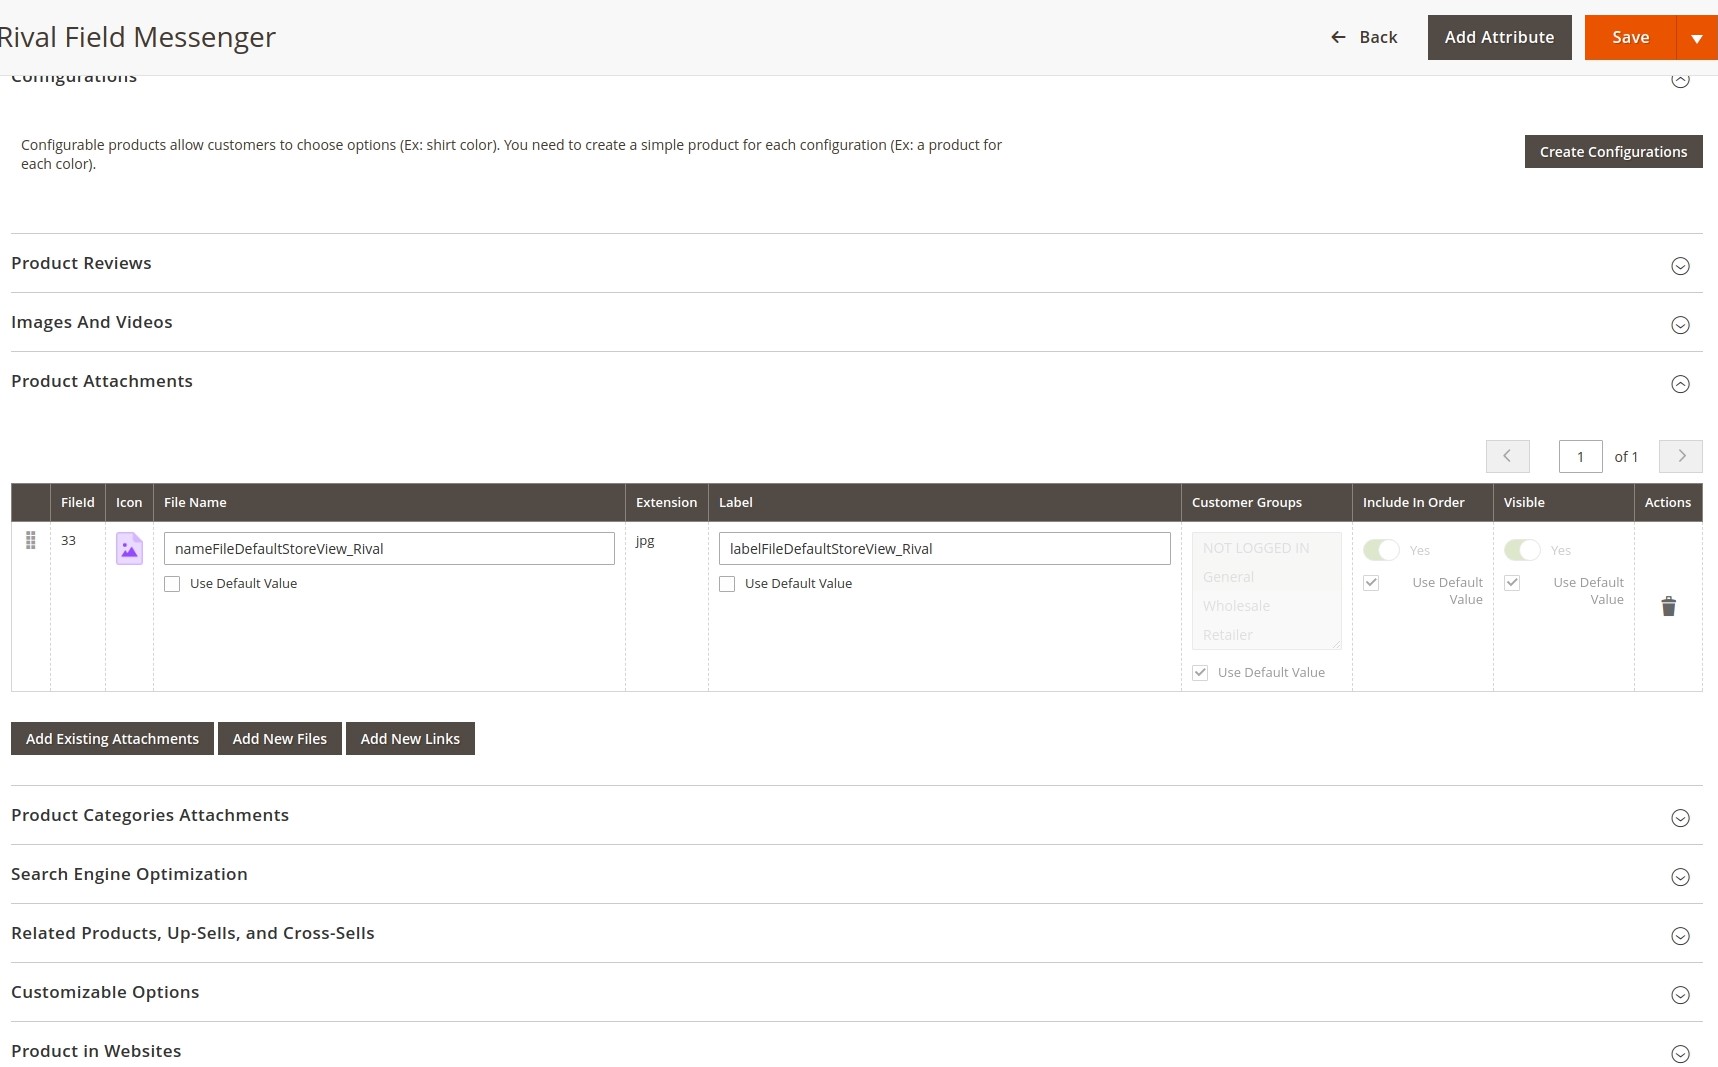
This handy grid allows you to manage all existing attachments easily:
Icon - define a needed attachment by catchy icons to add to the product.
File Name - specify a relevant file name for your internal use.
Extension - track the attachments easily according to file extensions.
Label - fill in the label that will be displayed on the frontend as the name of the attachment.
Customer Group - specify a customer group for which the attachment will be visible on the frontend.
Include In Order - enable this option if you want to display the product attachment in the tab 'My Orders' on the frontend.
Visible - modify this option to hide or display the attachment regarding the product.
If you show two or more attachments on a product page, you can specify the order for displaying files.
You can make the following actions right from the admin panel:
Click the Add Existing Attachments button to add files that are already loaded. Click the Add New Files button to add a new attachment for the related product. Click the Add New Links button to provide your product page with a necessary link.
Please note that attachments can only be assigned to parent products, which are then added to all associated child products. There is no option to attach files directly to individual child products.
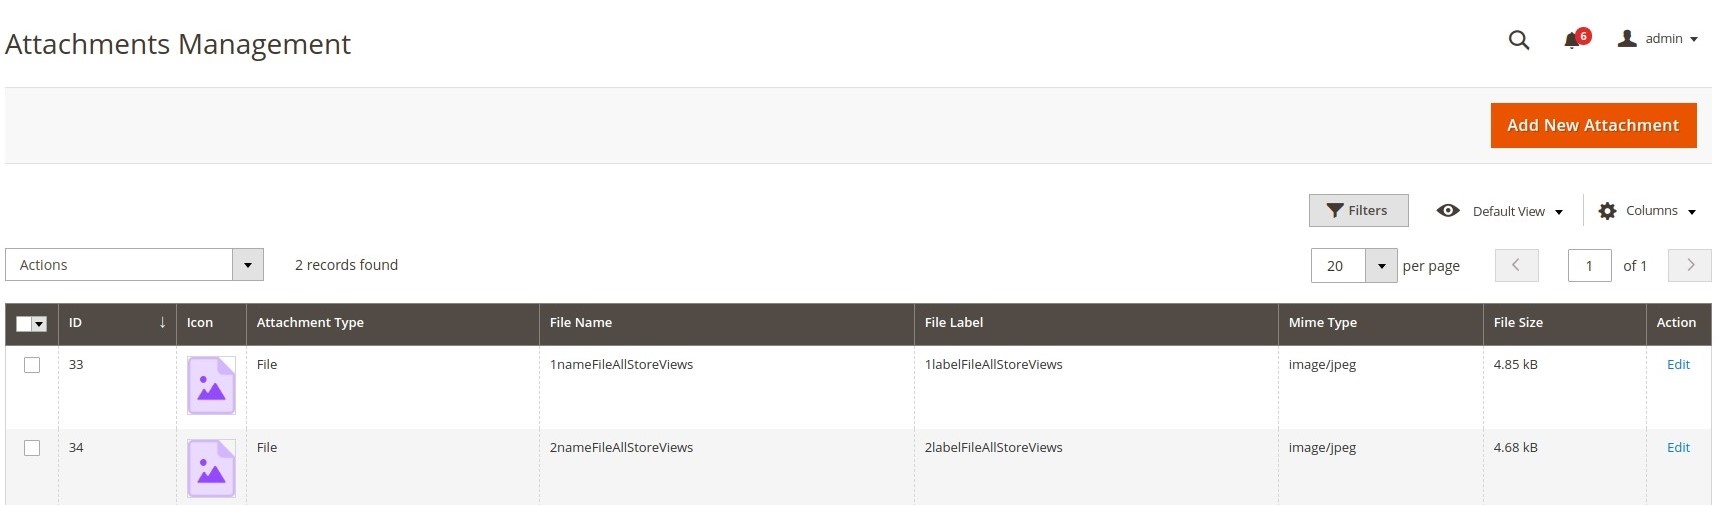
Attachments Management
To see all the attachments please go to Catalog → Attachments Management.

This handy grid helps you track all existing files by ID, icon, attachment type, file name, file label, mime type, and file size. Also, store admins can track the date of file upload and monitor the date of last changes (including changes of products, categories, etc.).
With an active support subscription or product subscription, the Customer Group column will also be available on the Attachments Management grid for monitoring and filtering.
You can add new files to the existing list right from the grid by clicking the Add New Attachment button.
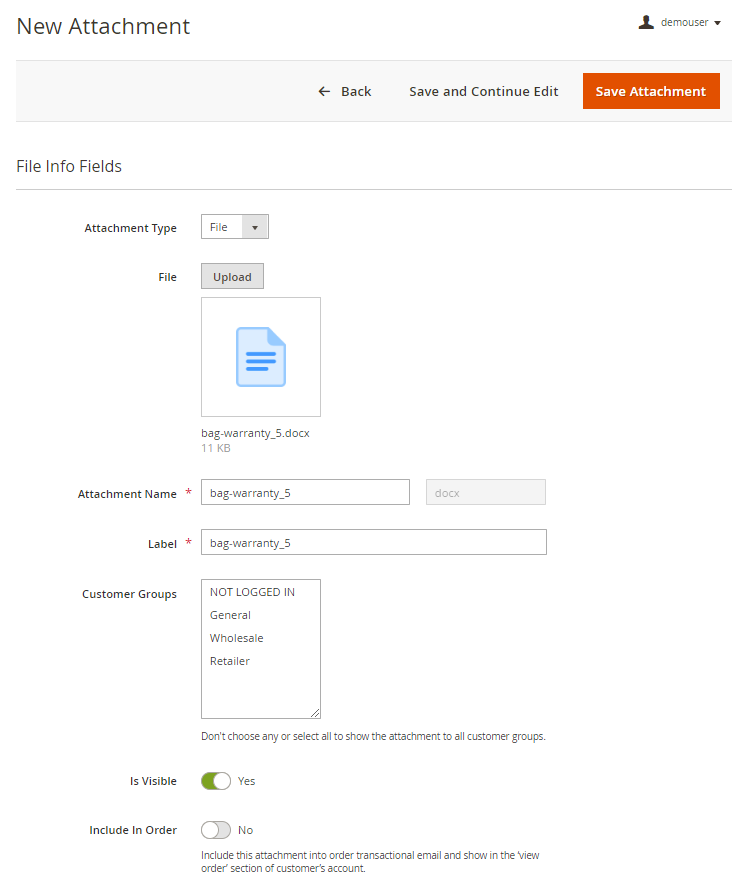
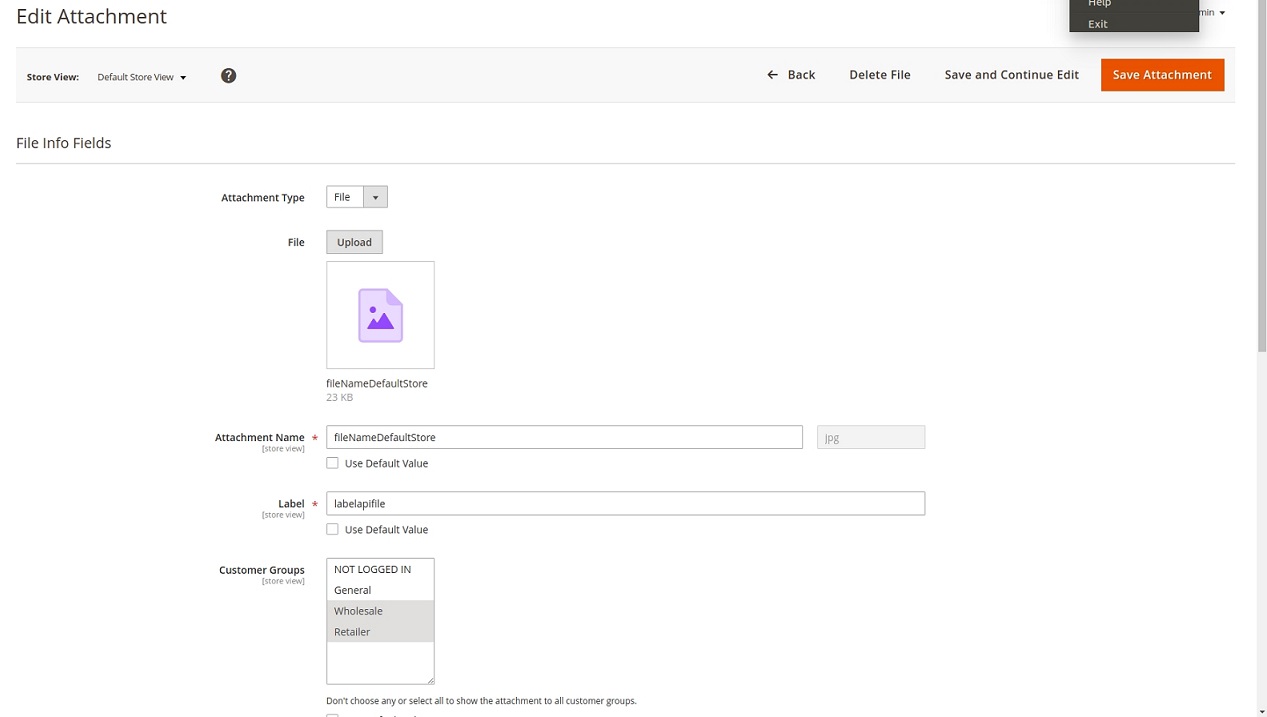
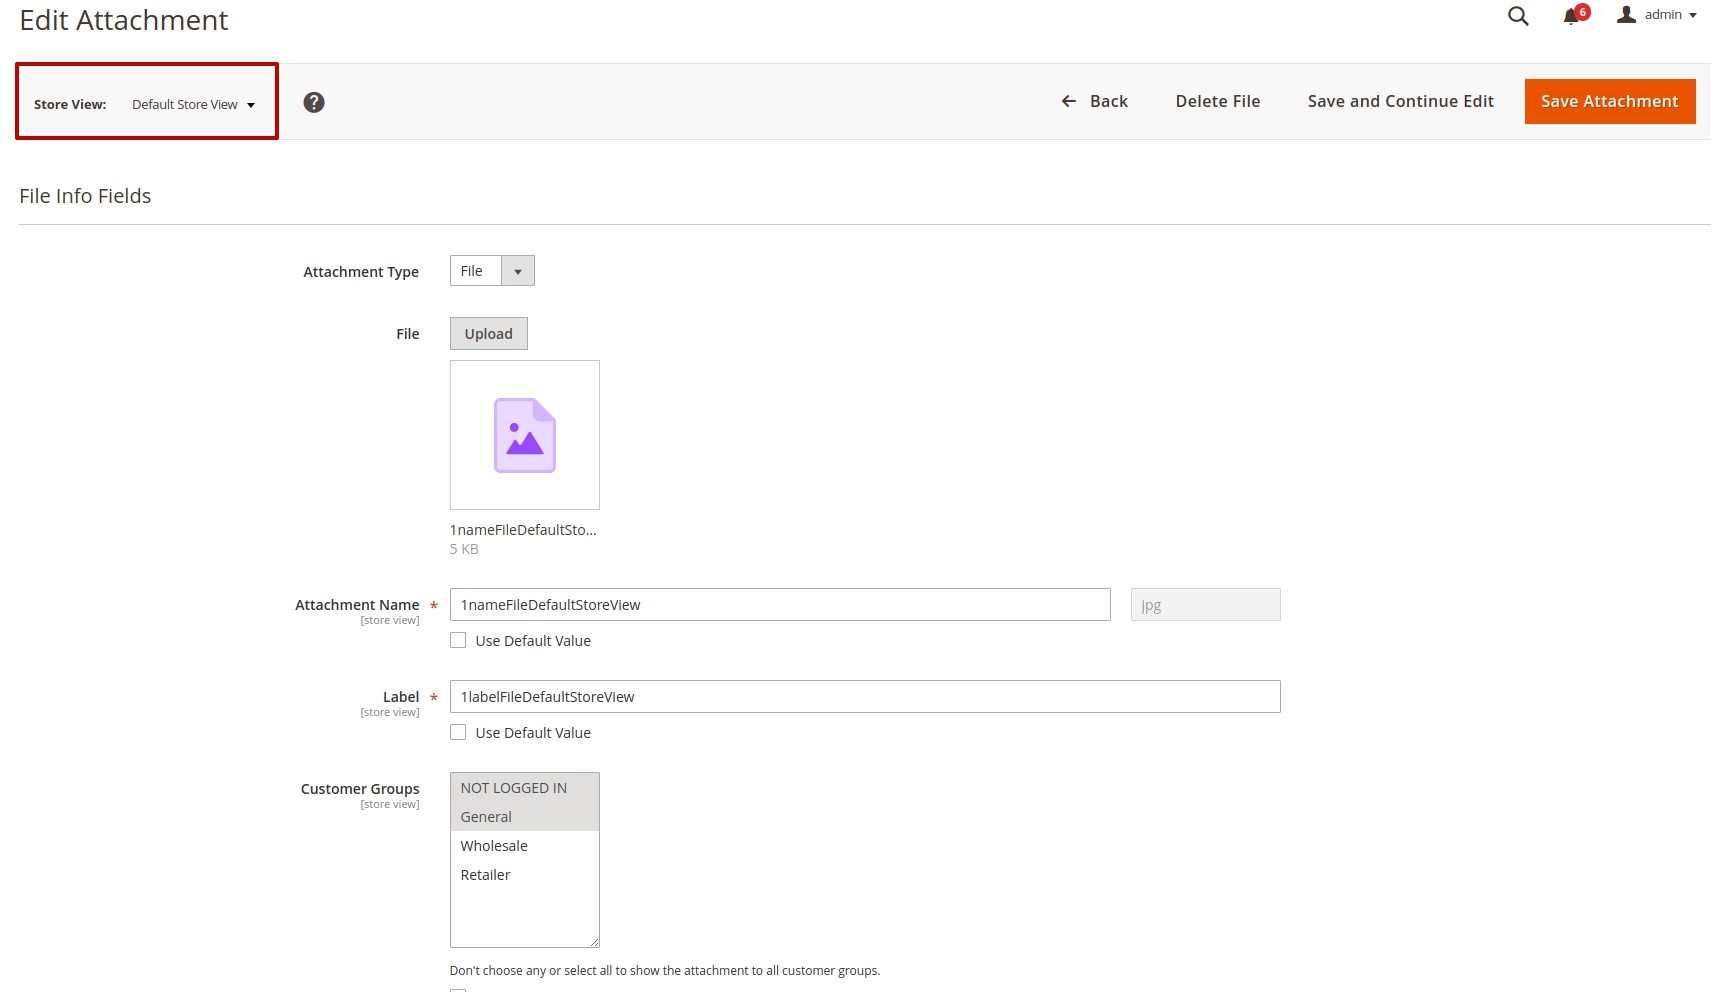
Specify the Attachment Type:
- сhoose File to upload the file of 25+ types
- choose Link to add the link for file downloading
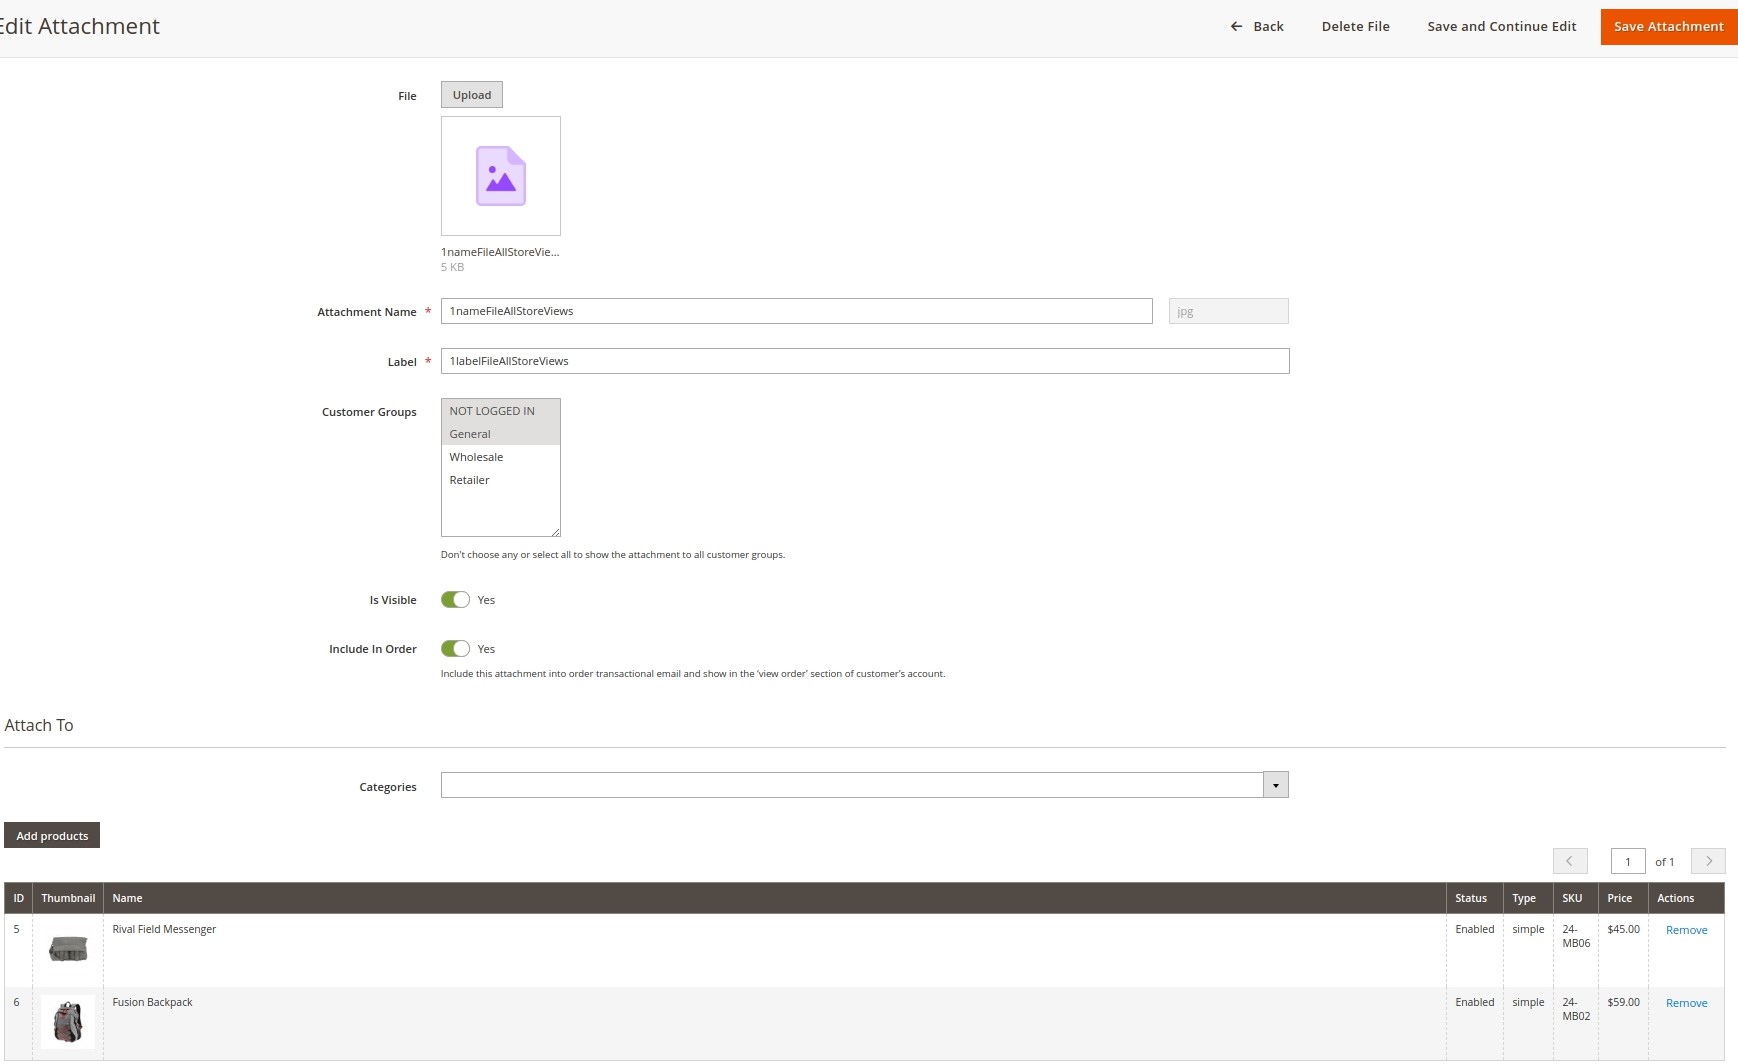
Fill in the Attachment Name, Label and then choose a Customer group to which display the file. Then press the Upload button to select a necessary file.
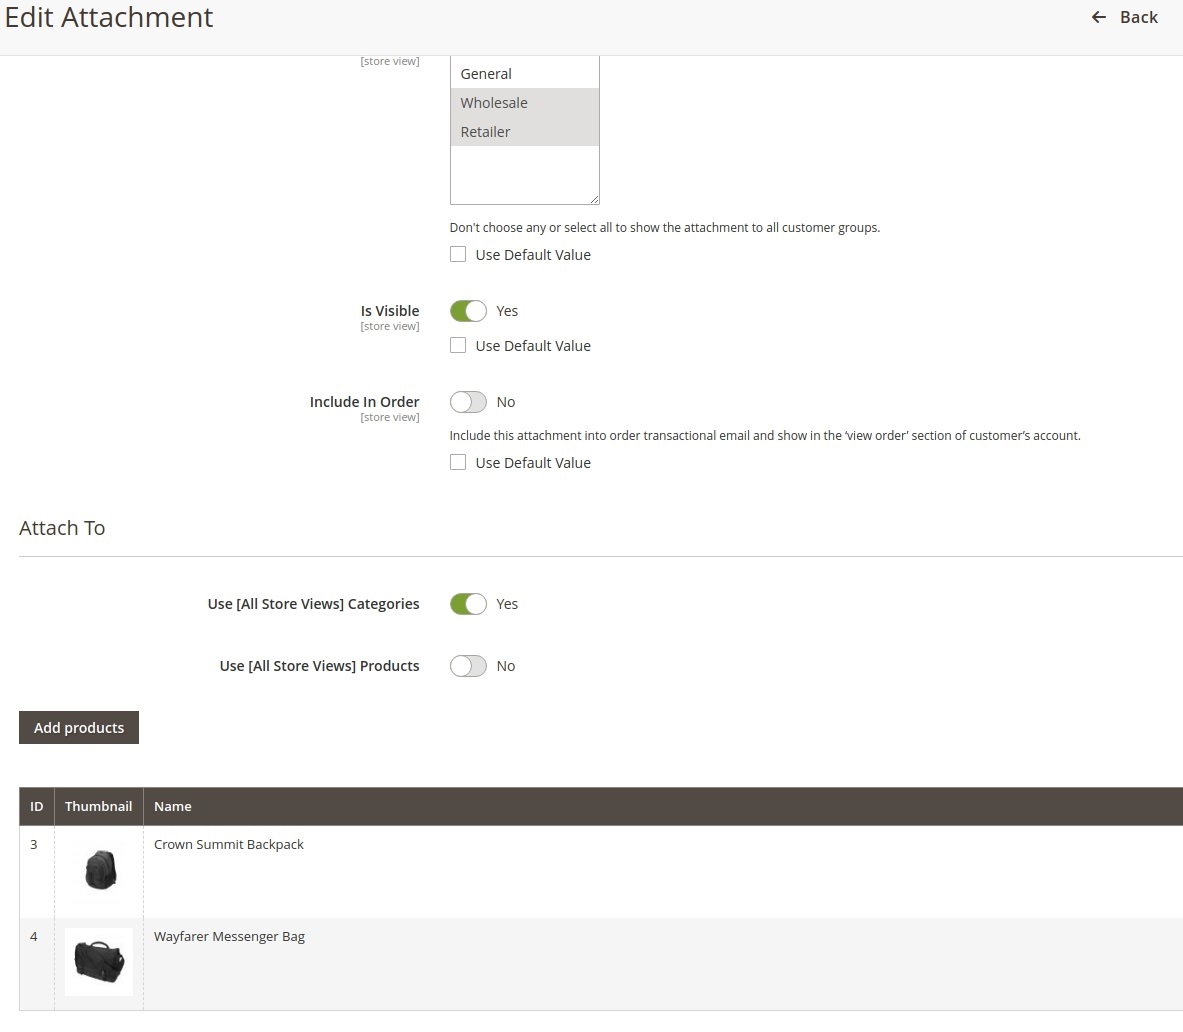
In one click you can regulate the file visibility and include it in order.
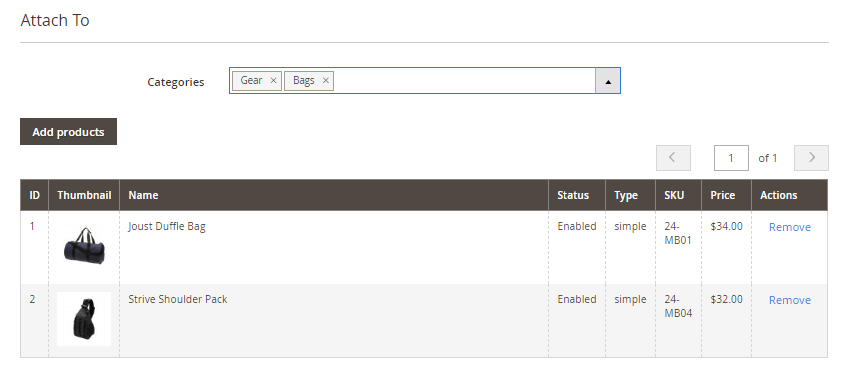
Also you can attach a new file to any category and product you need. Just select necessary categories and add products to attach a new file to them.
The maximum number of products that can be assigned to an attachment on its edit page is controlled by a PHP variable and the server setting max_input_vars. To add more than 100 products to a single attachment, you need to increase the max_input_vars value (e.g., to 5000).
Then press the Save Attachment button to finish the new attachment adding.
Adding an Icon
Make attachments more noticeable for customers with catchy icons. To create a new attachment icon or edit already existing ones go to Catalog → Icon Management.
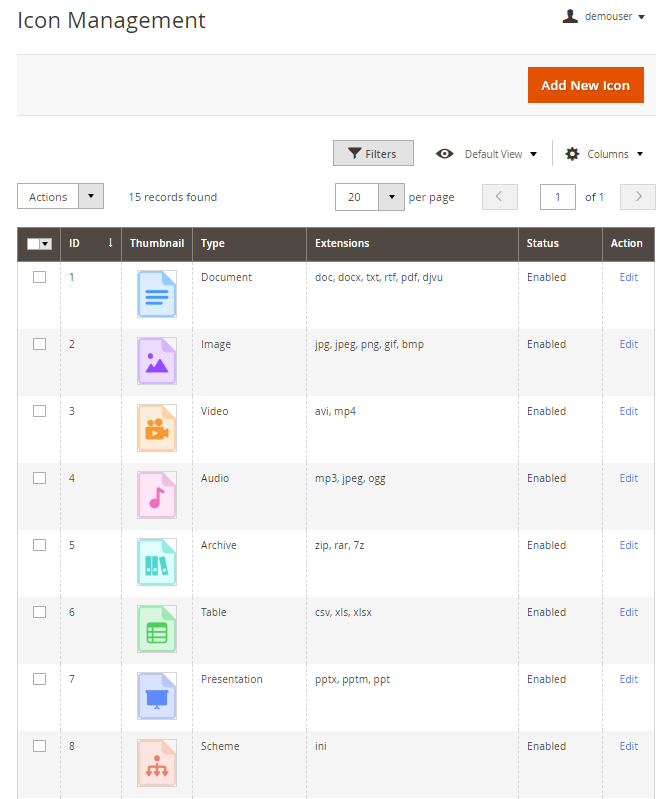
This handy grid allows you to track all existing files by thumbnail, icon type and extension. You can easily check the icon status in the same place.
The module let you add a new icon right from the admin panel by pressing the Add New Icon button.
![]()
Upload the icon you need, specify the file type for which the icon will be used.
The Alt Tag field serves SEO purposes and will automatically be filled in with the Type field value by default. However, you can leave it empty or specify another value if needed.
You can enable the icon displaying in one click. Then add the file extension by pressing the Add Extension button.
Hit the Save Icon button to finish the new icon adding.
Adding Files to the Product Category
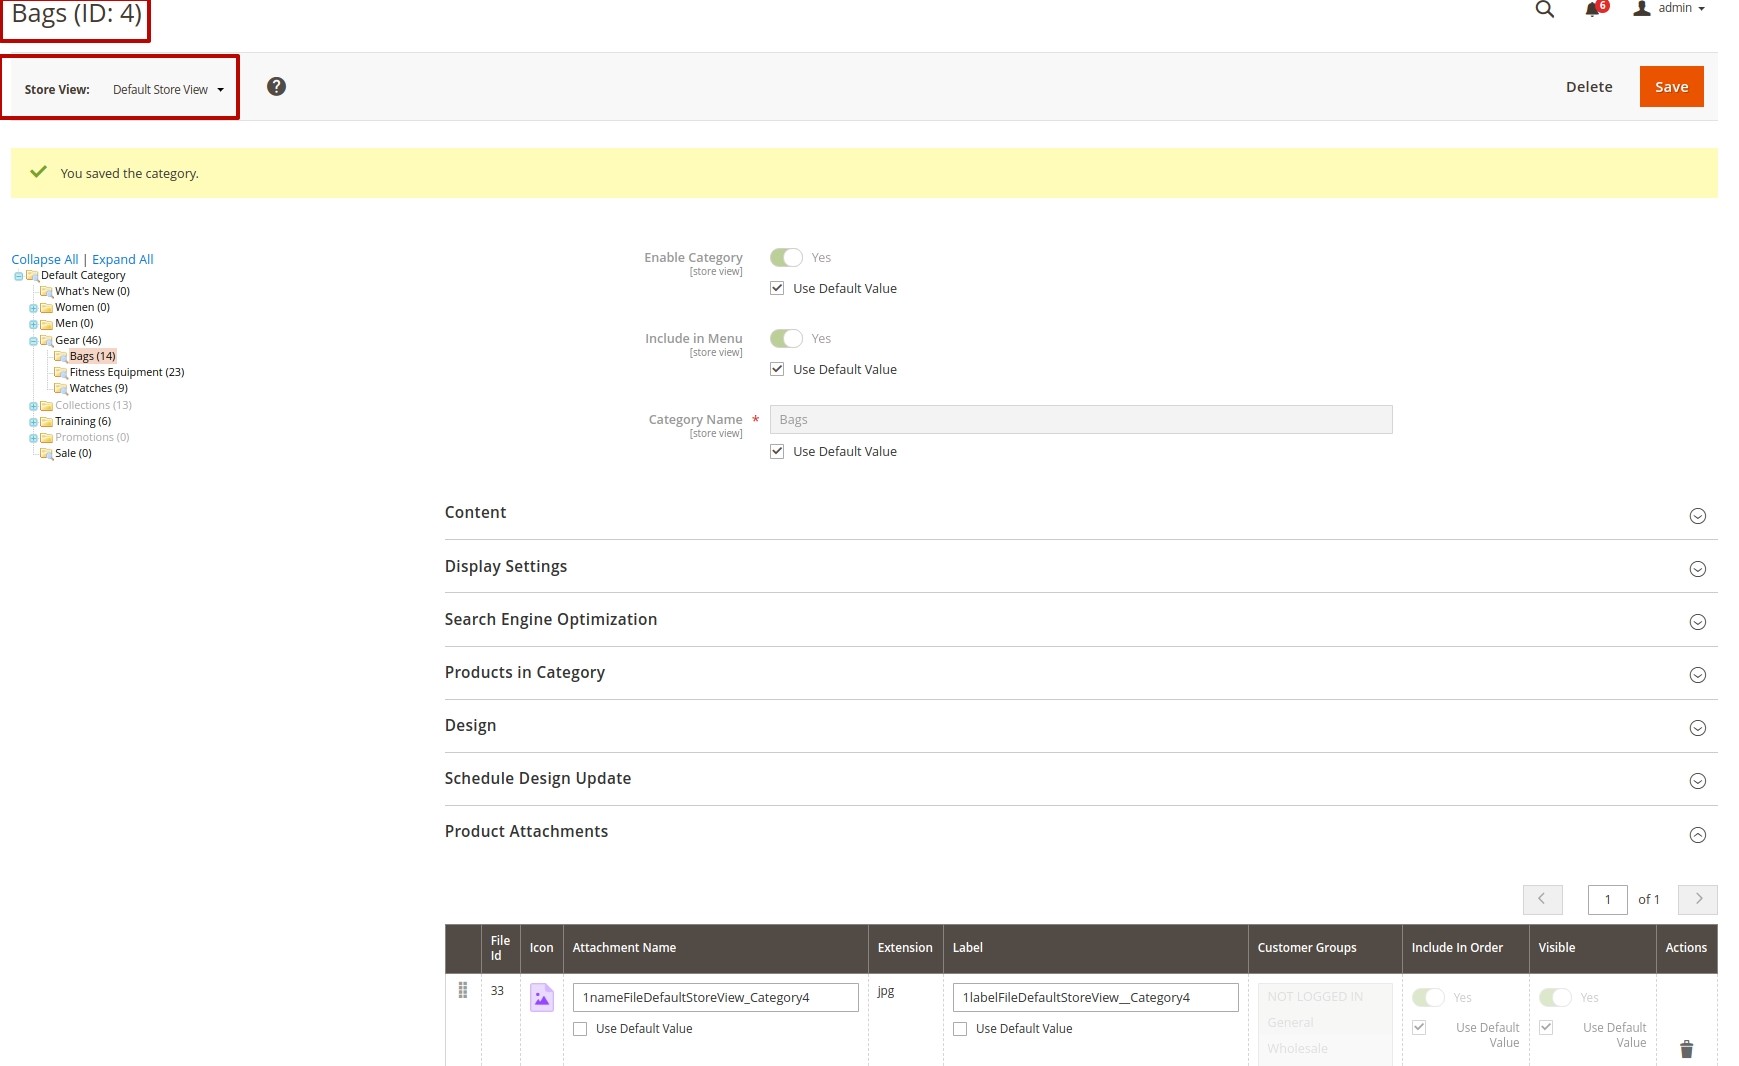
To attach files to any product category, please, go to Catalog → Categories and select any product category to which you want to add files.
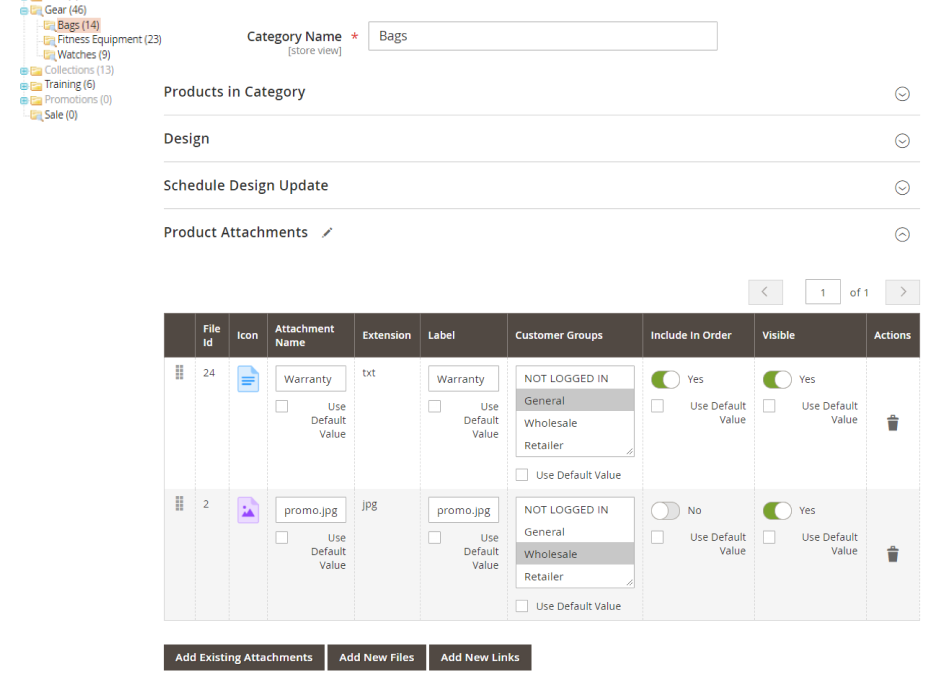
Then, expand the Product Attachments tab. You can add existing or new files or even add new links to the chosen product category. Then press the Save button to attach added files to the certain product category.
Managing Attachments Block via Widget
With the extension it is possible to add Product Attachments Block to any page or position via widget.
To configure the widget, go to Content → Elements → Widgets.

Click the Add Widget button.
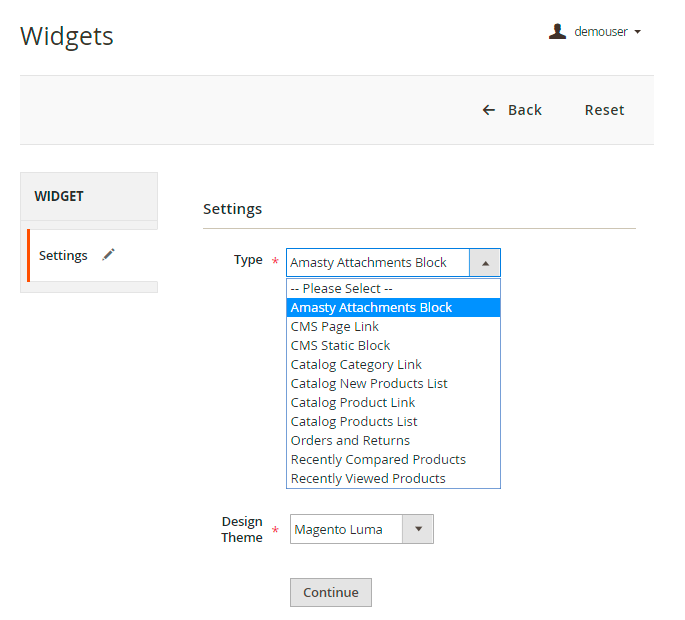
Type - select the Amasty Attachments Block widget type.
Choose the theme and click Continue.
Set the Storefront Properties of the block.

Widget Title - specify the title for the internal usage.
Assign to Store Views - select store views where the widget should be displayed.
Sort Order - set the position of the block in the same container.
In the Layout Updates section you can set any category or product page to display the widget.
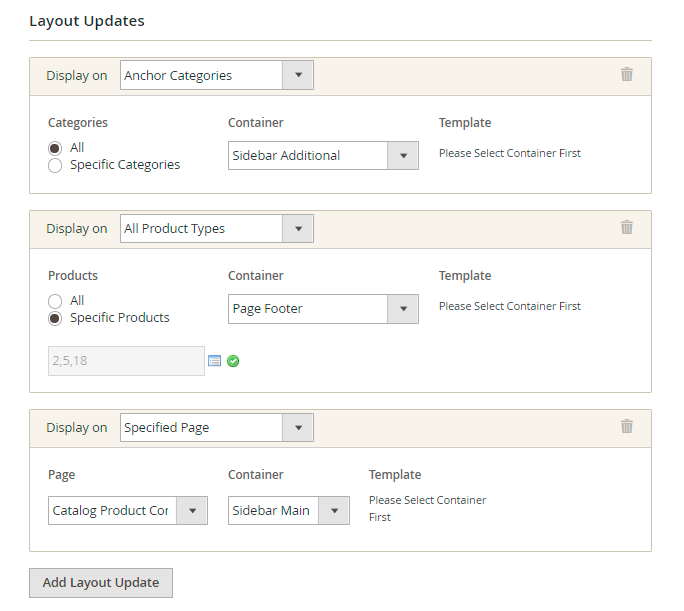
Specify the particular categories or products if necessary. In the Container dropdown menu choose where attachments block should be placed. Add as many pages and positions as you need.
Expand the Widget Options tab.
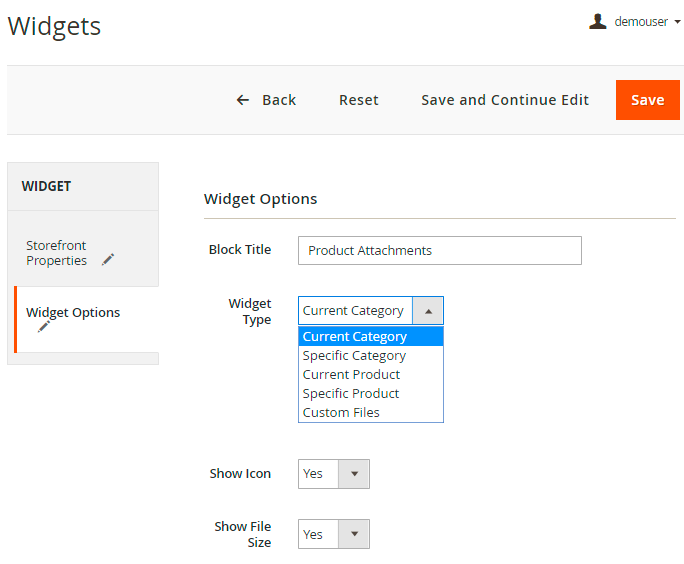
Block Title - specify the title that will be displayed on the frontend.
Widget Type - choose the type of the widget.
You can also Show Icon and Show File Size or hide them if necessary.
Hit the Save button.
Download Reports
Due to the advanced Magento 2 file attachment manager tool you can view and analyze detailed reports on file downloads. Here you can see statistics on what attachments were downloaded, when this happened and who downloaded the file.
To see reports on file downloads please go to Reports → Downloads.
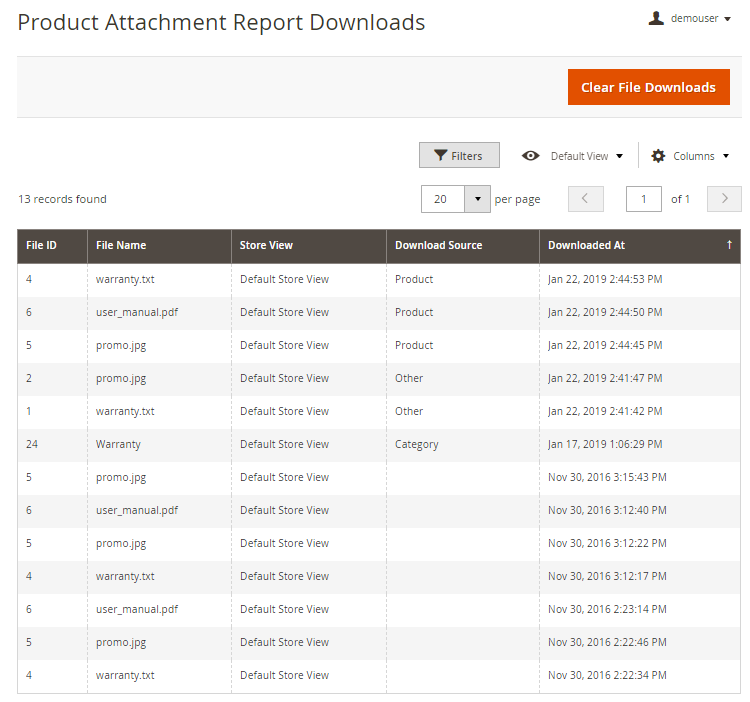
In case you want to refresh the reports download history, click the Clear File Downloads button.
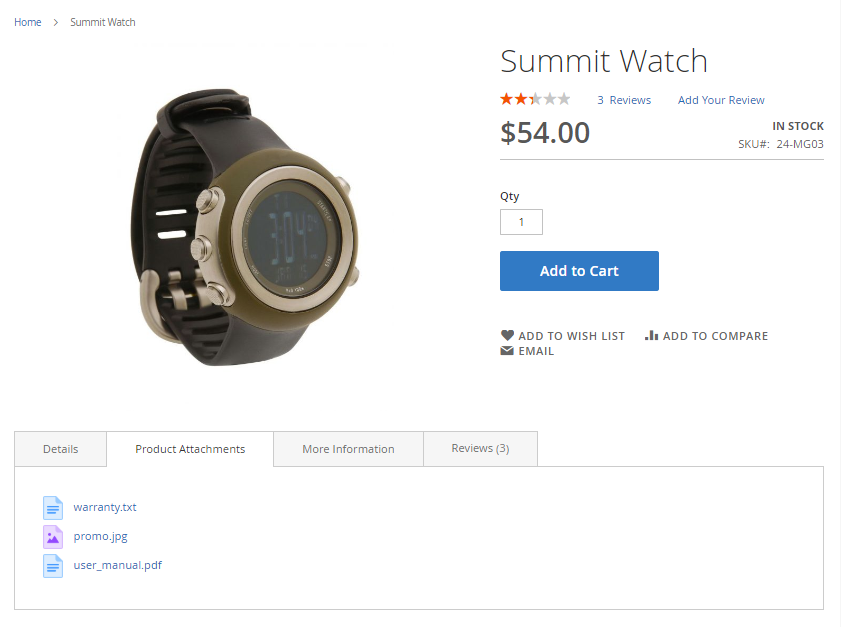
Show Attachments on the Product Page
You can place attachments in the product description block via widgets.
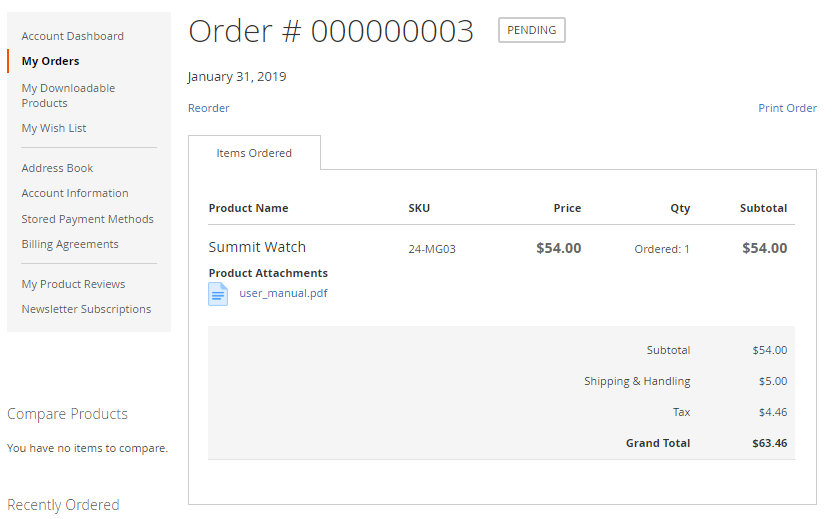
Add Attachments to Orders
Customers can find all attachments regarding completed orders in their accounts. When they view a necessary order in the tab ‘My Orders’, they find corresponded files. All this prevents from losing important documentation regarding the purchased product and its usage.
The extension allows you to place attachments in absolutely any location on product, category and CMS pages via widgets.
Attachments mass-import
With the extension you can import attachments in bulk and assign them to products via CSV-file import.
Go to Catalog, choose Mass Attachment Import in Product Attachments tab.
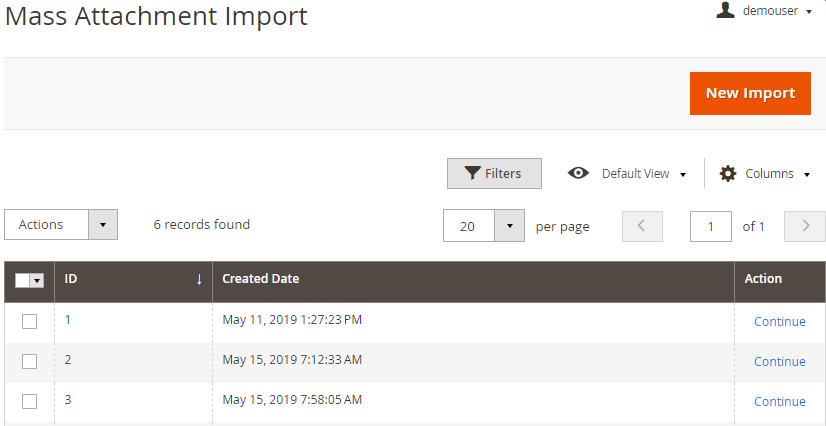
All incomplete imports are saved and displayed in the grid. To complete any of them, press the Continue button. To start a new import process, click New Import.
Step 1. Prepare attachments for import
In this tab upload all the attachments you want to import via Add New File, Add New Link, and Add New Page (for PRO only) buttons.
You can upload your attachments File type in pub/media/amasty/amfile/import/ftp folder.
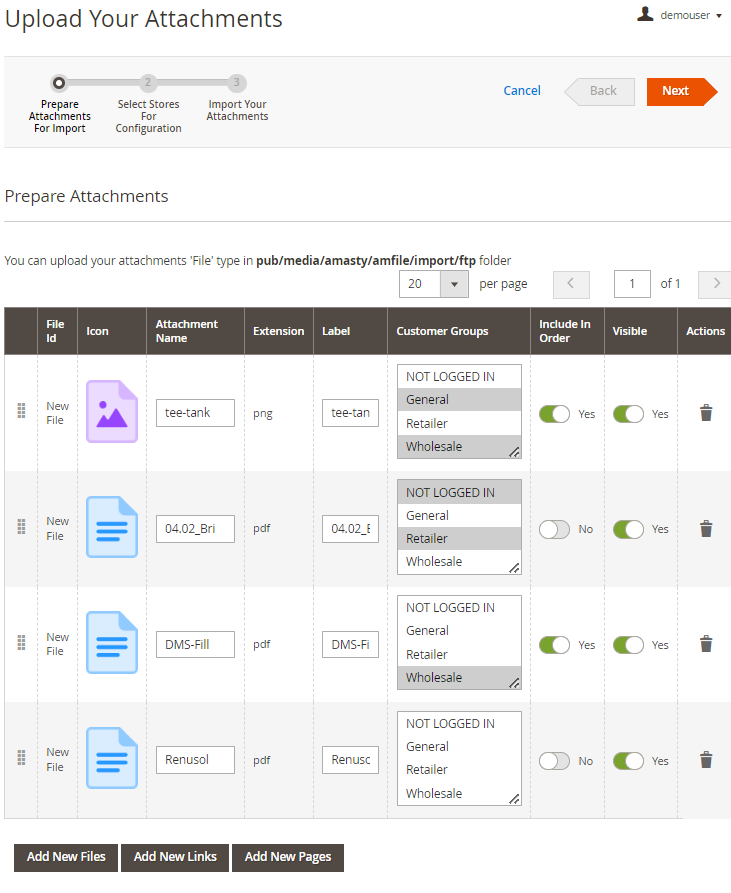
You can change files' names and labels if needed, assign them to the necessary customer groups, include in order and make them visible/invisible right in the grid.
Click Next.
Step 2. Select Stores For Configuration
Here specify store views to which you want to import files.
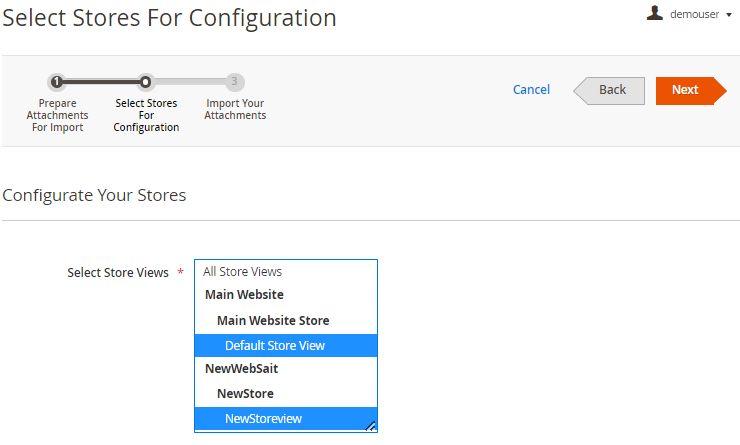
Press Next.
Step 3. Import Your Attachments
In this tab CSV-file is generated.
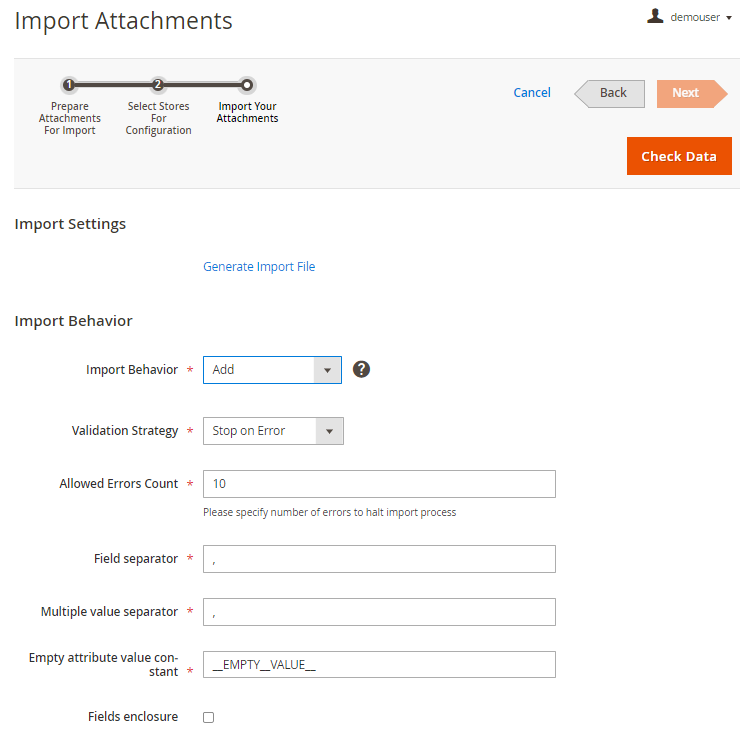
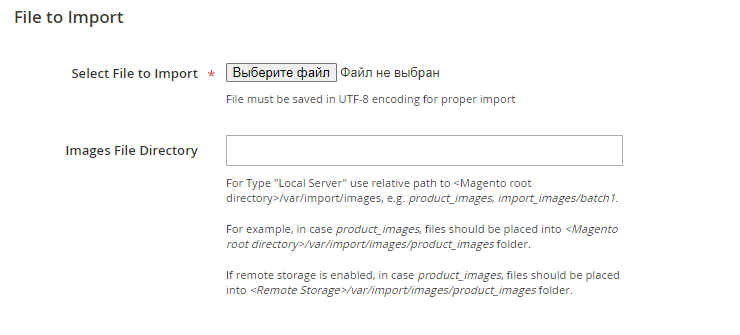
Press Generate import file to download an import sample file.
In the sample you can edit any data presented in Step 1.
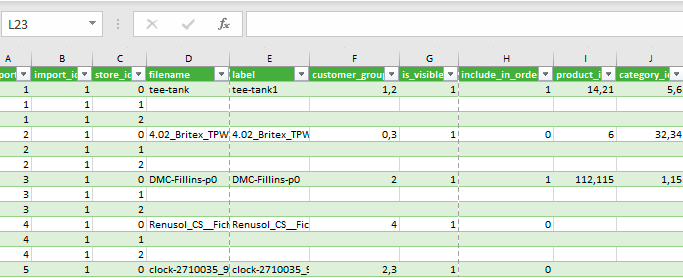
In our case we've selected 2 store views.For example, we have English store view (store_id - 1) and French (store_id - 2). So we can name the same file differently and assign to different categories, customer groups, etc.
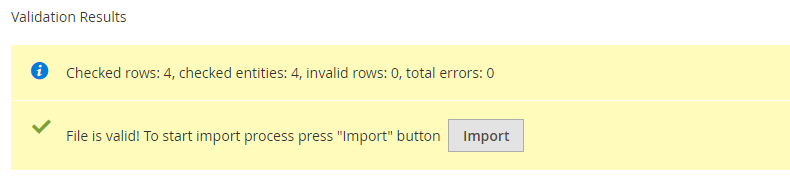
Set Add in 'Import Behaviour' tab.
Press the ‘Import’ button to import stock data.
It is possible to go back to any of the steps, make changes and regenerate import file if needed. All changes are saved automatically, and even if the import was not completed, it will be displayed in the Mass Import Grid so that you could continue importing later.
[PRO] Attachment Categories
Using the Pro package, you can group attachments into particular categories to make product presentation more structured and consistent.

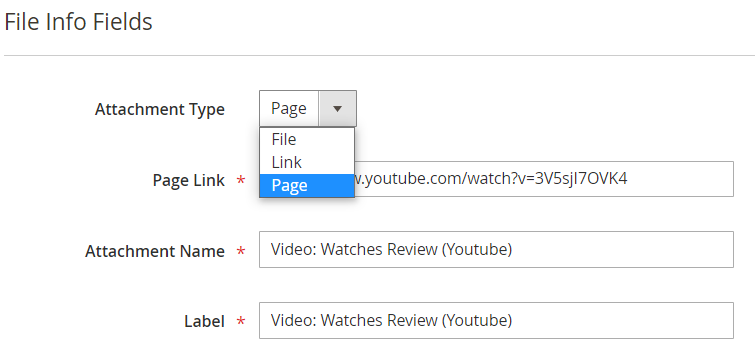
In the Pro version of the extension, one more attachment type is available - Page. This type allows you to use the URL of any web page as an attachment. For example, you can place links to blog articles or Youtube videos in the product attachments tab to provide customers with more detailed information about products.
To create categories, proceed to Catalog → Attachment Category Management.
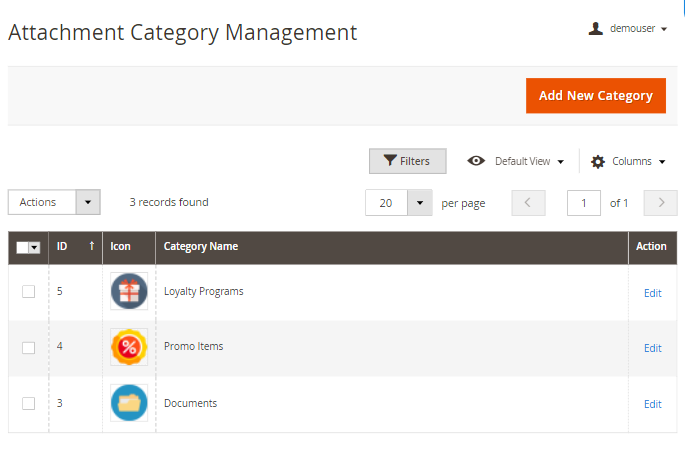
On the grid, you can see all existing categories and manage them.
Add New Categories
To create a new one, click Add New Category.
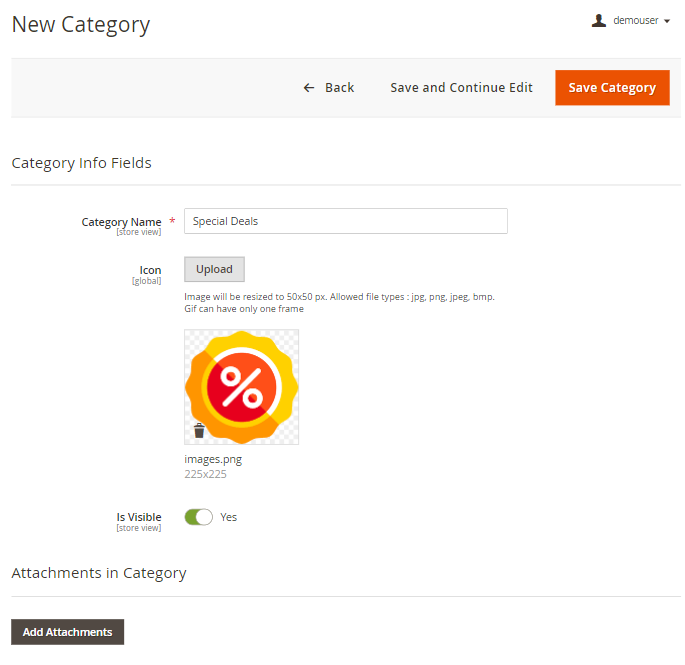
Category Name - specify the category title that will be displayed on both backend and frontend.
Icon - upload an icon that will be displayed before the title.
Please, keep in mind that the image will be resized to 50×50 px. Allowed file types: jpg, png, jpeg, bmp. Gif can have only one frame.
Is Visible - set to Yes to show the category on the storefront.
Assing Files to Categories - choose the files suitable for the category.
[PRO] Attachment Import&Export
The Product Attachments Pro extension allows you to import and export attachment data.
The one-time import&export functionality is available as a part of an active product subscription or support subscription. You can find the amasty/module-product-attachment-export-entity and amasty/module-product-attachment-import-entity packages for installing in composer suggest.
To import attachment data, please navigate to System → Amasty Import → Import → Select Entity → Amasty Product Attachments → choose the needed entity:

To export attachment data, please navigate to System → Amasty Export → Export → Select Entity → Amasty Product Attachments → choose the needed entity:

For more deatailed information about import&export settings configuration, please refer to this user guide.
[PRO] Manage Files via API
Product Attachments Pro also includes the API add-on to simplify file management.
Testing API with Postman
You can track and manage all the files of the Product Attachments extension with an API development environment - Postman. A handy HTTP client allows to create all necessary queries, put them into collections, and test apps automatically.
To download a ready-made collection for automated API testing click here:
collection-v2.zip
API support can be enabled only after purchasing an API Add-On to Product Attachments extension.
Setting up the Environment
The environment is set up in 3 steps:
1. Open Manage environments form:
2. Set the following variables:
- magento_api_url: https://magentourl/index.php/rest
- admin_username: your admin username
- admin_password: your admin password
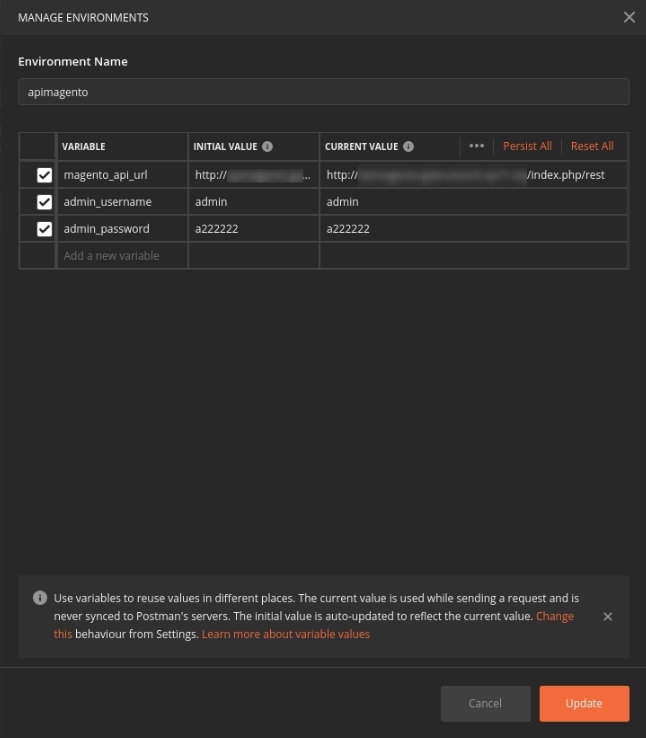
3. Select the created environment:

The specified variables can be used in further queries.
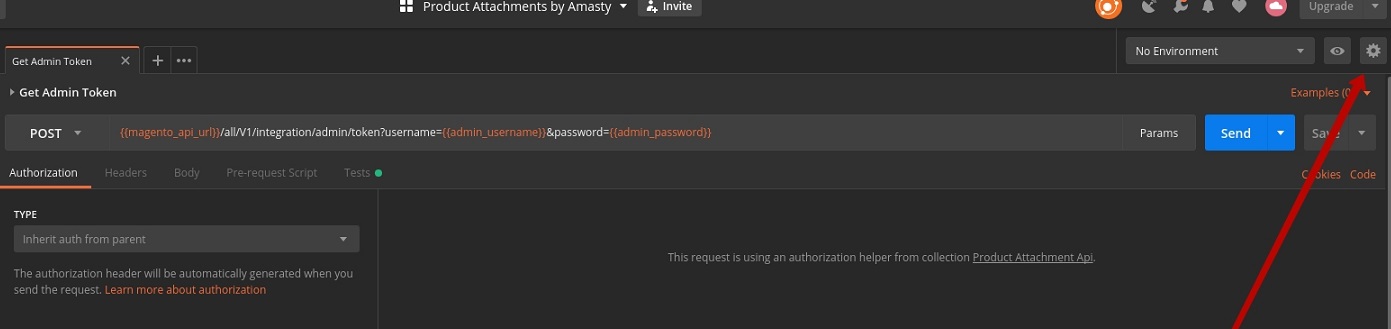
Backend API Testing: Getting Admin Token
To work with API, you need to authorize and get admin token.
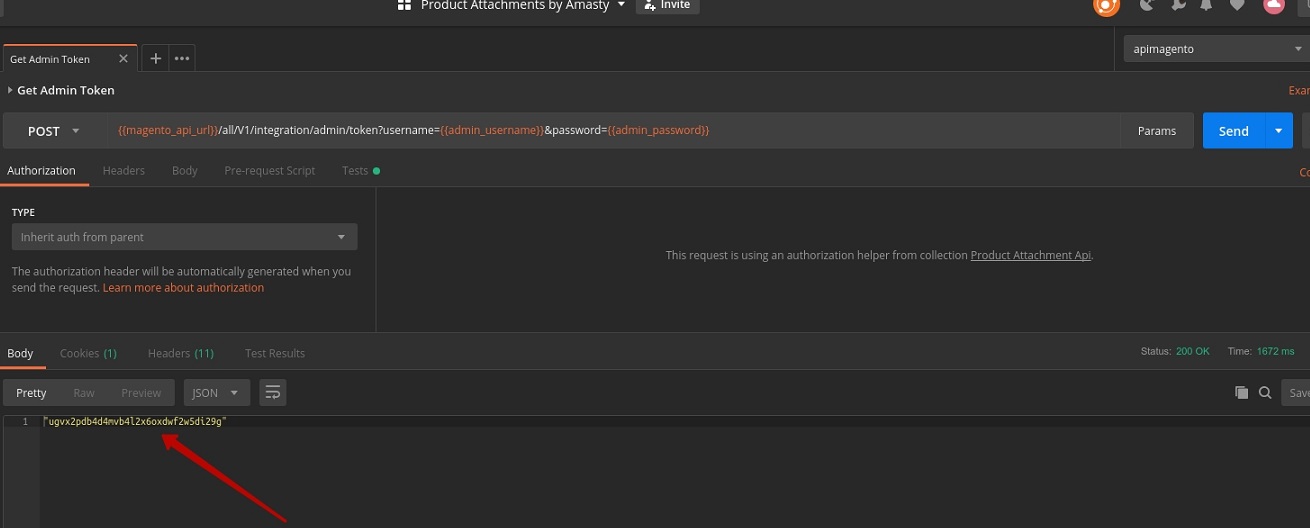
Start a POST request.
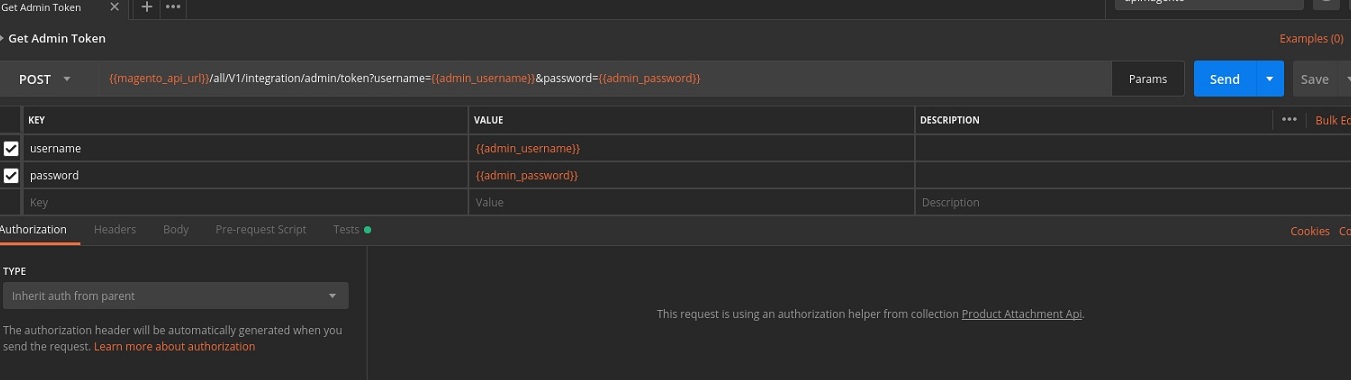
Hit the Send button.
The token will be generated in the response to the request.
Backend API Testing: Basic Operations
In Magento 2 Product Attachments admin can view, upload, edit and delete files.
In Postman the queries are the following:
- GET
- POST
- PUT
- SEARCH
- DELETE
Every time you want to perform operations as an Administrator, you need to authorize with Admin Token. Insert into the Token field:
{{adminToken}}

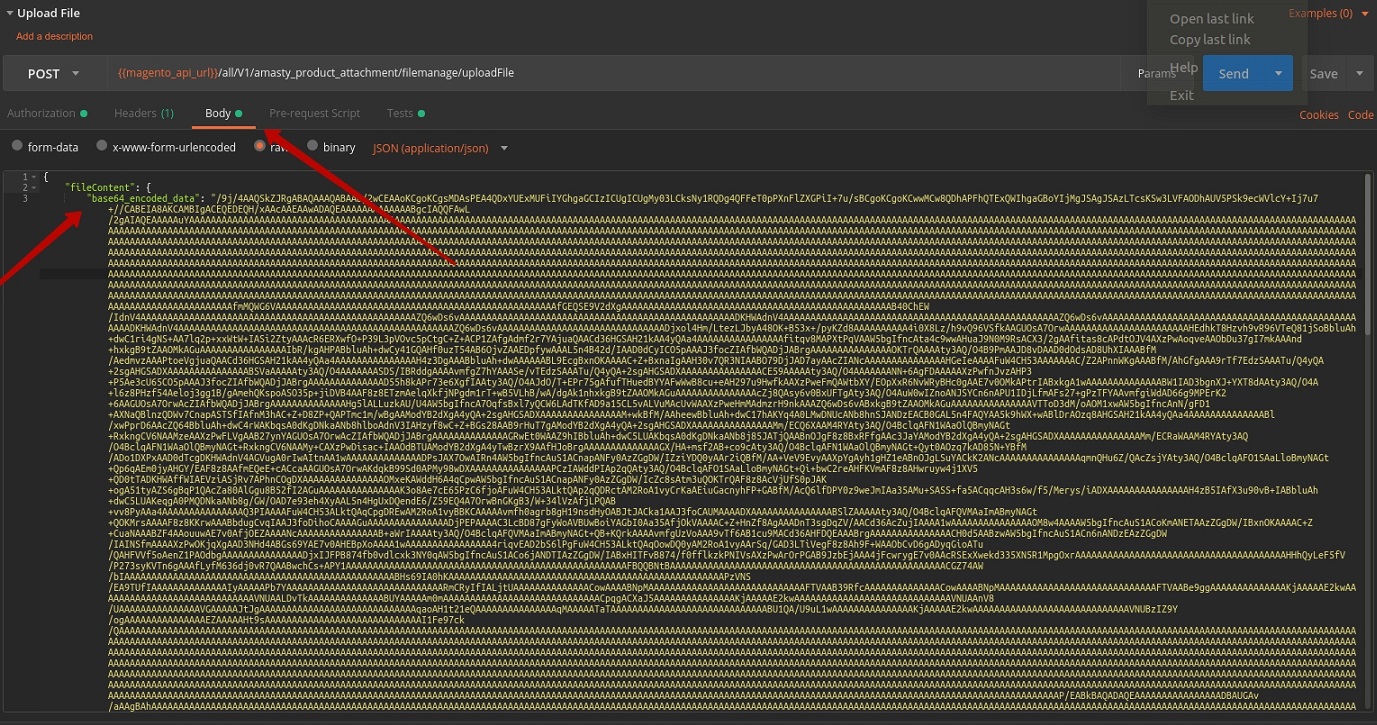
Upload the File
To test file uploading, use the POST query. First of all, encrypt the picture in Base64. To upload the file, insert “string” into “base64_encoded_data”.
This is how it reads: “base64_encoded_data”: “string”:
Check if the file is uploaded successfully and set it for use in further requests if needed:

The response is positive, now you can use the uploaded file for testing the Save Uploaded file query:

Save the Uploaded File
To save the file, use the POST query as well:
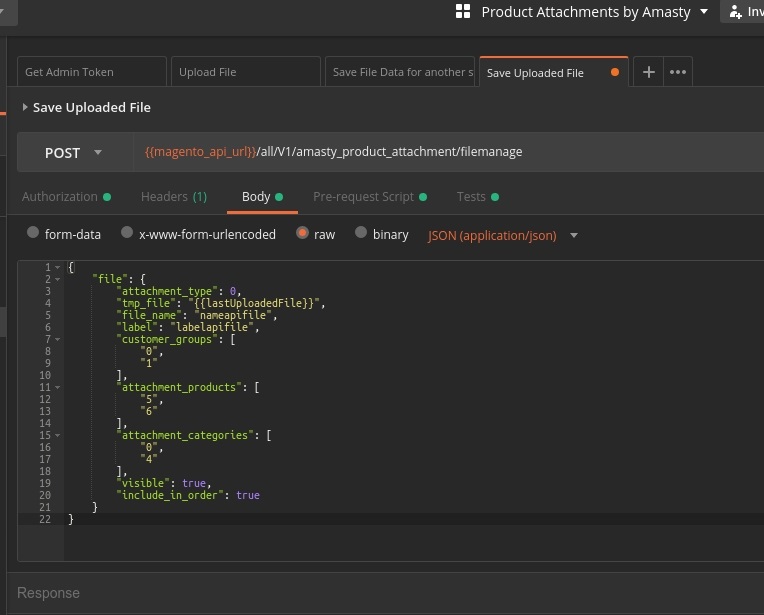
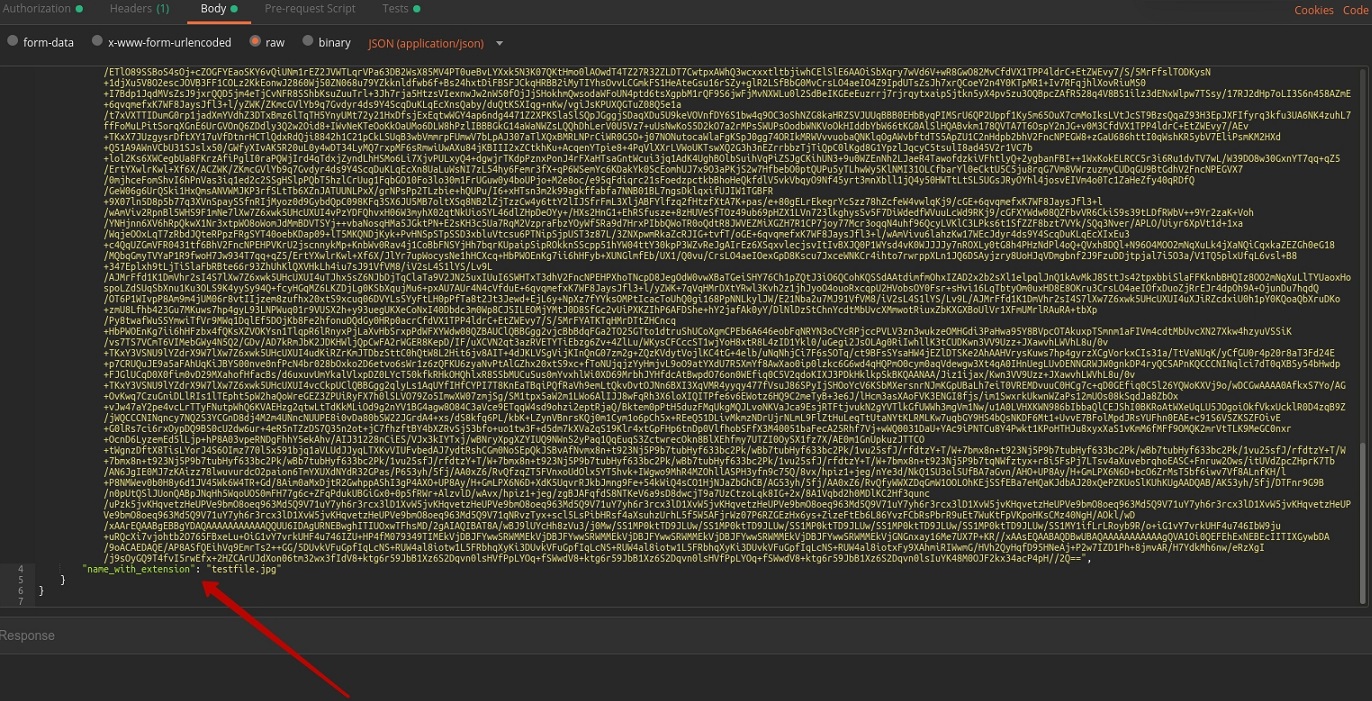
We add the loaded file “tmp_file” and write out the file data: name, label, etc:
{{lastUploadedFile}}
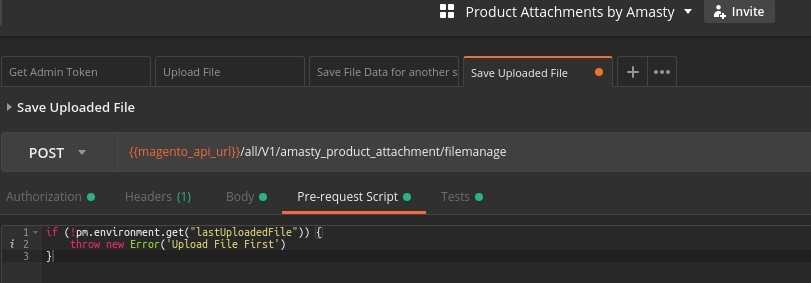
Before saving the file, make sure it was loaded. Check it with the help of a pre-request script. This script should be run before the actual request:
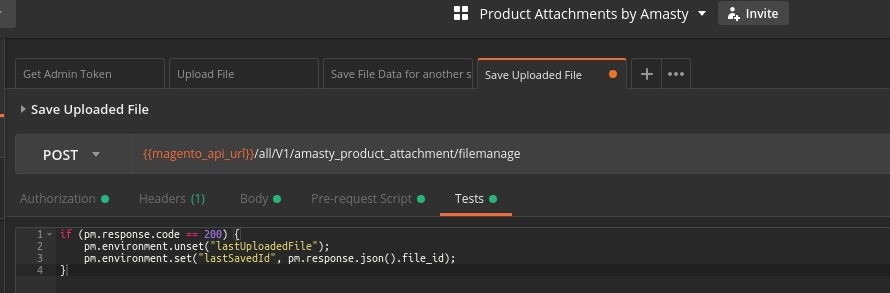
Unset the uploaded file and configure the settings to use it in the latter requests:
The file has been saved successfully:
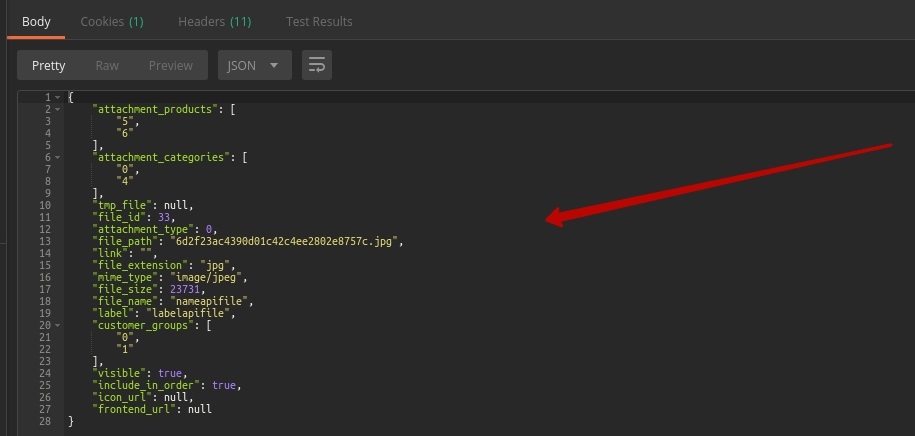
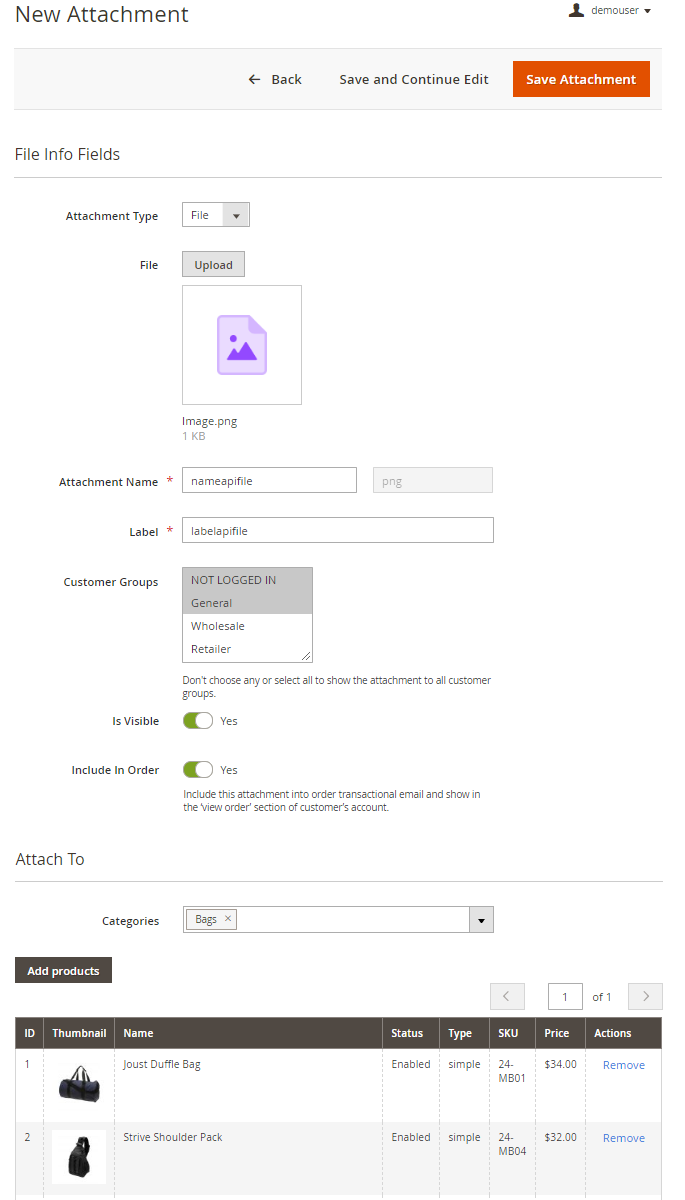
Make sure the data on the file match our Magento 2 Product Attachments settings:
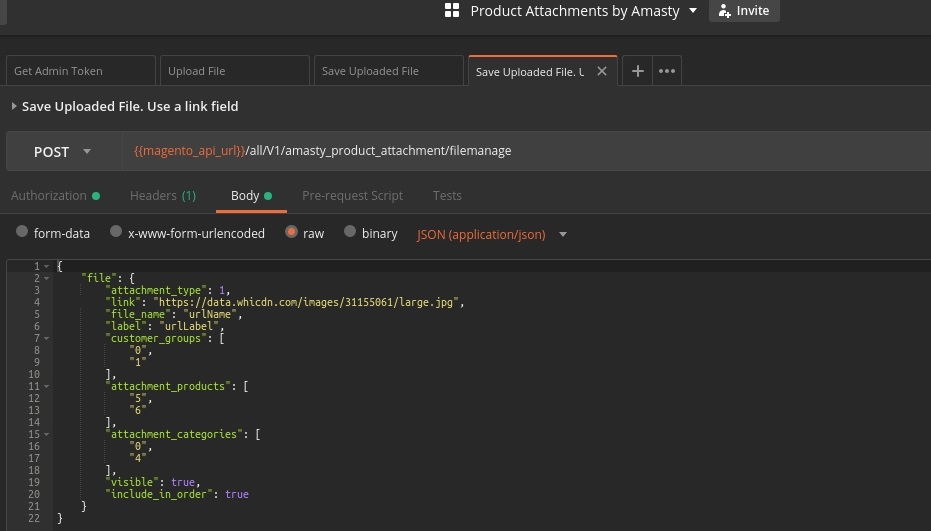
You may also save the uploaded file with the help of its URL (using a link field).
Save the File Data by the URL
In this case POST request is also used. Input the URL that points to the file location. Then set the file name, label, etc., and hit the Send button:
The response is positive:

The file has been saved.
Get File Data by the File ID
Get queries let you output the information on a certain file attached to a product. Admin can perform this operation for Default Store View and for All Store Views.
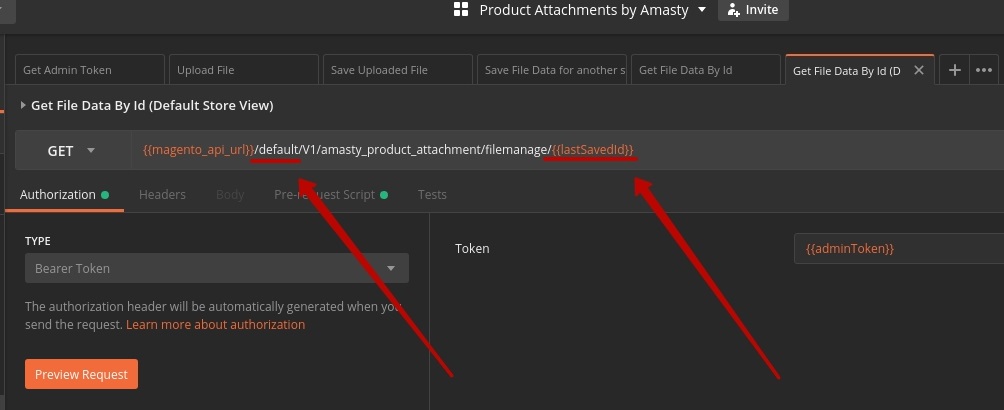
Let's get the data on LastSavedId with the help of the GET query.
Set the URL indicating the needed Store View and the file id:
Pay attention to a Pre-request Script. Before outputting the info about the file, make sure it has been saved:

If the file is missing, upload and save it.
Сheck if the information in the extension settings matches the info for the uploaded file:
The response request is positive:
Search for the File
Postman allows to create search queries by any specific attribute. You can also sort the search results the way you want to, reorder them and set the number of the results to be displayed in the response section:
Let's see an example.
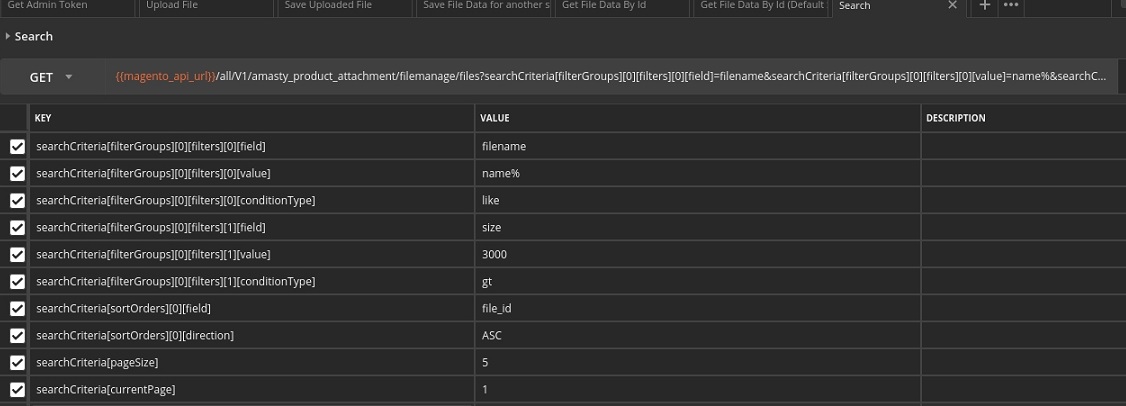
You are going to search for the attachment with the name starting with “filename” and with the size greater than 3000 Bytes. And you want the results to be sorted by id in the ascending order with 5 files per page.
Start with breaking the query into lines:
{{magento_api_url}}/all/V1/amasty_product_attachment/filemanage/files?
1. File name starts with “name”:
searchCriteria[filterGroups][0][filters][0][field]=filename&
searchCriteria[filterGroups][0][filters][0][value]=name%&
searchCriteria[filterGroups][0][filters][0][conditionType]=like&
2. The size is greater than 3000 Byte:
searchCriteria[filterGroups][0][filters][1][field]=size&
searchCriteria[filterGroups][0][filters][1][value]=3000&
searchCriteria[filterGroups][0][filters][1][conditionType]=gt&
3. The results are sorted by id in ascending order:
searchCriteria[sortOrders][0][field]=file_id&
searchCriteria[sortOrders][0][direction]=ASC&
4. The number of files per page is 5 and the number of page for viewing is 1:
searchCriteria[pageSize]=5& searchCriteria[currentPage]=1
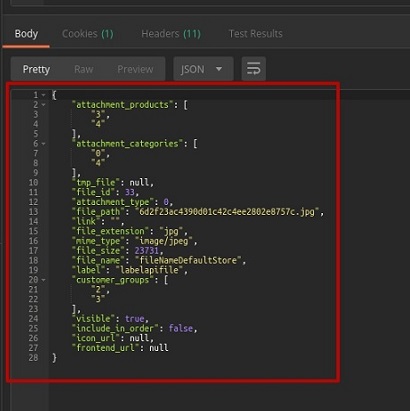
So 3 files are uploaded , and 2 of them meet the search query:
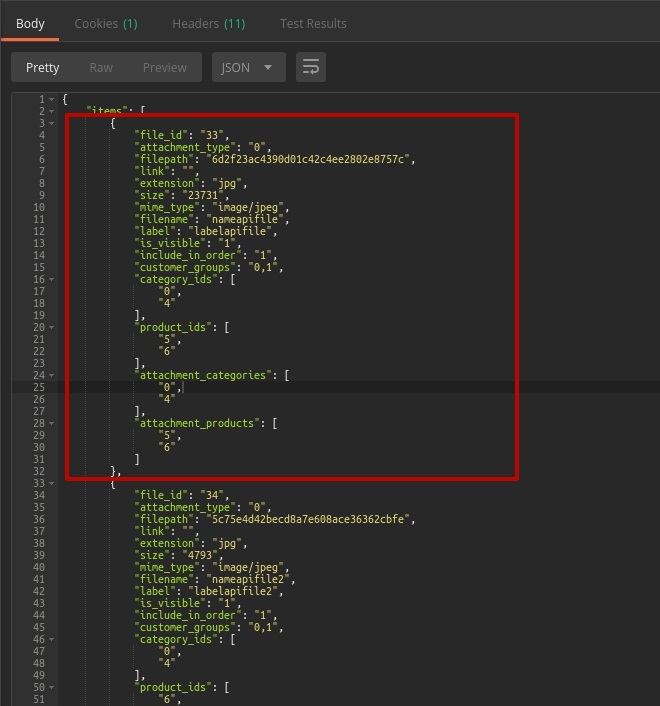

Compare it to Product attachments settings:

Delete the File
For example, you've decided to delete the last saved file. So, input the file id in the URL and see if the file is saved with a pre-request script:
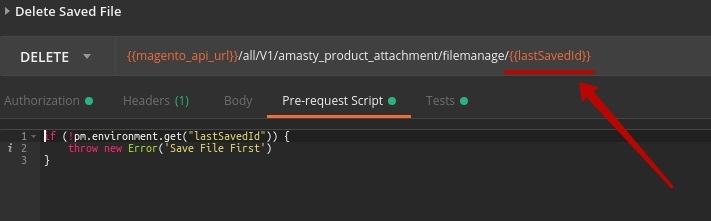
After the file is saved, you can go back to testing the delete function and unset the file:
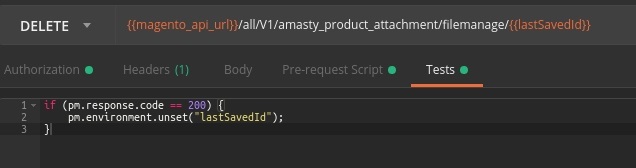
The file is deleted.
Check the result in the extension settings:
BEFORE

AFTER

Now you are sure the file has been deleted.
Frontend API Testing: Getting Customer Token
While the Backend API testing deals with admin users’ interactions, frontend API testing does the same for the customers. The operations they perform are not the same.
To test operations that customers perform, you need to log in as a registered customer and get a customer token.
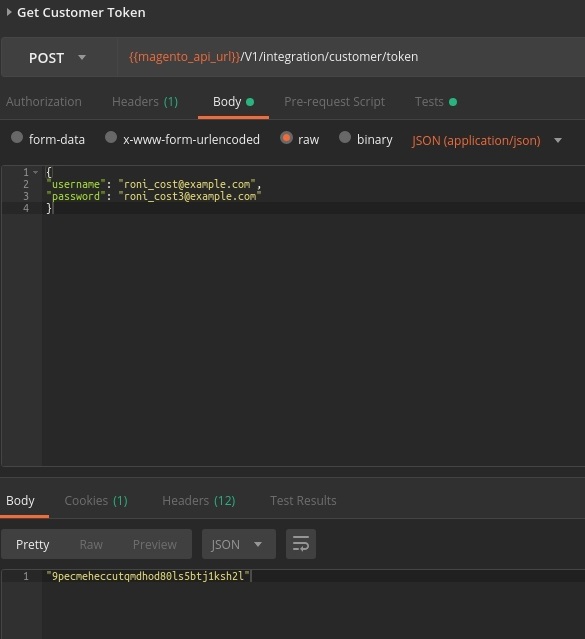
The algorithm is similar to the process of getting an admin token.
Input the username and password of a test registered customer in the body and click Send:

Here is the Customer Token.
Now you can use this token in Tests tab.

Unlike admin users, visitors and customers can only view or download files. You can test it using Get queries.
Get Files for Product
This test refers to the Default Store View and works with Logged in customers.
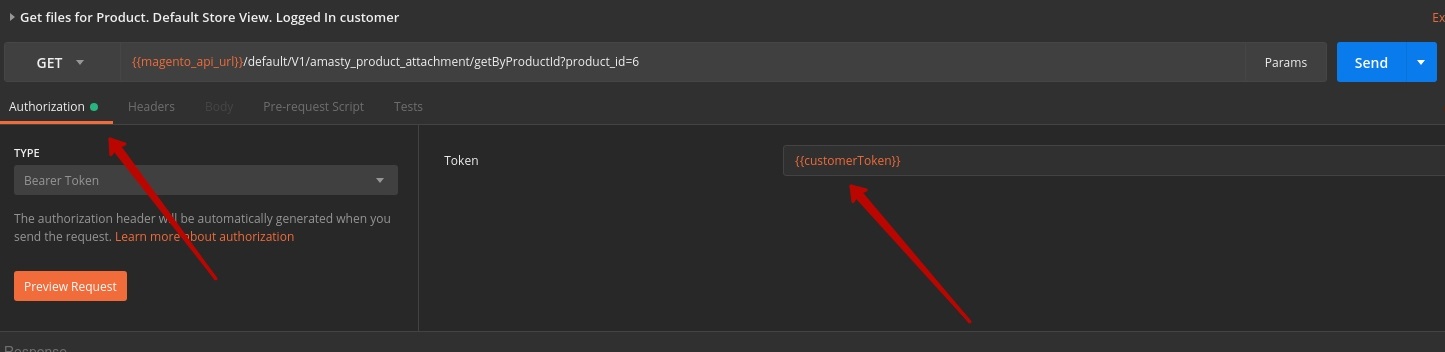
To see the attachments of a given product available for a registered customer in a particular Store View, use the GET method.
Input the Store View and the product ID in the URL:

To use the Customer Token you have got previously, input in the Token field:
{{customerToken}}
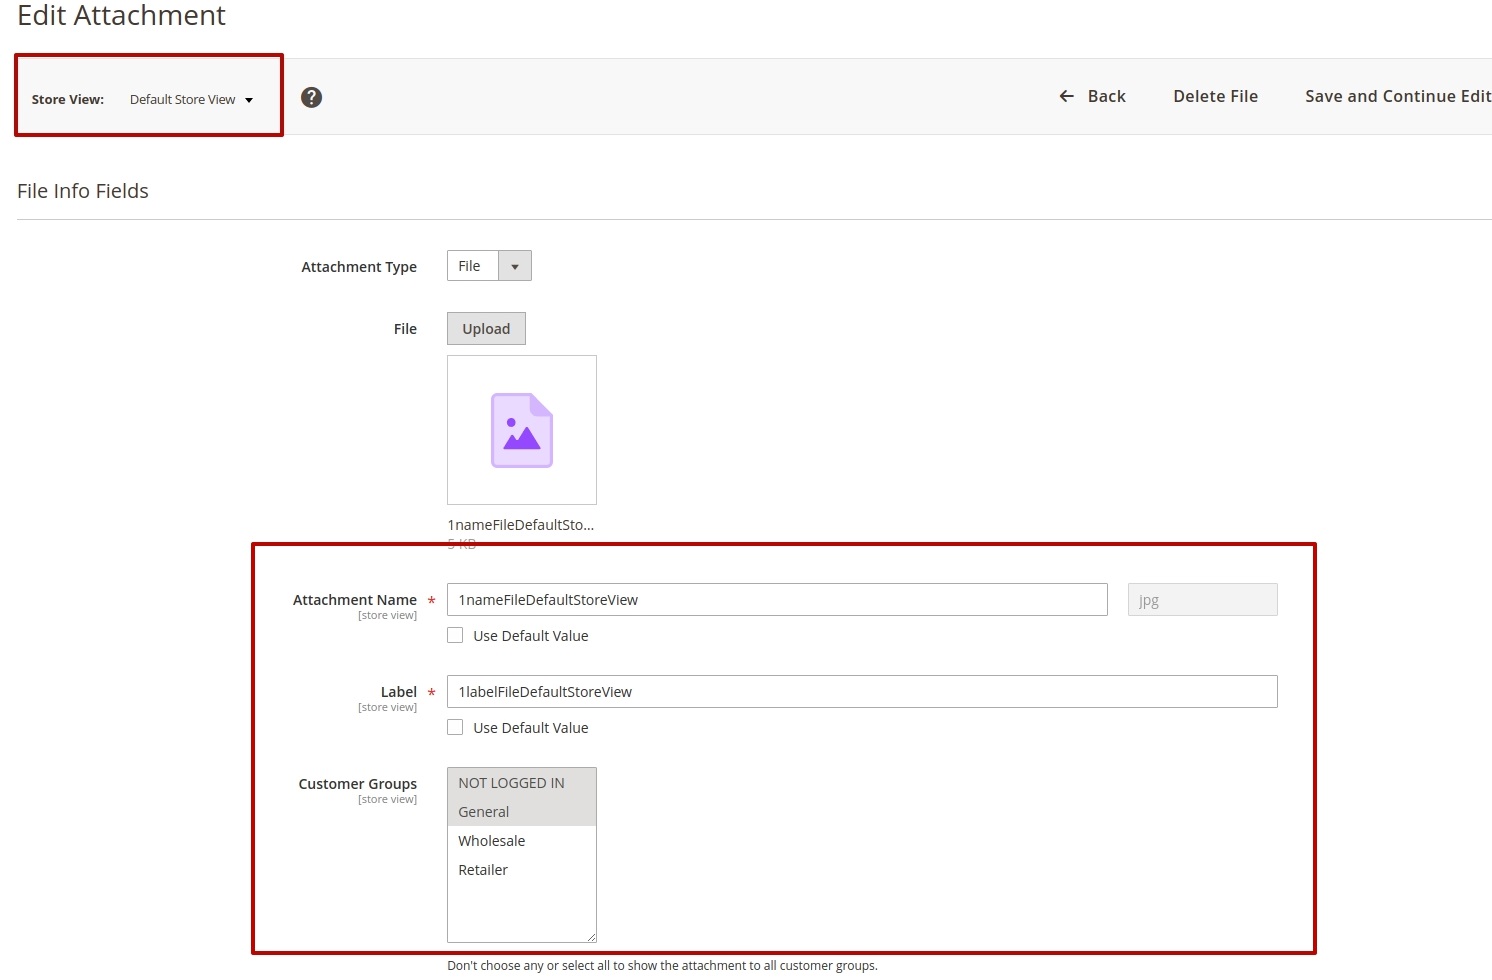
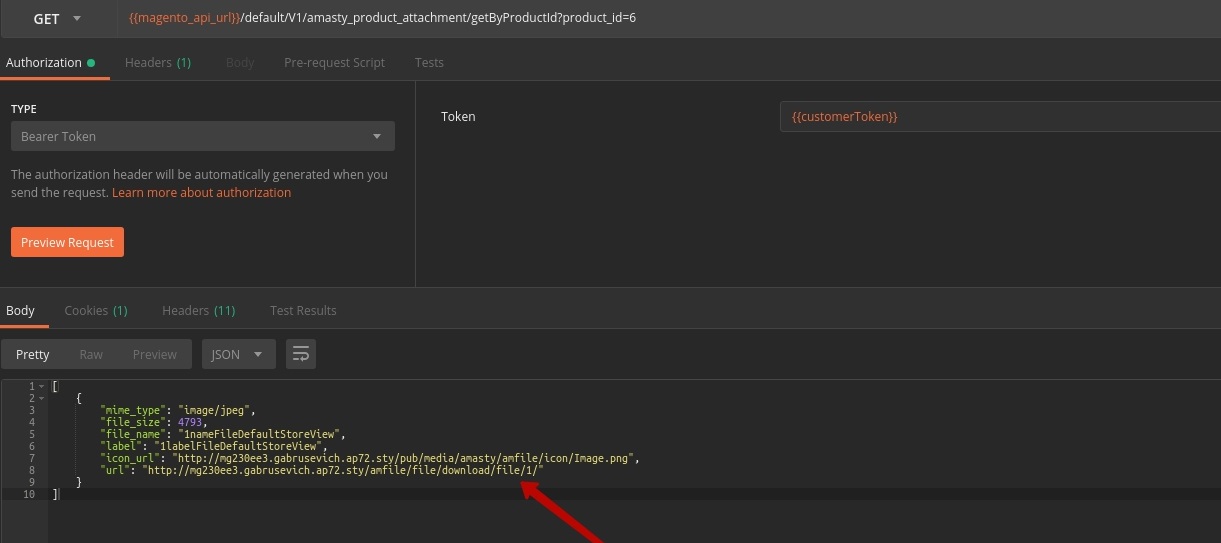
Here we see that 2 files are attached to the product with the specified ID:
- The first attachment is available for a registered user:
- The second one is not visible for a registered customer:
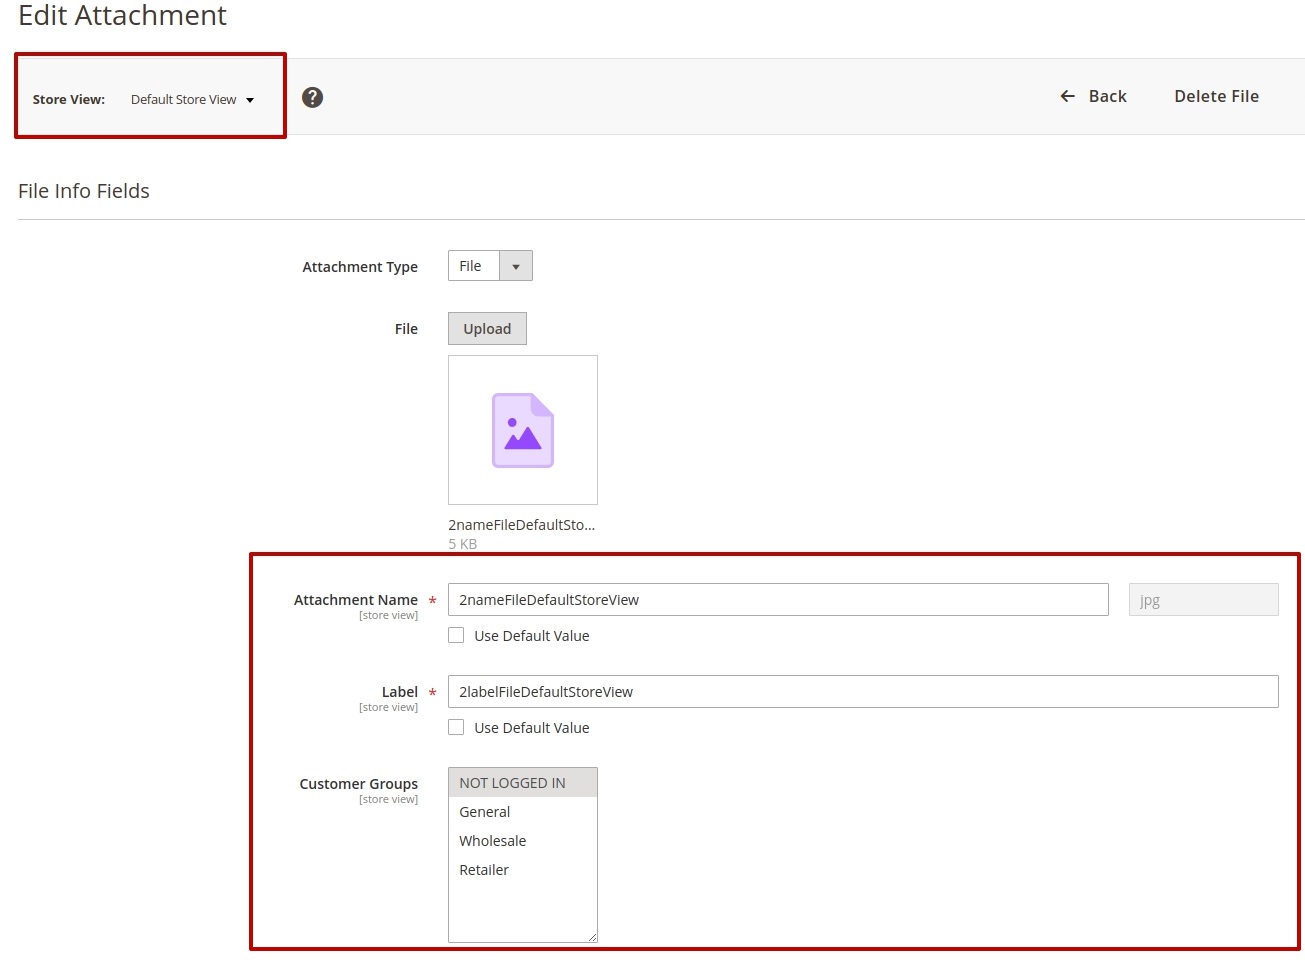
On the frontend it works like this: the registered customer doesn't see the second file:

The attachment info is displayed correctly:
Let's check how it works for NO Logged In Customer.
Get Files for Product in Different Store Views
The extension allows to adjust file display according to the Store View.
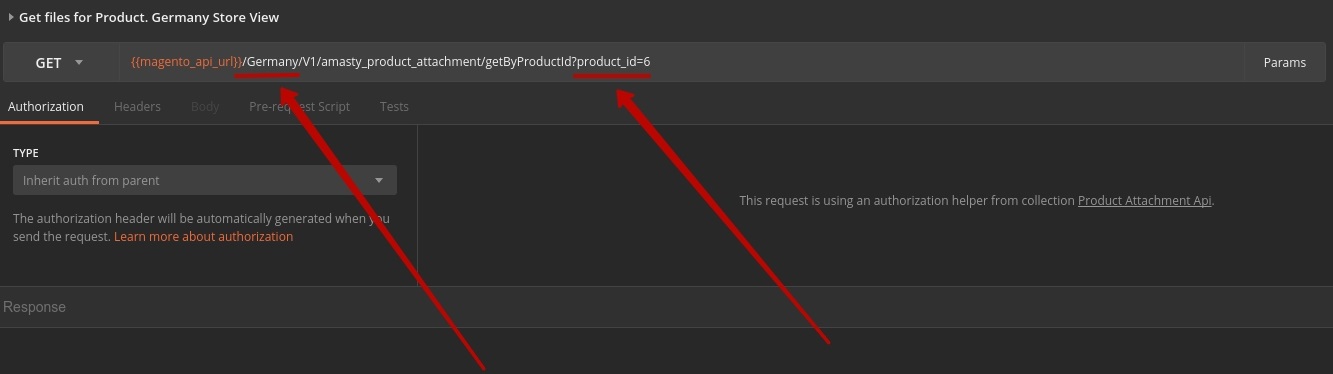
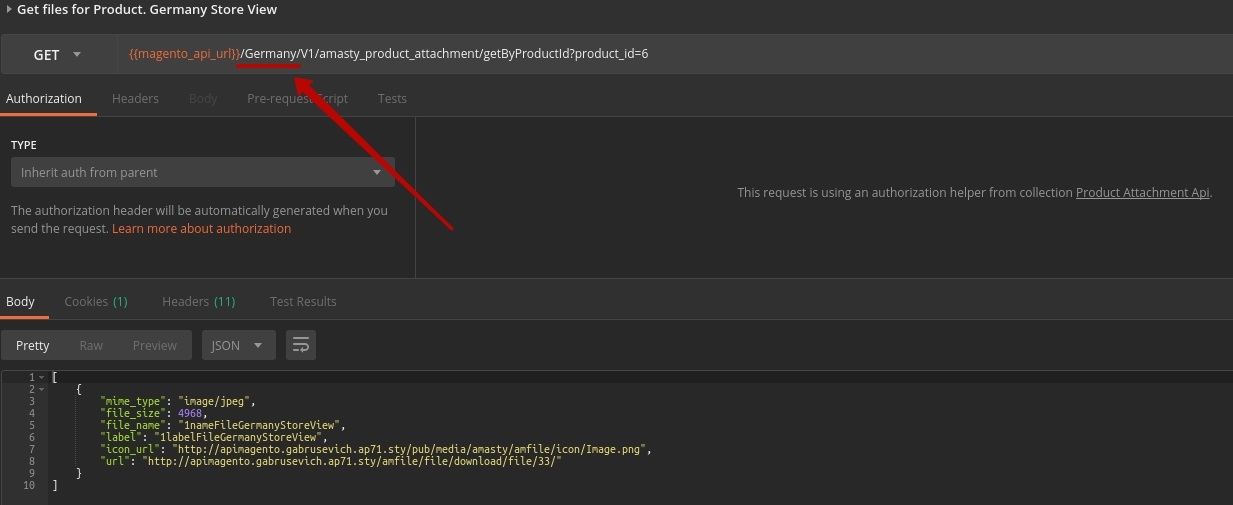
Here is the example on how it works for Default and, say, Germany Store Views. To test that we need GET query.
Specify the Store View and the product ID in the URL for Default and Germany Store Views.
Default Store View:

Germany Store View:
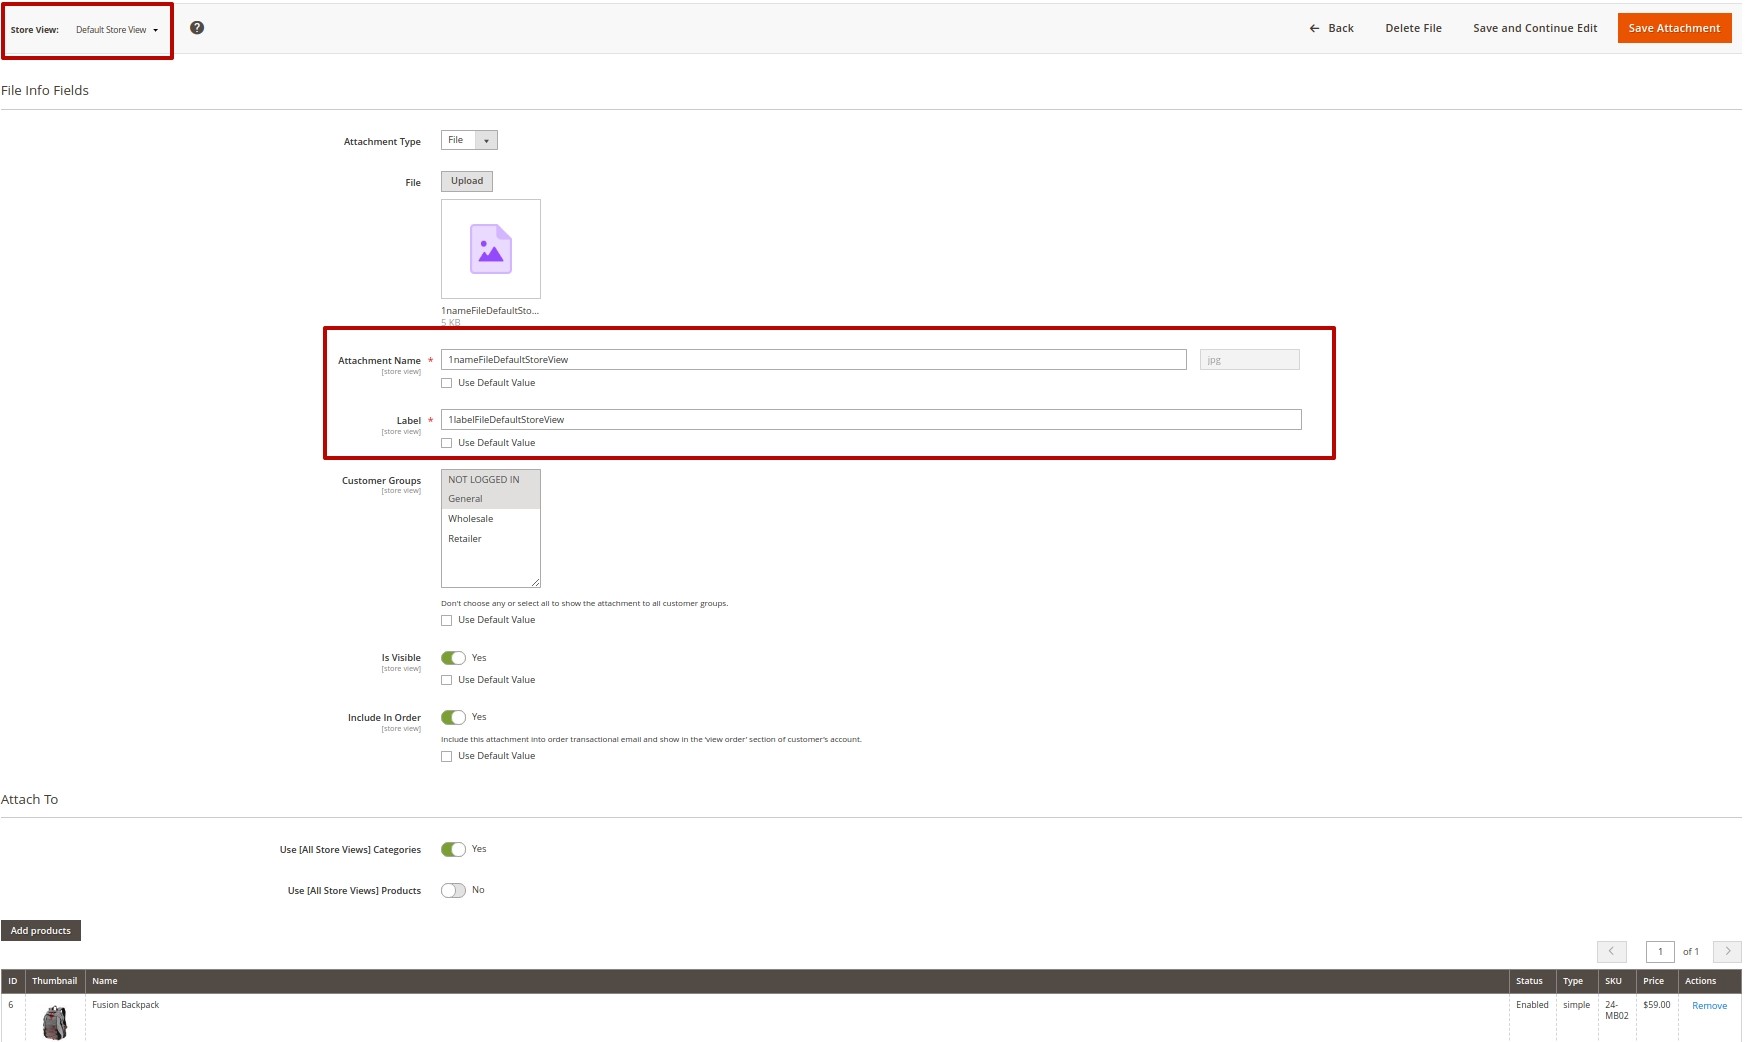
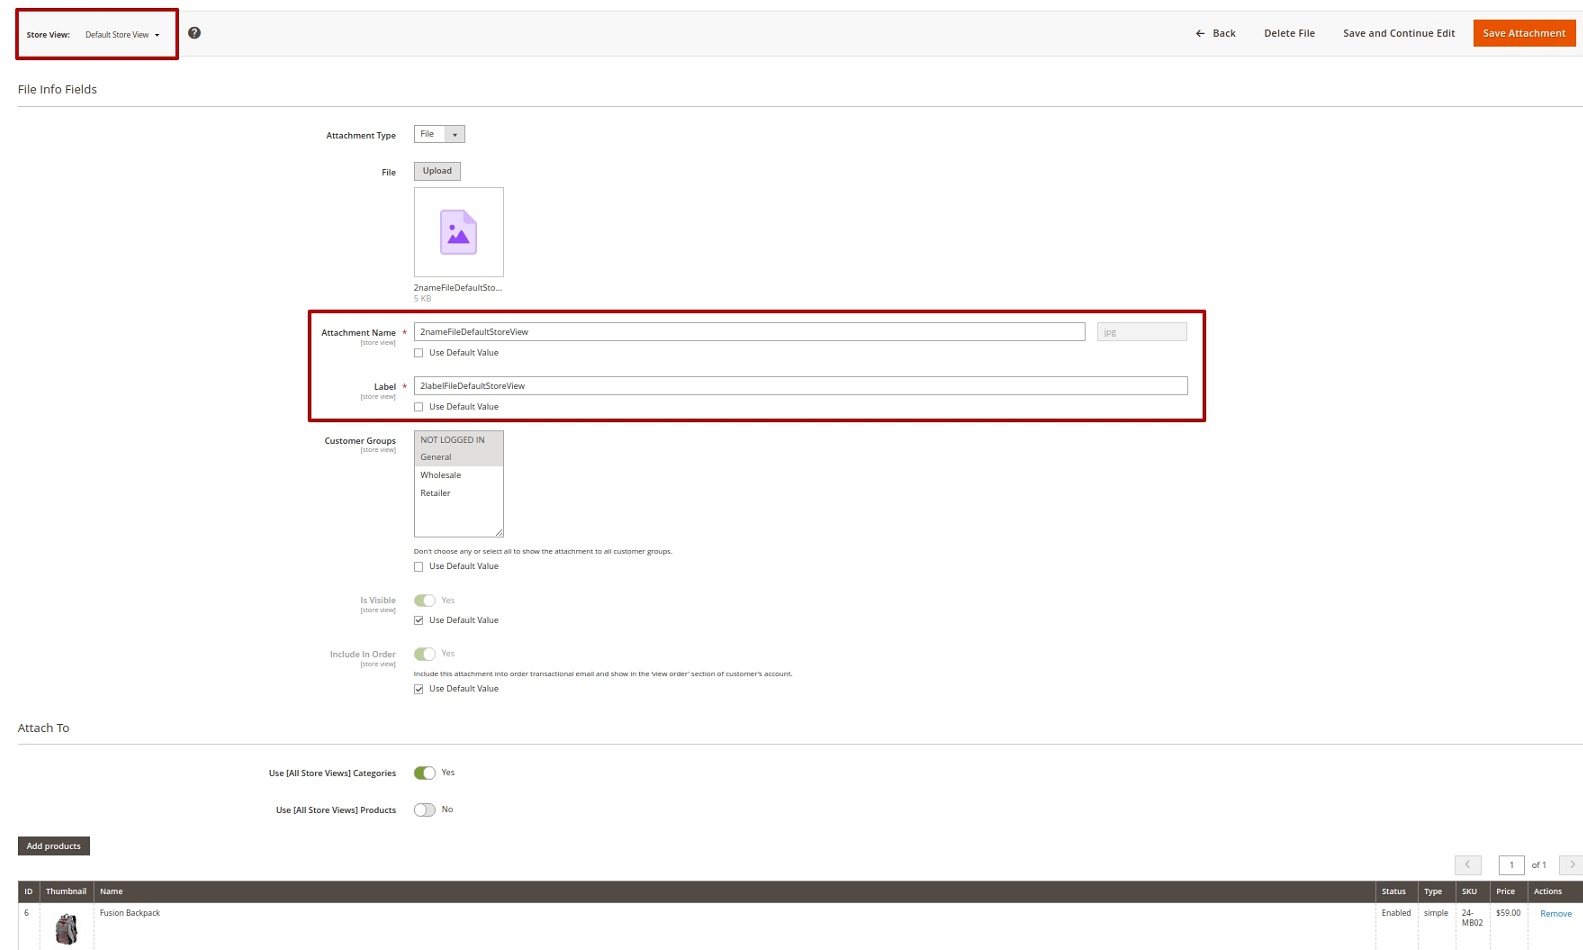
There are 2 product attachments in the Default Store View:
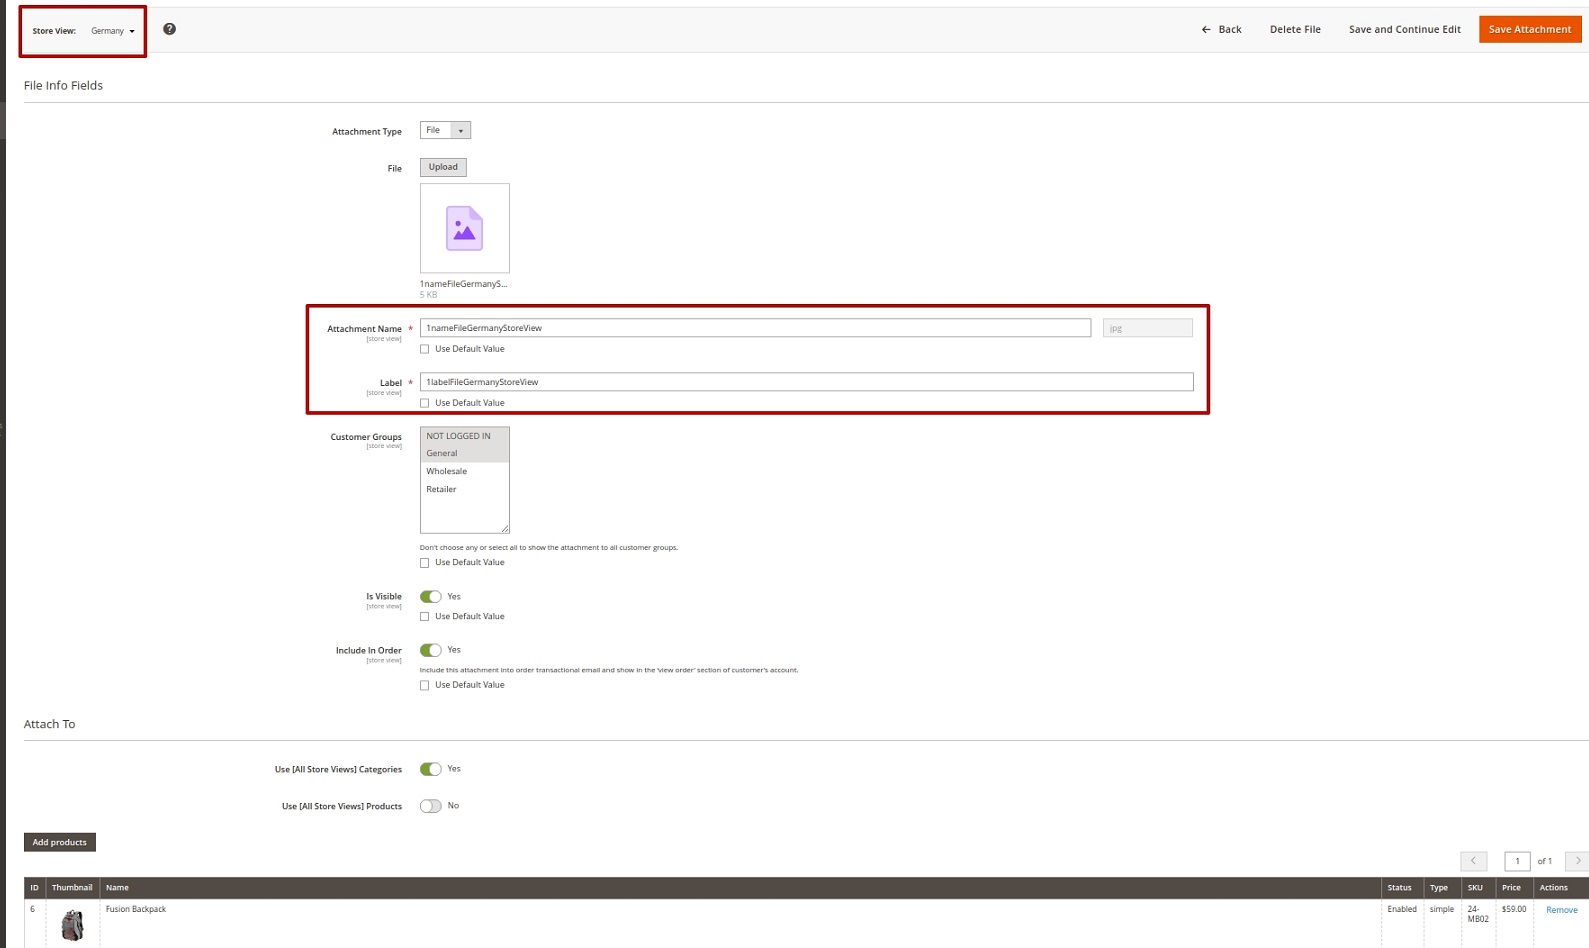
But in the Germany Store View, there is only 1 attachment:
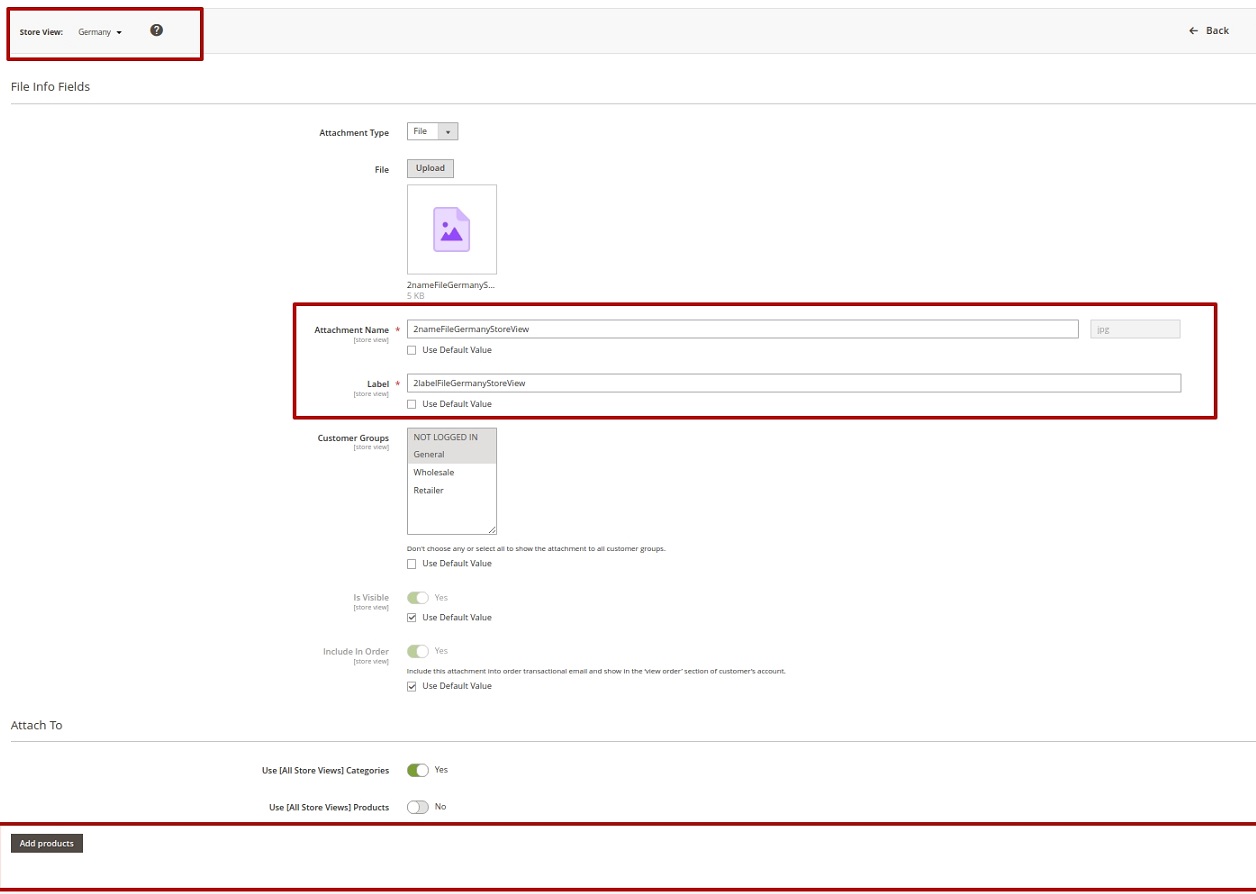
Thus, the data on attachments for each Store View is displayed correctly:
Default Store View:

Germany Store View:
Get Files for Product Included in the Order
This query concerns products in the required Store View. On the frontend, these files are displayed on the Order page.
Use a GET query. In the URL, specify the needed Store View, in the Params section – product_id, and include_in_order_only condition: 1 (Yes):
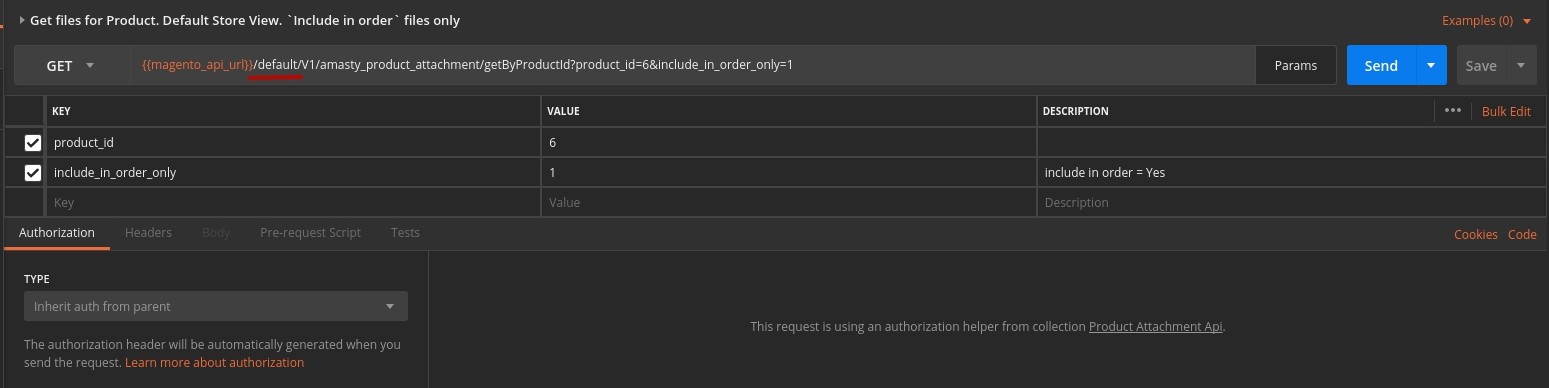
As we see, the product with ID=6 in Default Store View has 2 attached files, and Include In Order condition is met only in the second case:
Go to the extension settings. In the Type of Attachments to Display option choose ‘Include In Order’ Only:
Let's see how the Postman search query will bring the results:

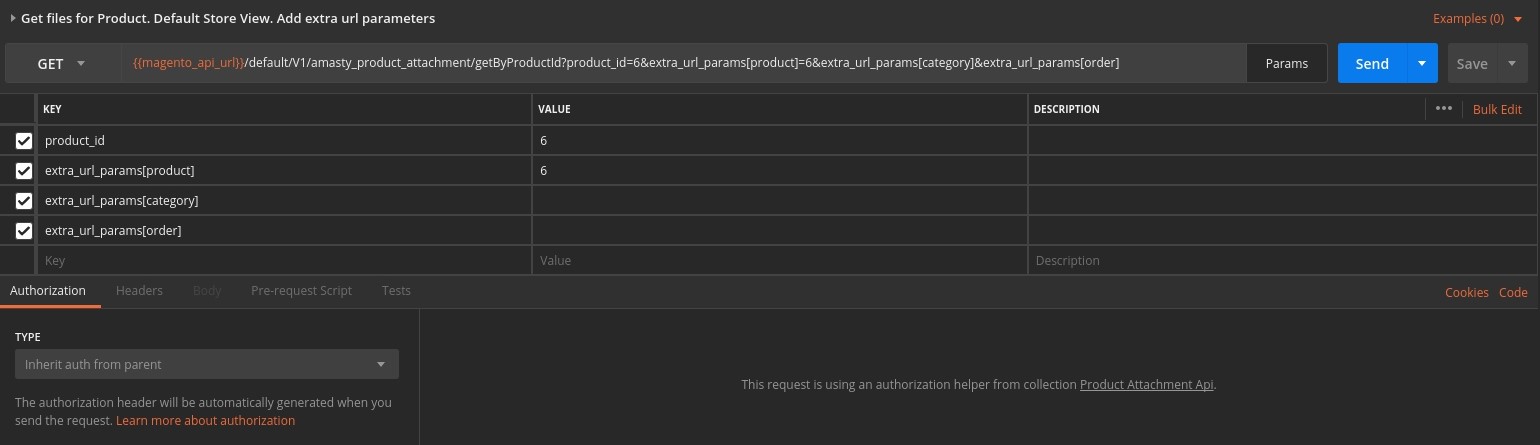
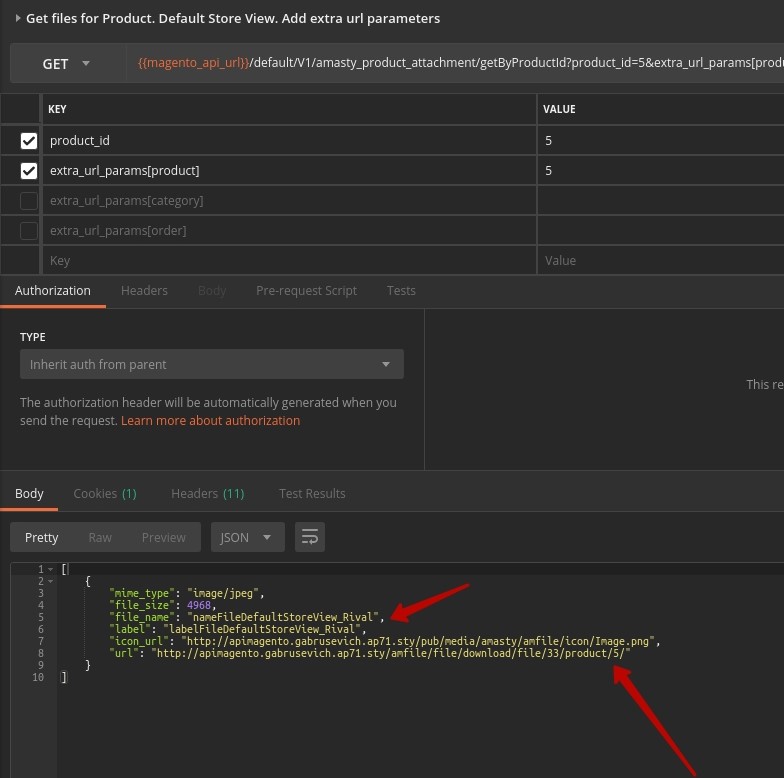
Get Files with Extra URL Parameters
Now we are going to consider the case when outputting the info on attachments in the necessary Store View needs adding extra parameters to the URL (category, product, order).
As usual, GET query is used.
In the URL, we write the Store View, the ID and the necessary parameters:
This file relates to 2 products:
In each case, the file has a different file_name and label:
In case the file is downloaded from the product page, it will have a separate URL for each item:
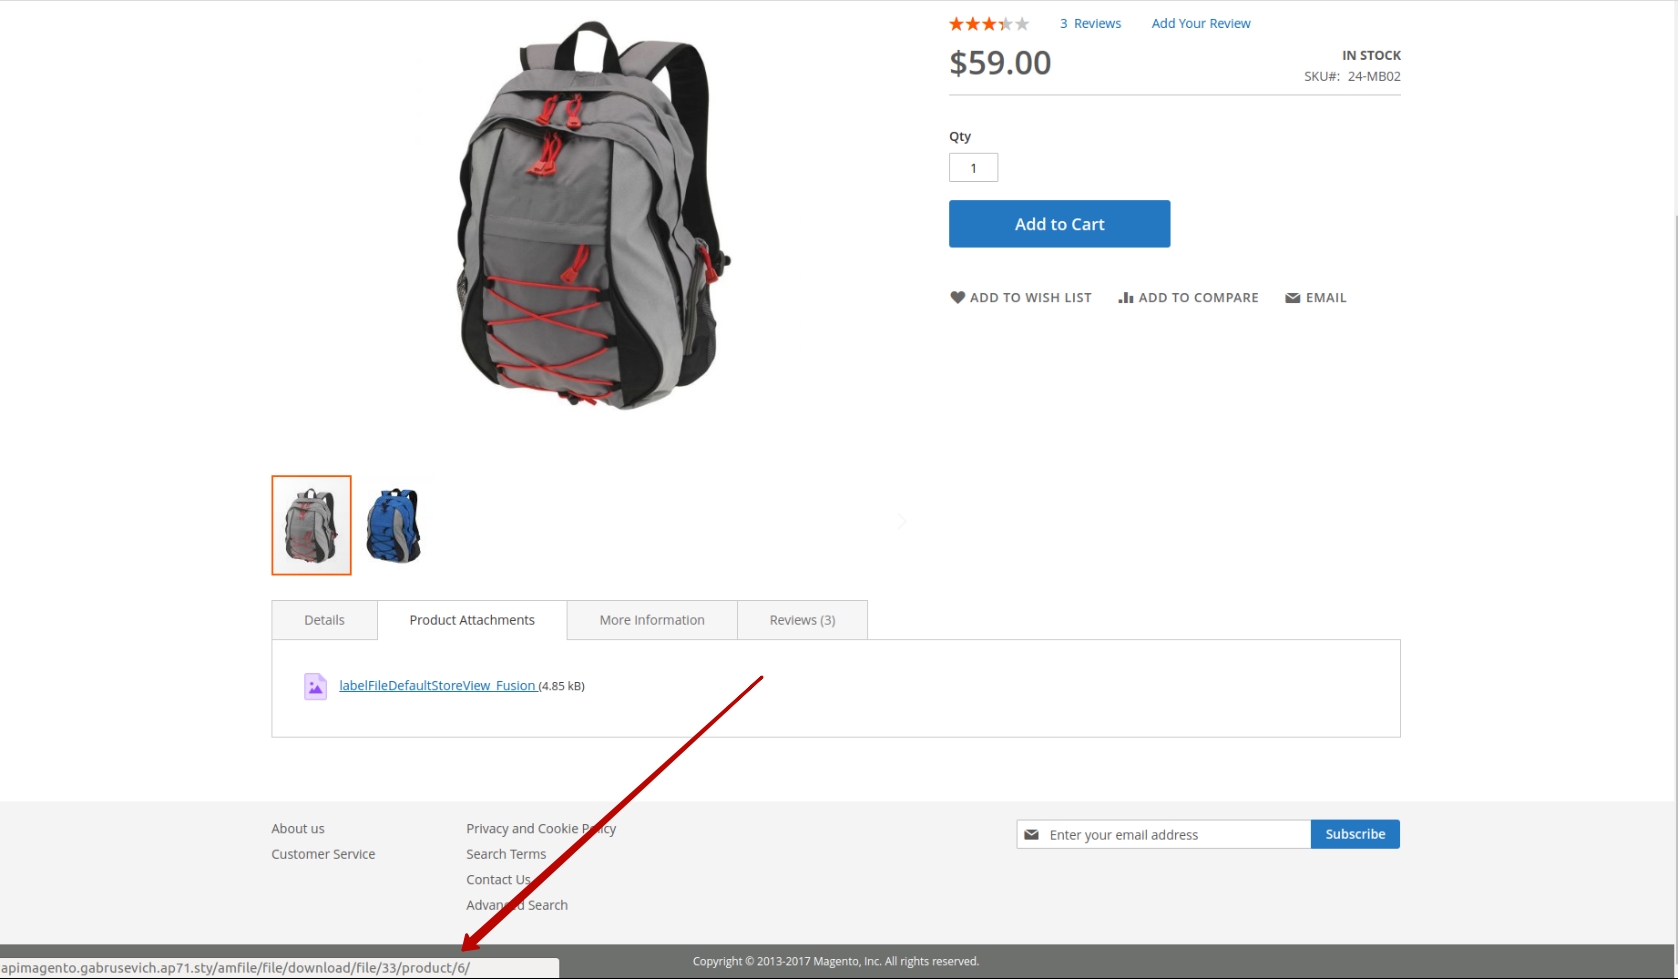
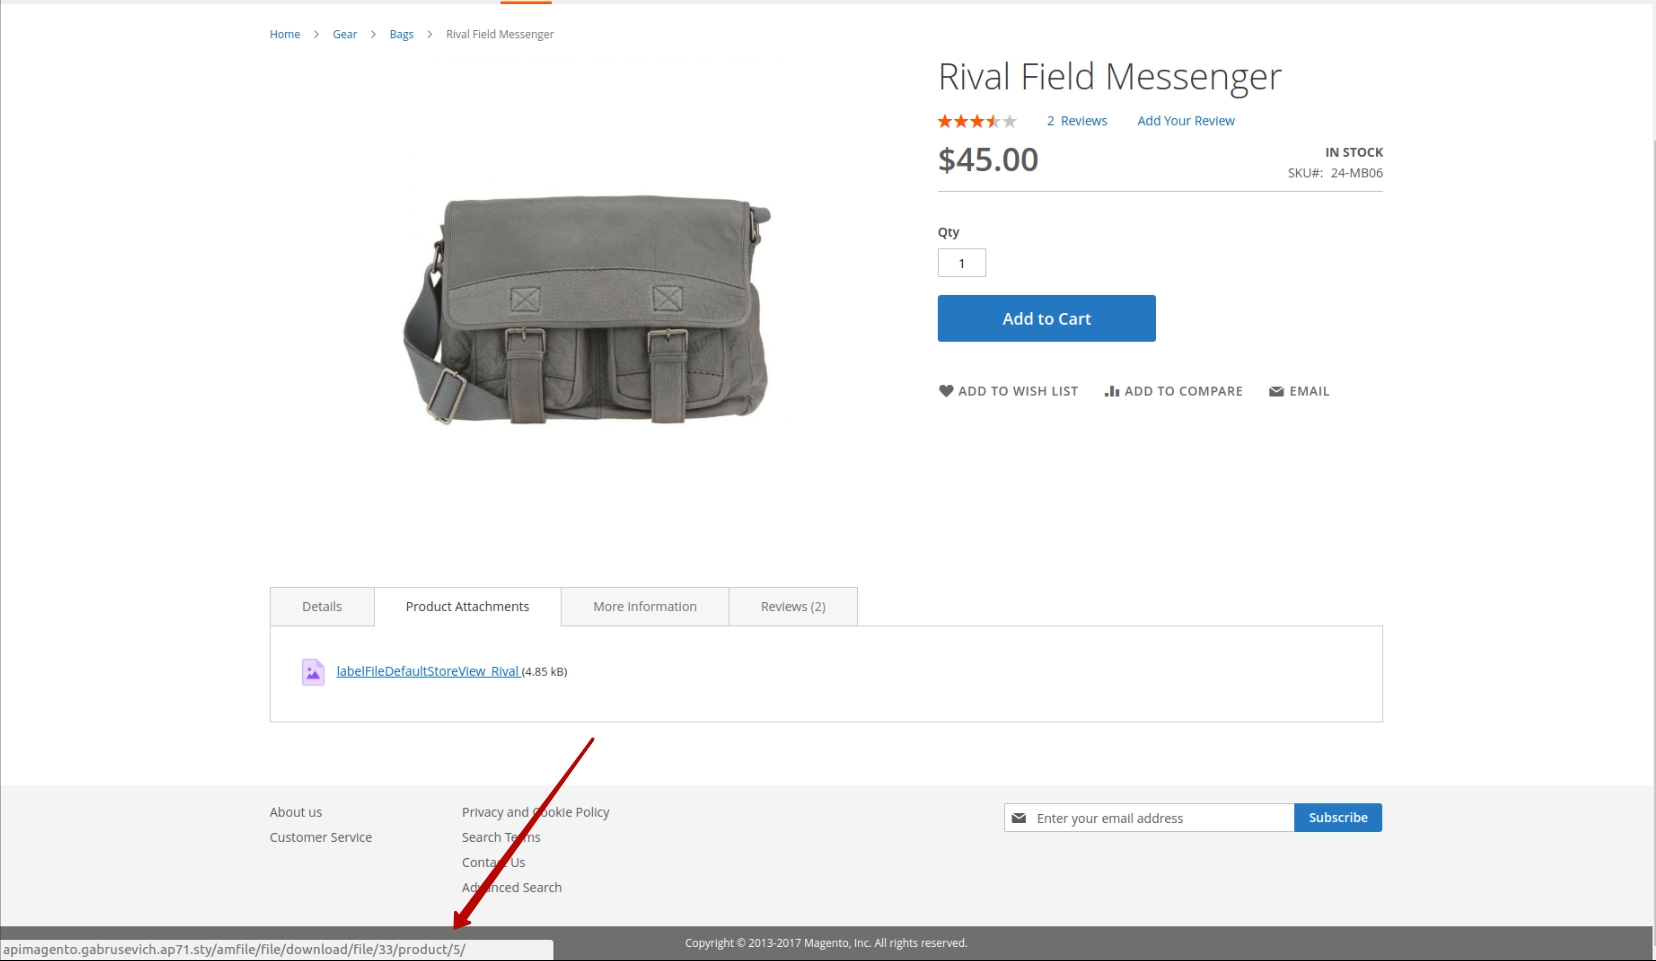
In Postman, if we make queries to extract the info on the attachment using the product ID only, the URL will be the same for each item:
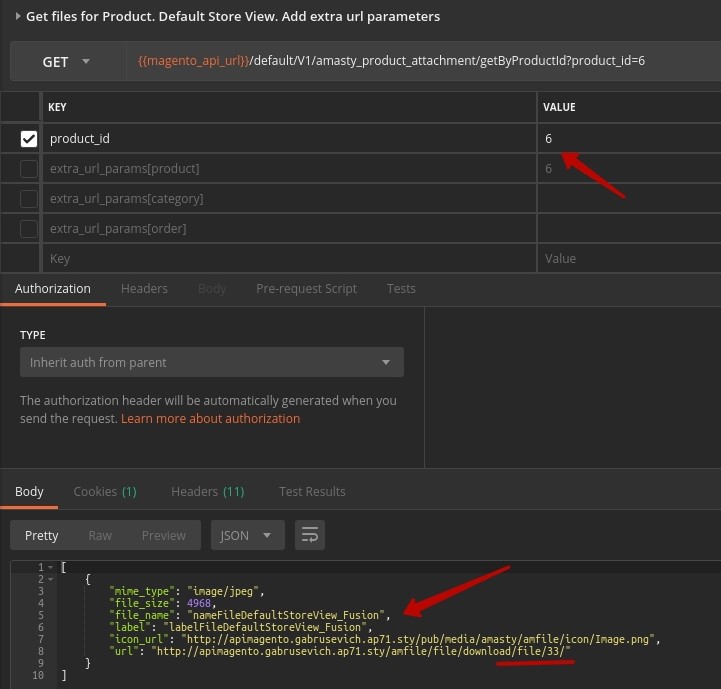
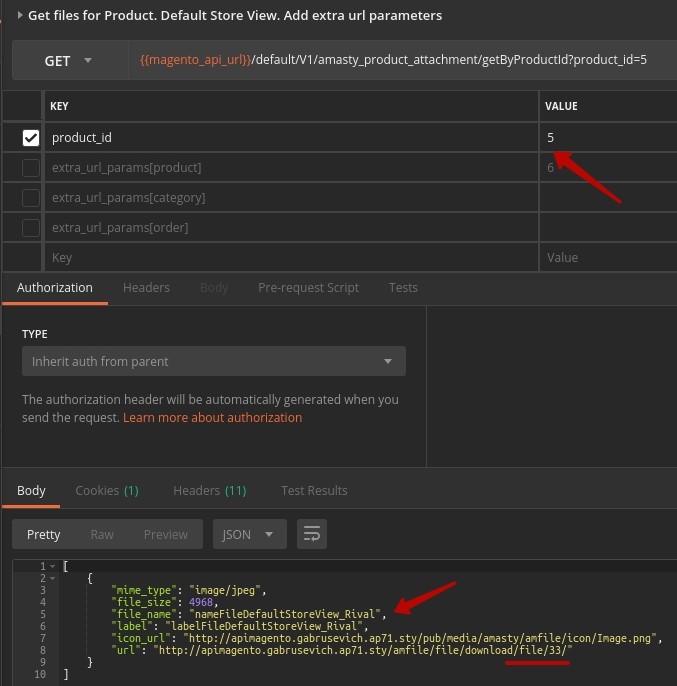
The main benefit of extra URL parameter is that we get one file with different settings for each product:

Another option of Product Attachments is that users can also output or view the data on the files attached to the whole category.
Get Files for Categories
Now let's output the information on the files attached to a Category of the necessary Store View, using GET request. The store view is Default:


In the URL, specify the Store View and the ID of the categories we aim to extract file info from. Here are the expected results based on the module configuration:
- File 1 is attached to the ID 4 category:

- File 2 is attached to the ID=4,5,6 categories:

Now we should check how the info is rendered in Postman:
- ID 4 Category:
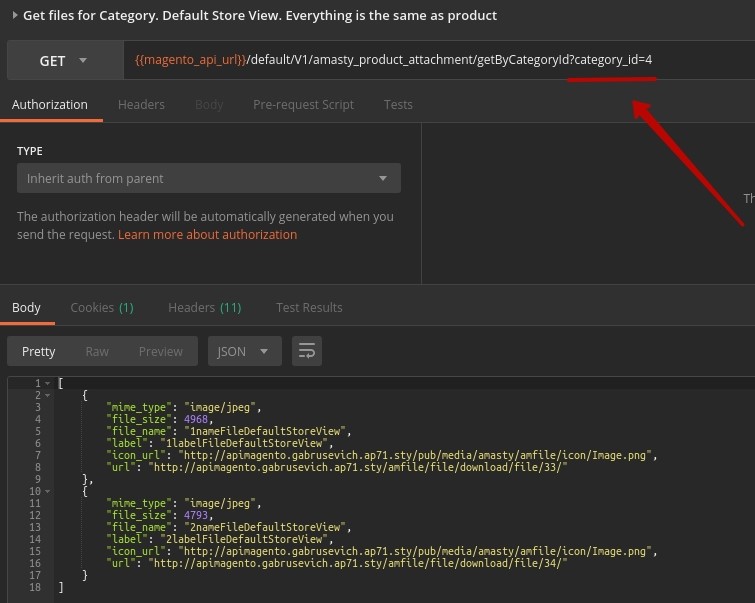
- ID 5 Category:
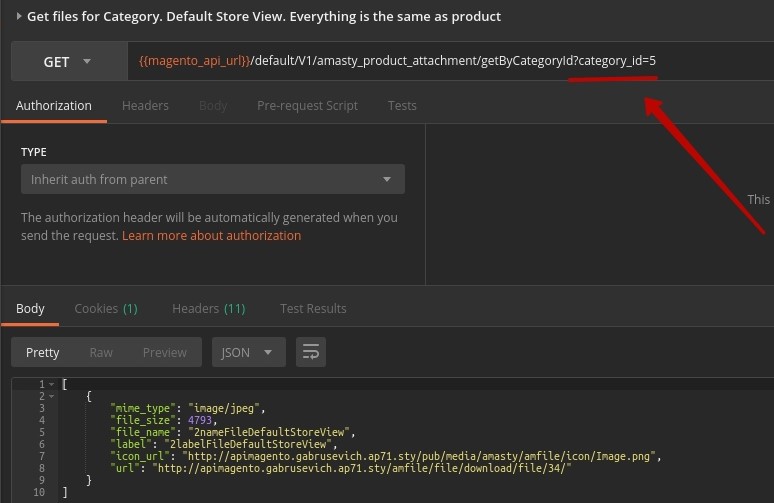
We see that there are 2 attachments in the ID 4 category and only one attachment in ID 5 category. This matches the module settings and the info is correct.
Get Files by File ID
In this case, we are going to extract the file info for the Default Store View, relying on the file ID.
As usual, in the URL, we fill in the Store View and the file IDs – in the Params section:
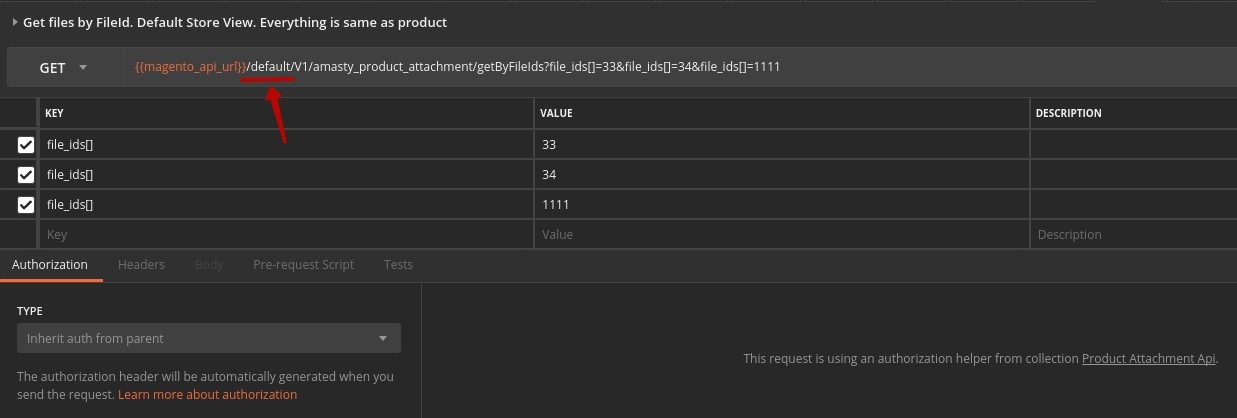
In our example we see 2 uploaded files:
The info is correct:
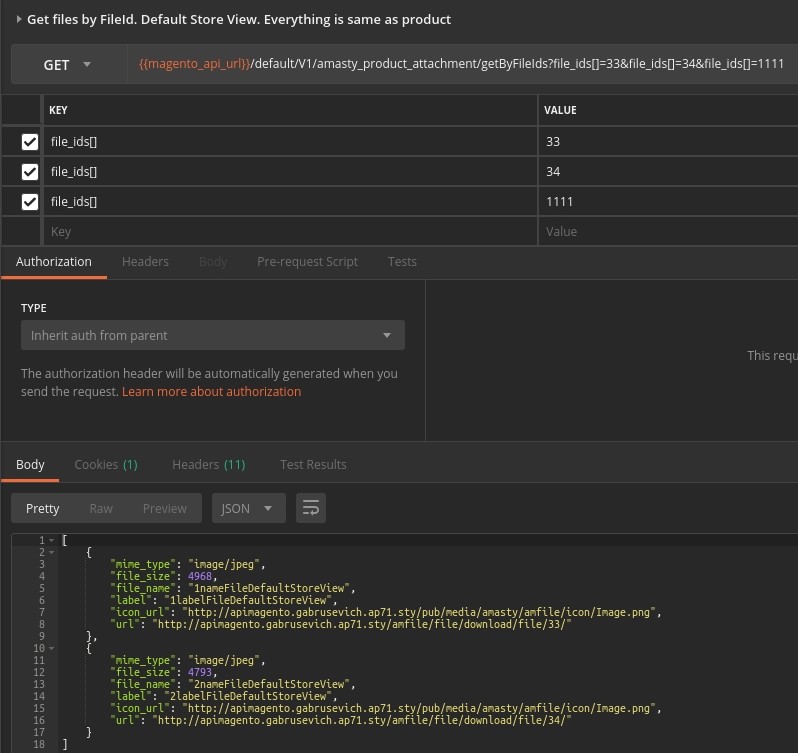
We have added the ID of a non-existing file (1111) on purpose. As you can see, Postman didn’t report any error. The tool just output the existing files.
Test File Downloading
To do this, output the info in Base64 format. Then copy the Base64 code and insert it into decoders to get the product picture. Use GET query to output the file data:
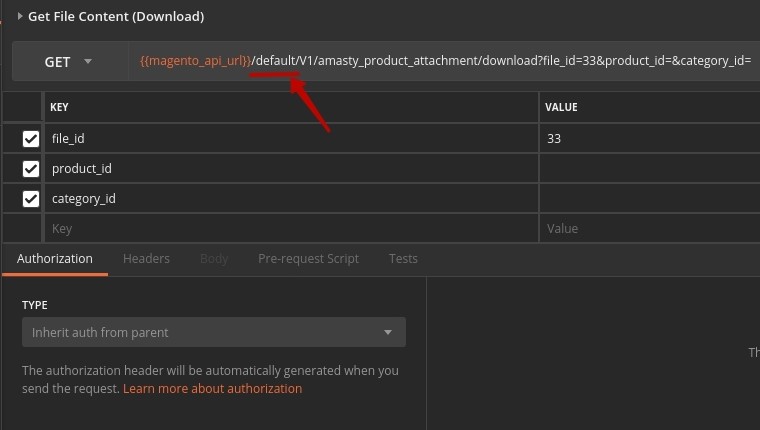
In the URL input the necessary Store View, in the Params section – the file/product/category ID.
There are several ways to get the file content. We provide the file settings in the module settings and their representation in Postman.
- Using the file ID:
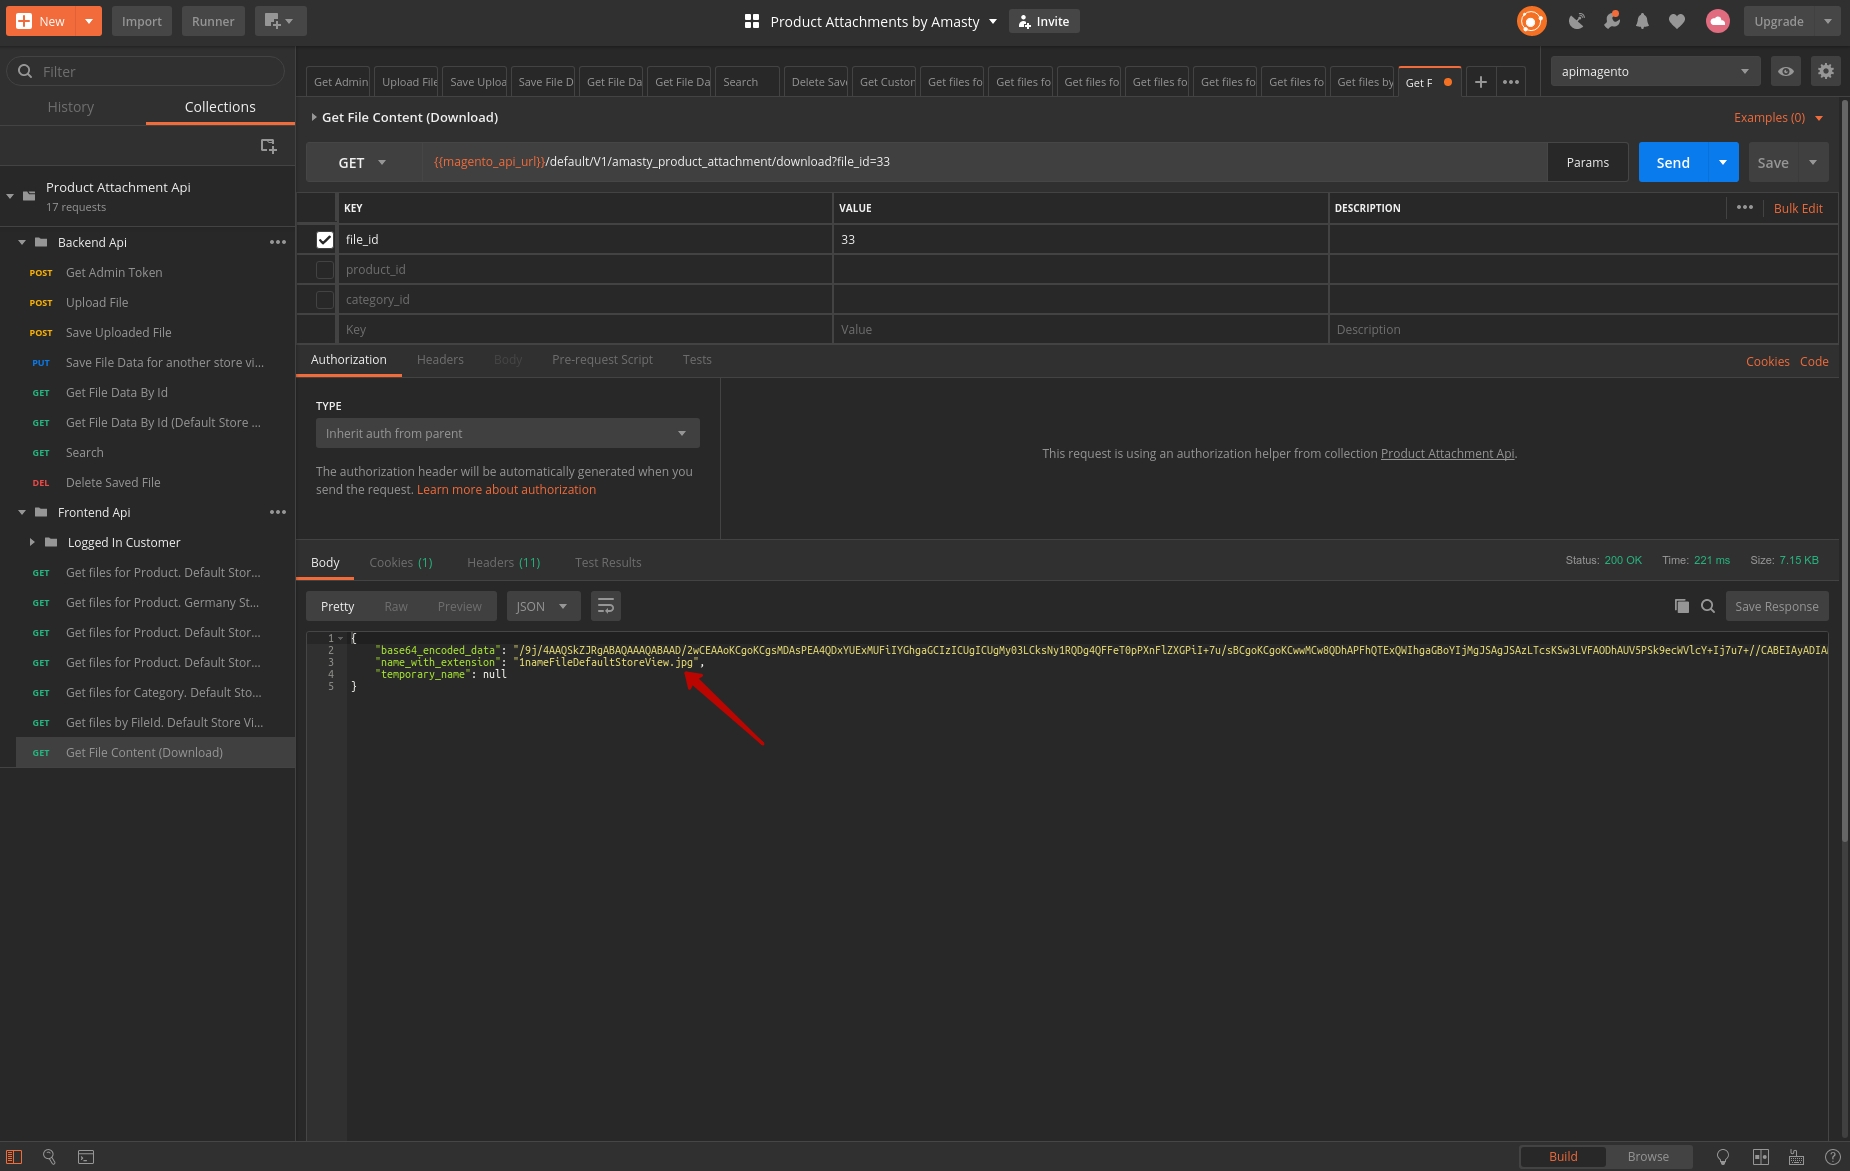
- Using the file/product ID:

- Using the file/category ID:

Best Practice Tips for Attachments
Properly optimize various attachment formats for search engines
Files in PDF (.pdf), Word (.docx), Excel (.xls), and PowerPoint (.pptx) formats come with built-in settings enabling optimization for improved discoverability and search engine ranking by adding meta titles, meta keywords, meta descriptions, etc. We recommend configuring these settings for files before attaching them.
To add meta data to a PDF file, follow these steps:
- Open the PDF file and navigate to File → Properties → Document Properties, then select the Description tab;
- Fill in the Title and Subject fields with keyword-optimized content;
- Ensure the Author field doesn’t identify a specific individual within your organization;
- Click the Additional Metadata button to add copyright or public domain information if applicable;
- Save the changes.
Furthermore, it is possible to tag content within a PDF file for better accessibility and visibility. Refer to this article for detailed instructions on tagging and optimizing PDF files.
To optimize Word, Excel, or PowerPoint documents for SEO, do the following:
- Open the relevant file and go to File → Info → Properties → Show All Properties;
- Check that the name in the Author field is correct;
- Enter the title for a document in the Title field (limited to 80 characters);
- Provide a comma-separated list of keywords to the Tags field. Avoid repeating keywords used in the title;
- Save the changes.
Additional packages (provided in composer suggestions)
To make additional functionality available, please install the suggested packages you may need.
Available for all tariff plans with no additional fees:
amasty/module-product-attachments-graphql- Install this module to activate GraphQl and Product Attachments integration.
Available as a part of an active product subscription or support subscription:
For Basic and Pro versions:
amasty/module-product-attachment-hyva- Install this additional package to ensure the Product Attachments extension works with the Hyvä Theme.
amasty/module-product-attachment-subscription-functionality- Install this package to add the 'Customer Groups' column to the Attachments Management grid.
For Pro version only:
amasty/module-product-attachment-pro-hyva- Install this package to ensure the Product Attachments Pro extension works with Hyvä Theme.
amasty/module-product-attachment-export-entity- Install this package to export attachment data.
amasty/module-product-attachment-import-entity- Install this package to import attachment data.
FAQ
magento_2/product_attachments.txt · Last modified: 2025/07/17 11:49 by kkondrateva