Sidebar
magento_1:improved_layered_navigation
Table of Contents
For more details see the Improved Layered Navigation extension page.
Guide for Improved Layered Navigation
Premium 7-year-old Magento extension, to which you can entrust your navigation.
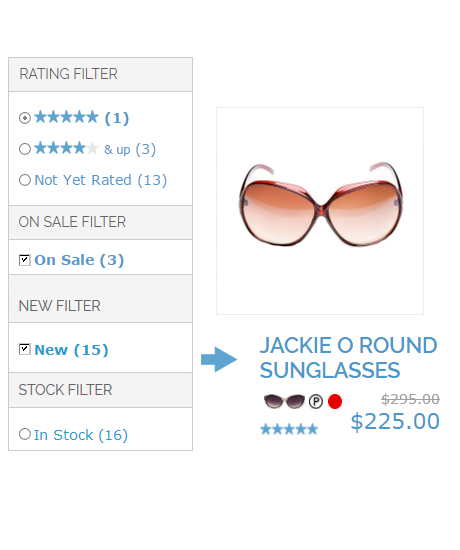
1. Layered navigation filters
Creation and configuration of attribute filters
To create and configure attribute filters, login to Admin panel, go to Catalog – Improved Layered Navigation – Filters. Then click Load button – filters will be loaded for all attributes, that are included in layered navigation.
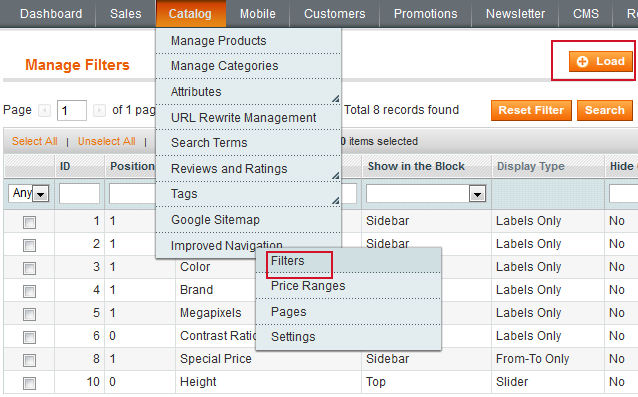
Click on each filter (Color, Brand, Special Price, Height) to edit its options.
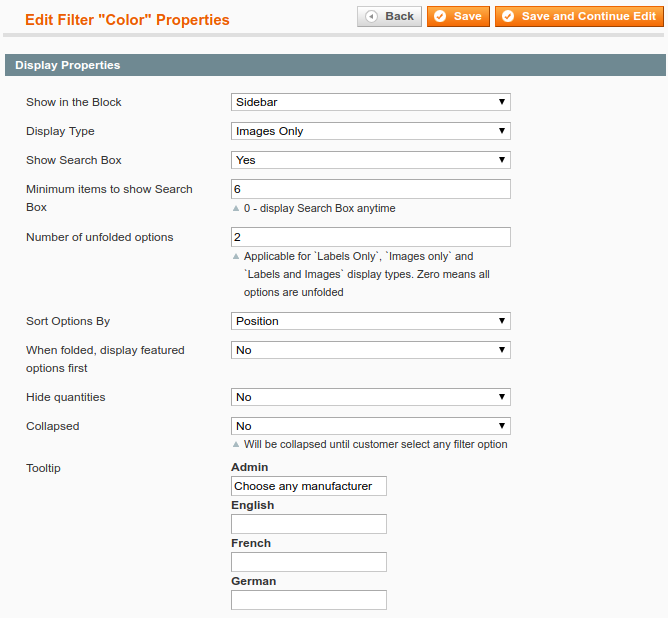
Show in the block - Specify which way to display filters' bar. You can choose whether to display the filter in left column or in the top block of the main column. You can also have Magento Vertical and horizontal navigation blocks being displayed simultaneously. (Options: Sidebar, Top, Both)
Display Type - There are various options to display filter values:
- Labels Only
- Images Only
- Images and Labels
- Drop-down List
- Labels in 2 columns
- Magento Swatches (or fallback to “Labels only”) OR Color Swatches Pro
Magento Swatches (or fallback to “Labels only”) - Choose this option in the Display settings type in order to enable Magento Configurable Swatches.
Color Swatches Pro - The feature is available when you have Amasty Color Swatches Pro extension installed. You will see the Color Swatches Pro option instead of Magento Swatches (or fallback to “Labels only”) in the dropdown. Select this option, if you want the swatches from the Color Swatches Pro extension to be applied.
Show Search Box - Choose whether to show the search box on a home page for a particular filter.
Minimum items to show Search Box - Specify, how many items should be listed in the filter in order to show Search box.
You can place the search box either on the top of the page or in the sidebar. 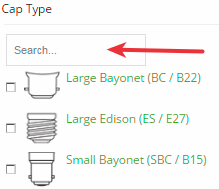

Number of unfolded options - The feature lets you indicate how many filter options to display in the navigation by default (customers will be able to unfold all the rest options). You can use individual number for each filter.
Hide Quantities - Set whether to display quantities.
Sort Options By - Specify sorting on the basis of Position, Name, Product Quantities.
When folded, display featured options first - It is possible to show featured options first for long lists of options (useful for top brands, etc.).
If you set Collapsed option to Yes, by default only title of this attribute will be displayed in the layered navigation. A customer will be able to expand the filter by clicking on the title.
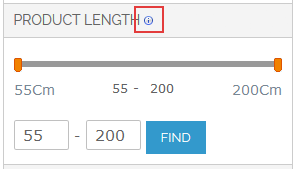
Tooltip - To help customers with the navigation you can add a tooltip for each filter. You can specify different tooltips per each store.
The tips are displayed only when customers hover mouse over the tool tip icon. You can use text, HTML or even images for tool tips to make them engaging and integrated with your store.


SEO parameters for filters
Search Engine Optimization - For each filter you can specify individual SEO parameters. These parameters take effect for all pages on which the filter values are applied. Let’s say you go to page example.com/category.html and select black in filter Color. Robots and rel nofollow parameters specified for Color filter will be applied to page example.com/category/black.html.

Filter options. Meta title and description
At the Options tab there’s the list of all the filter options. Click on an option to configure it: upload images, make it featured or add title, description and meta-tag data.
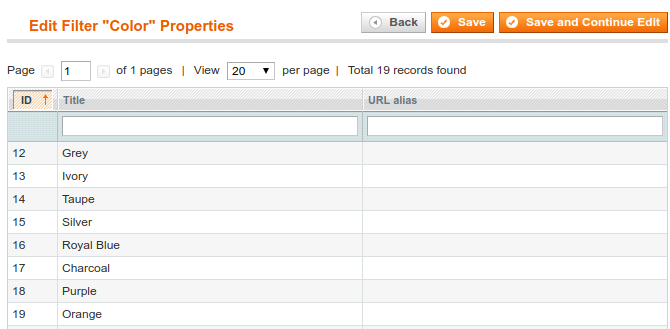
It is possible to search either by title or by URL alias.
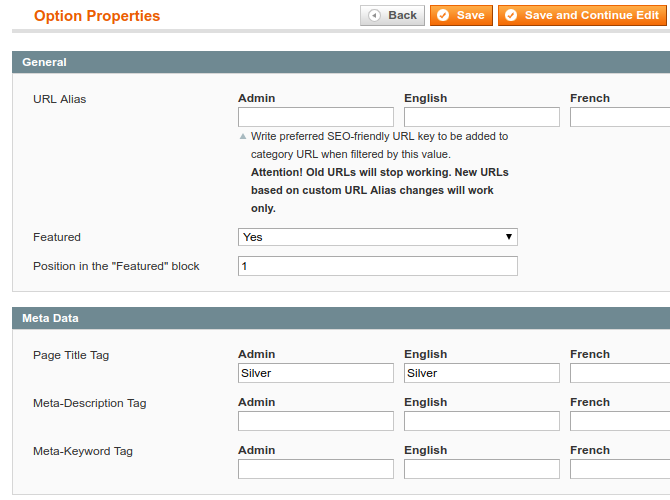
You can make each option Featured and then display all featured options of an attribute in a block.
Specify Meta Titles, Descriptions and Keywords for different store views.
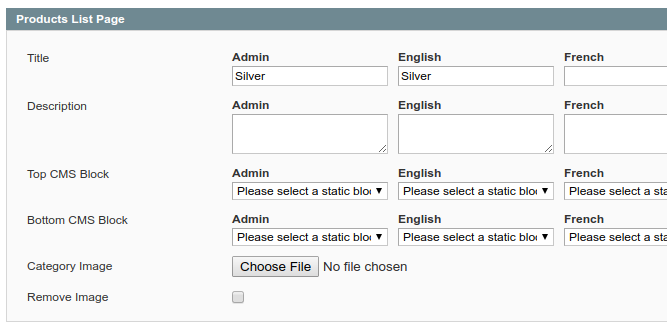
The title and description will be displayed on the option page, which enables you to place relevant content on your website pages and optimize it for search engines. You can specify title and descriptions for each store view separately.
You can use {category} tag for the options and pages in the meta data
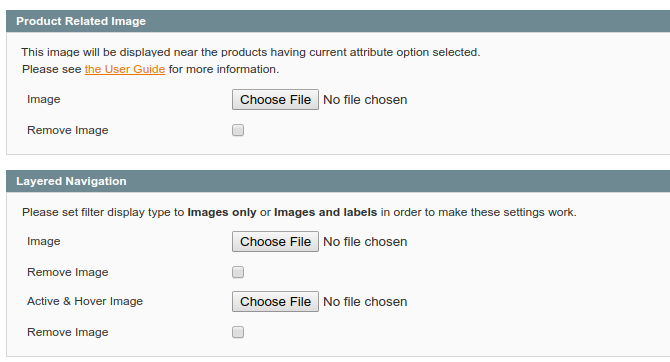
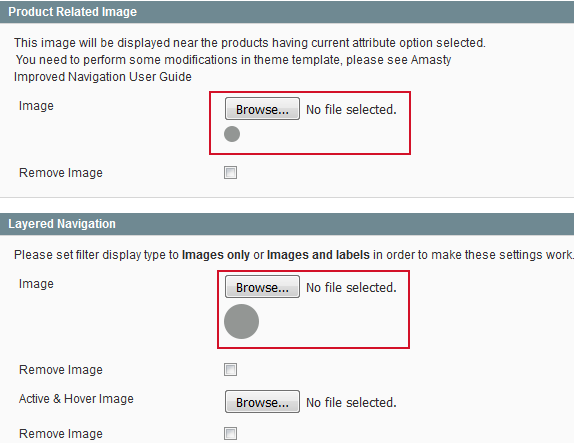
Also, you can upload images for product list page, product view page, layered navigation and image that will be displayed when customers hover over the logo.
Filter Mapping Settings
NOTE: You can apply the feature to any filters with a large number of values like color, size etc.
To configure mapping settings go to Catalog → Improved Navigation → Filters and choose the filter you need.
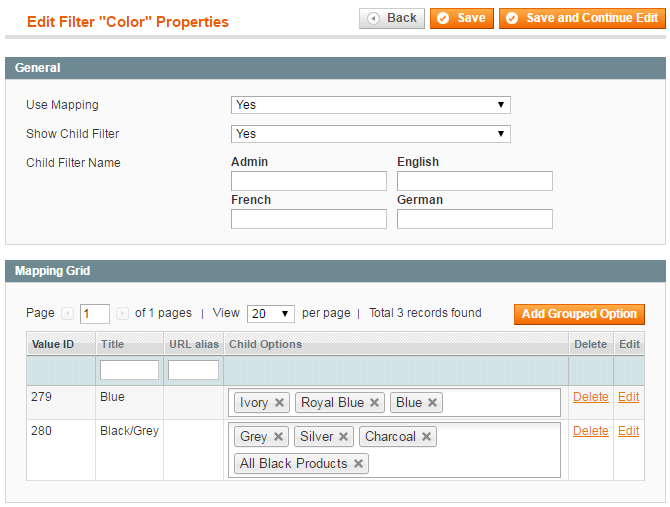
For instance, map all Blue color attribute values (Dark Blue, Navy blue, Light blue, etc) to the Blue filter so that your customers will find all options of Blue when filtering by “Blue” in the navigation filter.
Use Mapping - To enable the mapping option please set the Use Mapping feature to Yes.
Show Child Filter - Display child filter on the frontend.
Child Filter Name - Display child filter on the frontend with any title you like (e.g. name child colors’ block – COLOR GROUP)

Add Grouped Option - Click here to add a new grouped option.
New Grouped Option - Specify a grouped option name and click the Save button.
Once the name is saved you’ll see the newly-created group on the grid where you’ll be able to add child options.
By clicking on one of the parent colors, you activate the child colors' block, which will appear under the main color block. 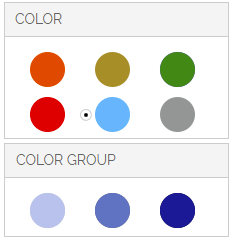

How to set the order of filters in Layered navigation?
To change the order of filters in the layered navigation:
- Go to Admin Panel → Catalog → Attributes → Manage Attributes
- Select the attribute which you would like to display higher or lower in the navigation
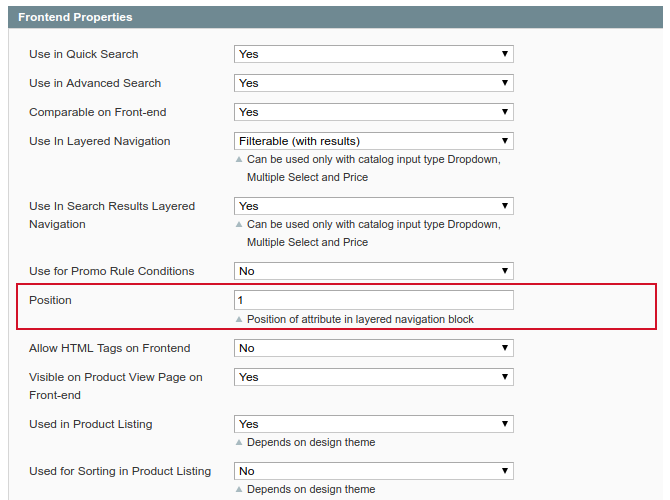
- Go to its Frontend Properties
- Change the attribute's position either to higher or to lower
Hide or limit the display of filters for certain categories
Single Choice Only - If you set this option to Yes, customers will be able to choose only one value at a time for this attribute.
If you set the option to No, there is one more field added - Use AND logic for multiple selections
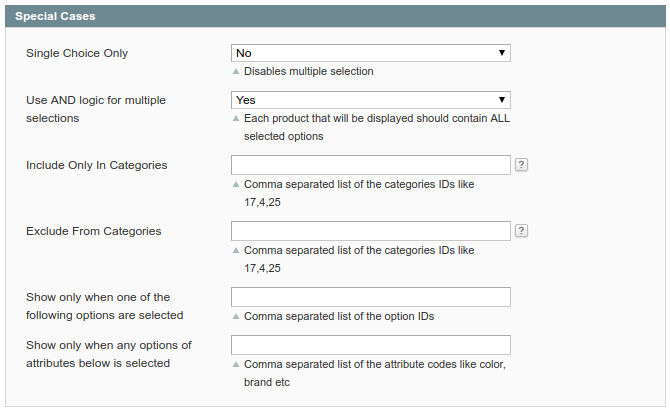
Include Only In Categories - If you want to display the attribute and its options on the page of particular categories, indicate the ID's of the categories in this field.
Show only when one of the following options are selected - You can set the filter to be displayed when customers choose certain options in other filters. For example, display shirt size filter only when Gucci brand is chosen. Specify ID's of options, which should trigger the filter, in this field.
Leave the field blank if you would like this filter to be displayed each time it is applicable. Each option of each filter has a unique ID, you can find the ids on the list of filter options at the Options tab.
Show only when any options of attributes below is selected - You can make the filter to be displayed when customers choose ANY option in other filters (for example, shirt size filter gets displayed only when an option of filter brand, e.g. Gucci, Mango, is chosen). Use this field to specify attribute codes* of the filters, by which current filter should be triggered. Leave the field blank if you would like this filter to be displayed each time when it is applicable.
* Each filter (attribute) has an attribute code, you can find the code on the list of
attributes in Admin panel → Catalog → Attributes → Manage attributes.
How to remove filters from Layered navigation?
If you need to remove a filter from layered navigation:
- Go to Admin Panel → Catalog → Attributes → Manage Attributes.
- Select the attribute which you would like to remove from the navigation
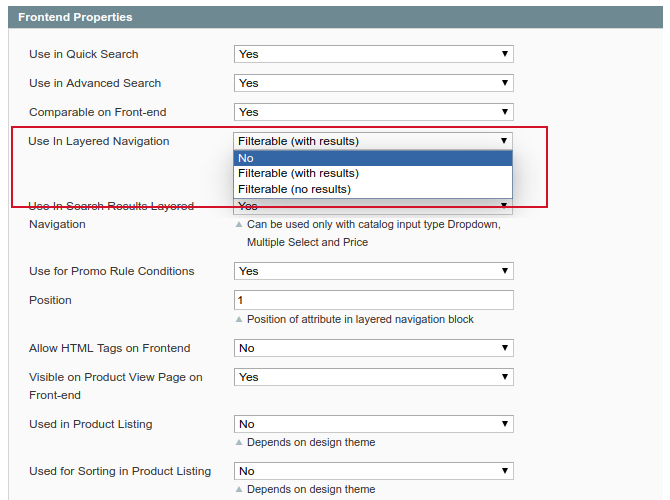
- Go to its Frontend Properties
- Set Use in Layered Navigation option to No.
How to enable a category filter?
To configure the category filters:
- Go to System → Configuration → Amasty Extensions → Improved Navigation
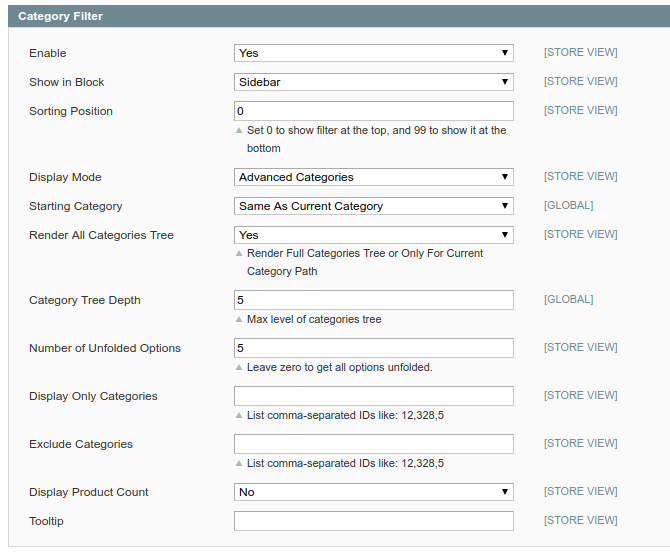
- Find the Category Filter Section
Exclude Categories - If you would like not to display some categories in the layered navigation, please specify IDs of the categories in this field.
Sorting Position - You can choose position for categories filter and display it for example under price filter or at the bottom of the navigation block. You can remove the categories filter from the layered navigation by typing -1.
How to display attribute icons on product pages?
To show attribute images with links on product page please use this code:
<?php if (Mage::helper('core')->isModuleEnabled('Amasty_Shopby')) {
echo Mage::helper('amshopby')->showLinks($_product);} ?>
paste the above code in the app\design\frontend\base\default\template\catalog\product\view.phtml file right after the:
<div class="product-name">
<h1><?php echo $_helper->productAttribute($_product, $_product->getName(), 'name') ?></h1>
</div>
Option icons make product pages better to comprehend and more attractive. Also they link to the lists of products, utilizing the same options, which makes it much easier to find other products with similar qualities.
The way it looks like on the front-end 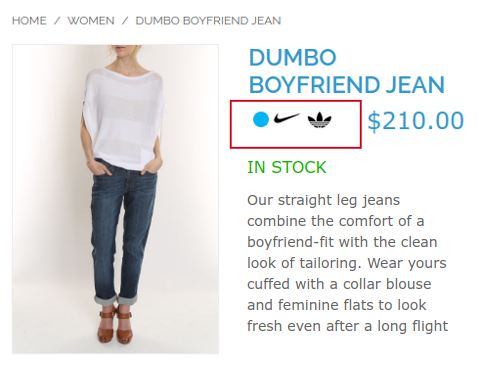

How to display attribute icons on category pages?
To show attribute icons on product list page (category page), follow these steps:
1) open app\design\frontend\base\default\template\catalog\product\list.phtml, where `base` is your current design package and `default` is your current theme
2) add this line (2 times, one for grid mode and one for list mode)
<?php if (Mage::helper('core')->isModuleEnabled('Amasty_Shopby')) {
echo Mage::helper('amshopby')->showLinks($_product, $this->getMode());} ?>
after the product name code: <h2 class=“product-name”> … </h2>
Go to Admin panel → Catalog → Attributes → Front end properties. Select icons you would like to display, and set Used in Product Listing to Yes: 

See the example of attribute icons on category pages. You can easily add such attribute icons as color, brand, etc. to any category page.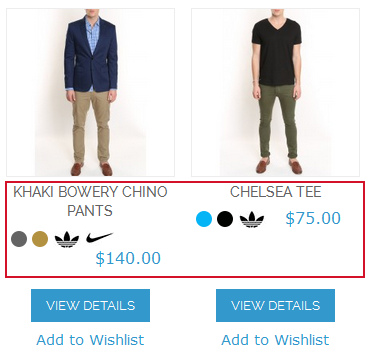

How to add layered navigation to home page?
To add the layered navigation to the homepage, please do the following:
- Open your home page in Admin Panel → CMS → Pages
- Select your Home Page
- Go to the Design tab → Page Layout
- Set layout to 2 columns with left bar
- Copy-paste these lines to the Layout Update XML:
<reference name="left">
<block type="amshopby/catalog_layer_view" name="amshopby.navleft" after="currency" template="catalog/layer/view.phtml"/>
</reference>
Please be aware that some or all of the existing Layout Update XML may be surrounded by the comment tags '<!–' and '–>'. If so,
please make sure that you paste the above lines outside of the comment tags.
- Save the page
Additionally:
1) It is recommended to enable the anchor for Home Page (Default Category)
- Go to Catalog → Manage Categories → Default Category → Display Settings
- Set Is anchor to Yes for root category
For more details, check our note Why anchors are necessary?
2) Also, if you would like to show horizontal navigation at the home page, add CMS block to the content area:
- Go to Admin Panel → CMS → Pages
- Select your Home Page
- Go to the Content tab
- Copy & paste the following code:
{{block type=amshopby/catalog_layer_view_top name=amshopby.navtop template=amasty/amshopby/view_top.phtml}}
How to display Layered navigation on product pages?
To display layered navigation at product pages, open app/design/frontend/base/default/layout/amasty/amshopby.xml file and comment out this code:
<!-- comment out to show navigation on the product pages
<catalog_product_view>
<reference name="right">
<block type="amshopby/catalog_layer_view" name="catalog.navleft" before="-" template="catalog/layer/view.phtml">
</block>
</reference>
</catalog_product_view>
-->
If you use a custom theme, go to app/design/frontend/%THEME%/default/layout/amasty/amshopby.xml and add app/design/frontend/base/default/layout/amasty/amshopby.xml file to the theme folder.
By default, the navigation will be displayed in the right column. If you would like to move it to the left one, please change
<reference name="right">
code to
<reference name="left">
The navigation block is visible when a product page layout has either left or right column. To configure the layout, go to Catalog > Manage Products and choose the item you need.
Expand the Design tab. Set the necessary option in the Page Layout dropdown menu.

If you would like to use AJAX in navigation at product pages, wrap the products area as below your current product list or cms blocks:
<div class="amshopby-page-container">
<div style="display:none" class="amshopby-overlay"><img src="<?php echo $this->getSkinUrl('images/amshopby-overlay.gif')?>"
width="32" height="32"/></div>
</div>
2. Price and Numeric
Add ‘price’ attribute filters to layered navigation
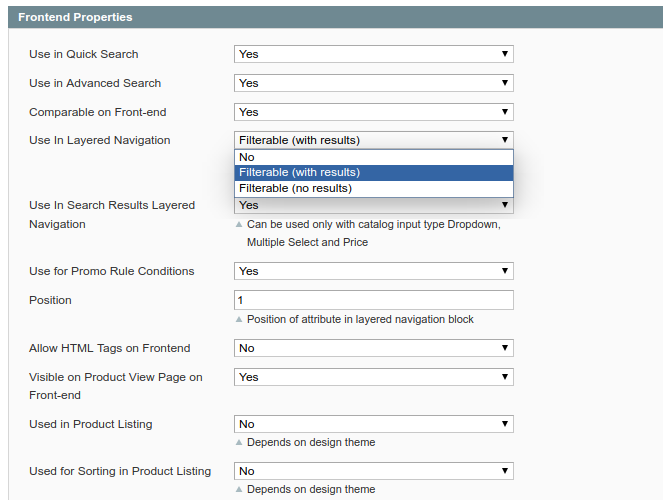
Use in Layered Navigation - For a price attribute to be added to the layered navigation please go to edit the attribute in admin panel → Catalog → Attributes → Manage Attributes and set the Use in Layered Navigation setting to Filterable.
Use in Search Results Layered Navigation - Set this option to Yes if you would like the price attribute also to be available in layered navigation on search results page.
Display Type - Settings of price attribute filters are a bit different from regular filters. For example, for display type you can choose Default, Dropdown, From-To Only or Slider option.
Range Step - Also for such attributes you can specify range step. If you indicate 50 like here, automatic ranges with step 50 will be created, e.g. 0-50, 50-100. 100-150, etc.
These automatic ranges are used only for display types Dropdown and Default.
Slider Step - You can also specify slider step size. If you indicate 1.00 like here, automatic ranges with step 1 will be created.
The slider step is used only for display type Slider.
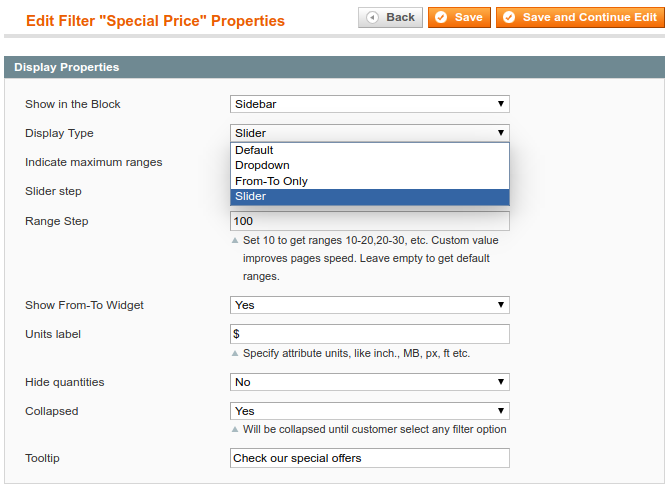
For more information, read How to show sliders? How to hide the currency symbols?
SEO for Price and Numeric
For price attribute filters the SEO options are the same as for regular filters. Check SEO settings here. Also you can exclude price attribute filters from certain categories.
Creation of numeric attributes, e.g. width, height
If you use numeric attributes like width or height and would like to use slider for such attributes, please choose catalog input type Price for such attributes:
Choose catalog input type Price for numeric attributes if you would like to use sliders for them. Don’t forget to set the Use in Layered Navigation option to Filterable.
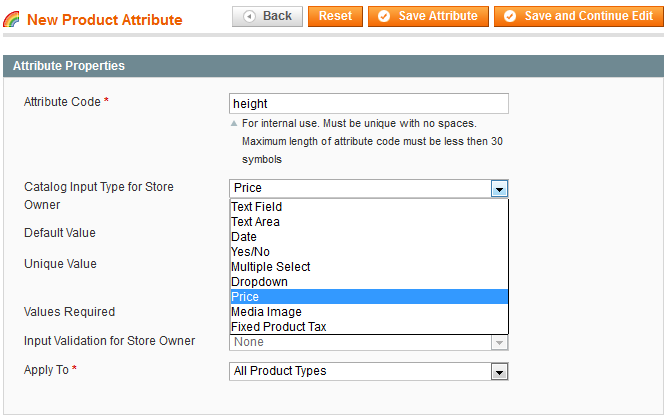
Once you create the price attributes please go to Catalog → Improved Navigation → Filters and click Load button.
After that the numeric attributes will appear in the list of filters.
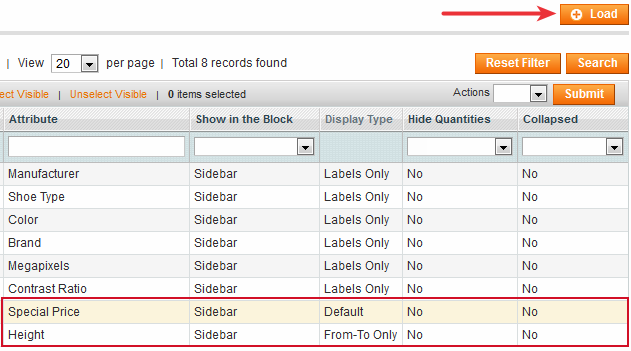
Such filters have the same settings as other price attribute filters.
For numeric attributes you can specify labels for measure units, e.g. px (pixels), MB (megabytes), ft (feet), etc. These labels will be displayed in layered navigation on front end.
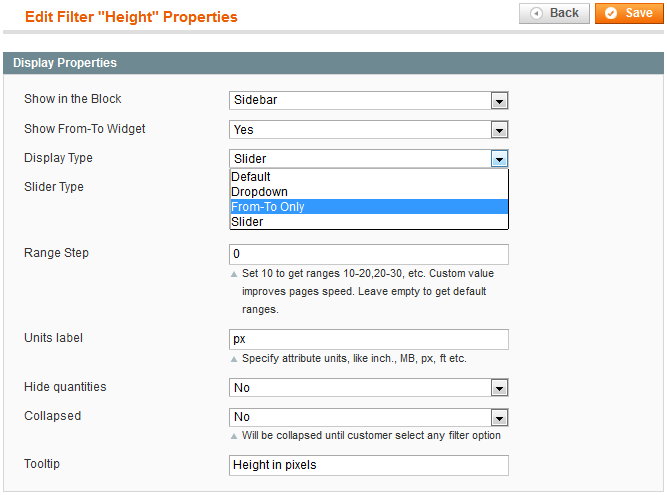
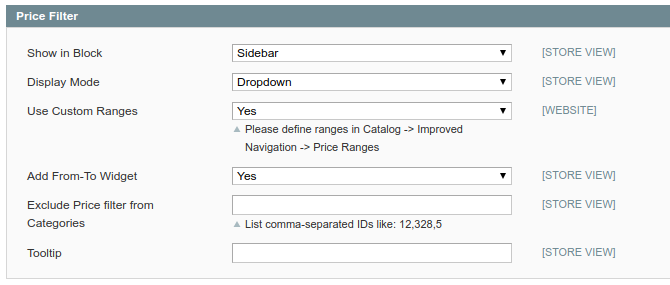
To use custom price ranges you should enable the feature in the Settings section.
Go to admin panel → Catalog → Improved Navigation → Settings → General and set this option to Yes.
Collapse Filter - Please set Collapse to Yes to show only its title by default. Customers will be able to expand the filter by clicking on the title.
Exclude Price Filter from Categories - In order to configure Price attribute please go Admin Panel → Catalog → Improved Navigation → Settings. Set Categories where you want to exclude Price filter.
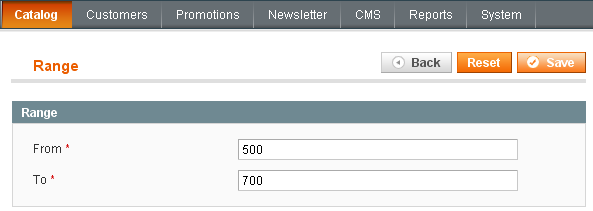
At the Ranges page you can add/delete ranges for price attribute. The custom price ranges need to be enabled in the Settings section.
Press Add Range button to add a new range.
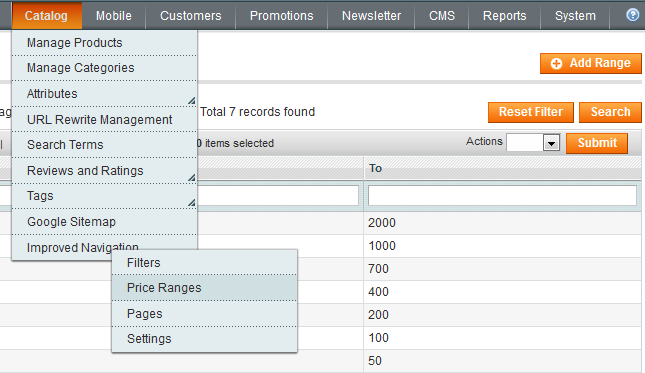
Press Save button after you’ve entered the range data.
In addition to predefined price ranges, you can give your customers opportunity to search by their own price range. They can fill in only minimal or only maximal price margin. For example with 500 as maximum price and 75 as minimum (see the screen shot), the extension will find all products in-between this price interval. In this case all products cheaper than or equal to 500 and more expensive or equal to 75. If you would like to use only From-To price option, please set Show Price As setting to From-To only. 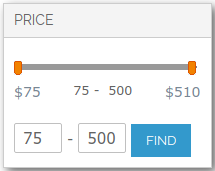

3. Brands
To create alphabetic lists blocks, e.g. list of all brands, models, etc, use code of the kind:
{{block type=amshopby/list attribute_code=manufacturer header="All Brands" columns=2 template=amasty/amshopby/list.phtml}}
When copying the above code to Magento admin panel, please make sure that there’s a space between block and type commands so they are spelled in two words as block type not in one word blocktype (sometimes space may get deleted during copying).
Indicate code of the needed attribute instead of manufacturer, use header parameter to indicate the name of the block and column parameter to specify the number of columns in the block.
Important: after selecting a brand, customers can narrow down selection by any available attribute (price, color, etc)
Here’s an example of All brands block: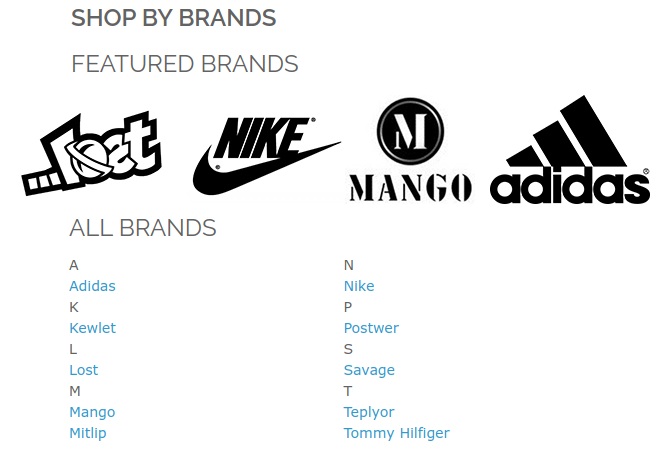

Creation of blocks with featured attribute options
To add a block with featured options of an attribute to a cms page, add the following code to the page:
{{block type=amshopby/featured attribute_code=manufacturer template=amasty/amshopby/featured.phtml}}
Use the code of the needed attribute instead of manufacturer – the code can be found in Attribute Code column at the Manage Attributes page.
To display a limited number of featured options, limit parameter, to show them in random order use random parameter (it should be set to 1):
{{block type=amshopby/featured attribute_code=manufacturer random=1 limit=4 template=amasty/amshopby/featured.phtml}}
Display of brand logos in navigation block
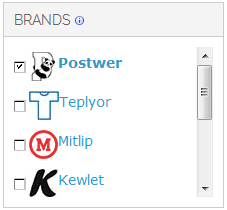
To display brand logos in navigation block you should work with filters’ settings. To edit filter properties go to Admin panel → Catalog → Improved navigation → Filters . You’ll see the list of filters. Click on brand filter to edit its options.
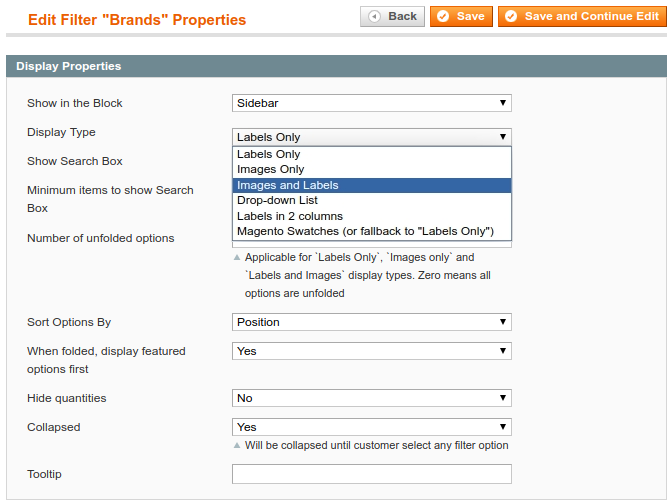
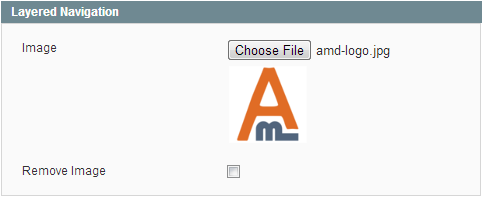
There are several options for display of filter values. Set Images or Images and Labels for your brand filter.
- Make sure that a picture is assigned to the filter option.
- Go to Filter properties → Options tab.
Single selection for 'brand' attribute
This feature is very appropriate for attributes like Brands, when customers often want to see products of only one brand at a time. Please go to Admin Panel → Improved navigation → Filters → Select Brand → Filter Properties→ Special Cases
Single Choice Only - If you set this option to Yes, customers will be able to choose only one value at a time for this attribute.
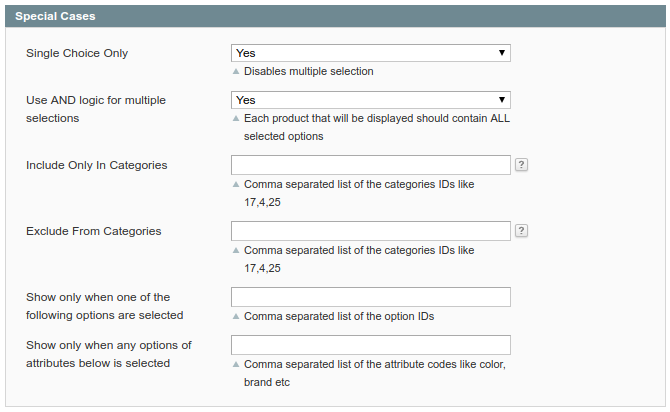
Setup SEO URLs for Brand pages
Please go to Admin Panel → System → Configuration → Improved Navigation → Brands
Brand Attribute Code - It is possible to setup nice short urls for pages of a brand attribute (or any other one you prefer), e.g.: example.com/canon.html example.com/nike.html To generate such urls for an attribute, please specify the code of the attribute here. This feature works only for one attribute at a time.
Brand URL Key - It’s possible to customize your brand page URLs for better SEO. Here you can specify the URL key that will be displayed before the brand name in the URL.
Show logos instead of labels on brand list block - You can also use clickable logos for brand list block.
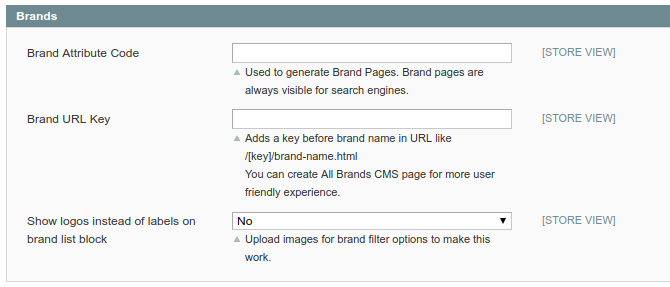
Read more in our article on How to make short URL's for the brand pages?
Menu with categories' thumbnails on Brand pages
To display a menu with categories (that contain brand items) on each brand page, go Admin Panel → System → Configuration → Improved Navigation → Brands
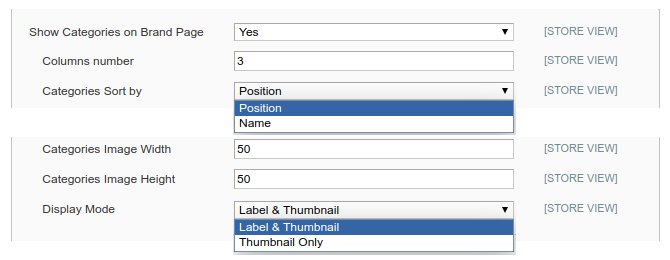
Show Categories on Brand Page - Enable the option.
Columns number - Specify the number of columns per line.
Categories Sort by - Sort categories in the menu by their position (IDs) or alphabetically.
Specify the Categories' thumbnails Width & Height in pixels, the way they will be displayed in the menu.
Display Mode - Specify whether to display categories either with thumbnails only or thumbnails along with the names.
4. SEO
Creation of optimized URLs. Structure of canonical URLs.
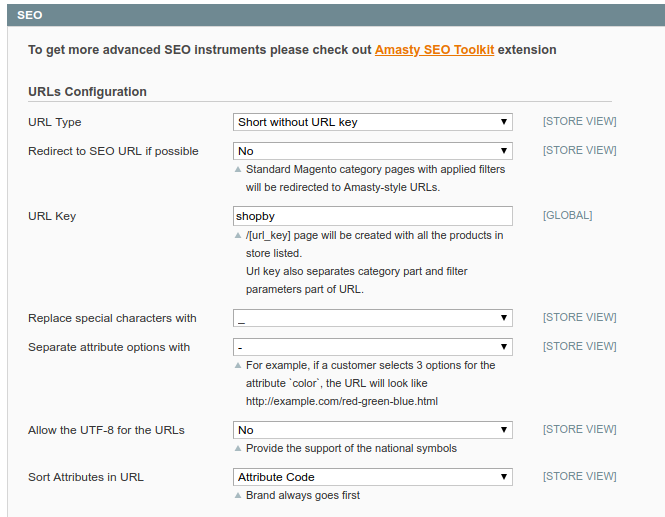
Redirect to SEO URL if possible:
- Choose Short without URL key type to make your URLs nice looking and more SEO friendly by excluding the URL key from your links.
- If you decide to change you old URLs to shorter ones, the 301 redirect option will help you lead clients to necessary pages.
- In case you choose the Long type you can specify any URL you like. It’s NOT mandatory to have a key.
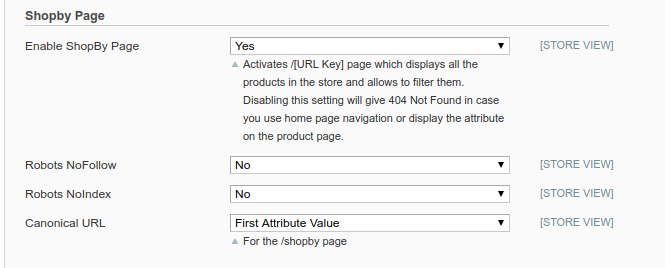
Shopby Robots NoIndex Tag - To close Shopby page from indexation set this option to Yes.
Shopby Robots NoFollow Tag - Ebable NoFollow tag for all links from the Shopby page.
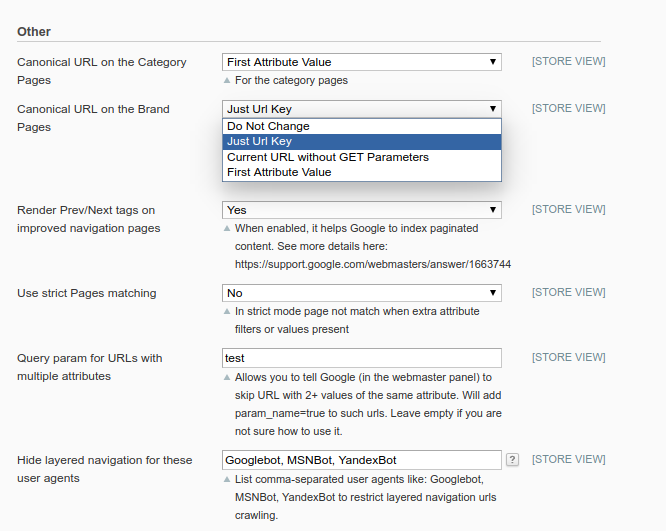
Canonical URL - You can set structure of canonical URLs for ‘key’-related (Canonical URL setting) and category (Category Canonical URL setting) pages:
- 1. If you choose Just URL Key option, canonical URL for all ‘key’-related pages will be like this: http://example.com/URL_Key/// For category pages it will be like this:http://example.com/category.html//
- 2. If you select Current URL canonical URL will be the actual URL of the page both for ‘key’-related and category pages.
- 3. With First Attribute Value canonical URL for ‘key’-related pages: http://example.com/URL_Key/first_attribute_chosen_in_navigation.html// For category pages it will be like this: http://example.com/category/URL_Key/first_attribute_chosen_in_navigation.html//
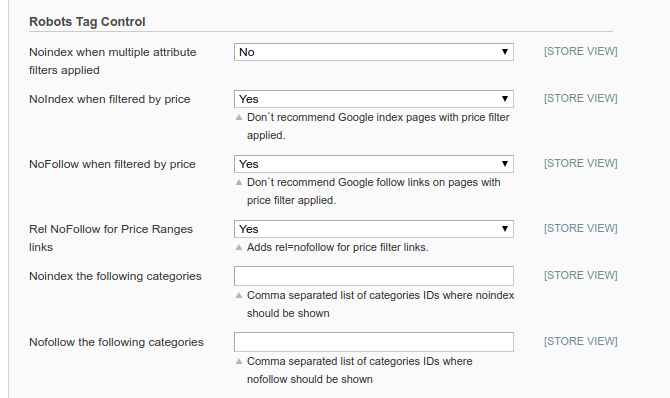
Noindex when multiple attribute filters applied - You can apply NoIndex option for pages to which multiple attribute filters are applied.
NoFollow when filtered by price - Switch this option to Yes to prevent Google from following pages with price filters.
Rel NoFollow for Price Ranges links - Enable this option to add rel=nofollow to price filter links.
Apply NoIndex and NoFollow options for particular categories.
Render Prev/Next tags on improved navigation pages - This option was specifically created by Google to fight duplicate paginated results. Switch it to yes to index all your paginated pages.
Use strict Pages matching - Pages feature modifies filtered results meta tags and in-page content in accordance with the selected filters. If a strict mode is enabled any additional filter, like price or weight will cancel these changes.
Query Param for URLs with multiple attributes - When you have a lot of attributes and their options, there’s a great variety of URL combinations. This may cause wrong Google indexing. You can put ‘param_name’ here and it will add ‘param_name=true’ to URLs with 2+ values of the same attribute.
Ex. It was: color=red-green
It is now: color=red-green&multi_select=true
Be careful! This feature requires high level of SEO knowledge.
5. Custom Meta Tags for pages with selected attributes
The module enables you to specify custom meta tags for pages with certain attribute values selected. For example, if you select color black and manufacturer HTC, this page will have only meta tags of the category page. With the module you can add custom meta tags for page with such selections.
Please be aware that this feature works only when AJAX is disabled.
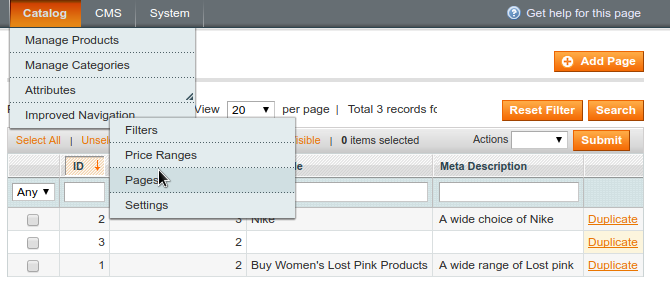
To create the custom meta tags, go to Catalog → Improved Navigation → Pages.
Add Pages - To add custom meta tags for a page, click the button.
Duplicate - Save time on page creation by duplicating necessary pages with all their settings in one click.
Adding a New Page
Indicate the number of selections, for which you would like to specify meta tags.
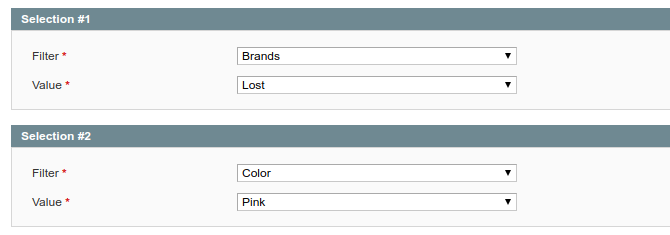
In this case, we specify meta tags for combination of two attribute selections - color pink and brand Lost. So we type 2 here. If you would like to specify meta tags for 3 values of the same attribute (or 2 of one attribute and 1 of some other attribute), for example color red, white and green, please type 3 in this field.
When indicating a number, count the total number of selections, not attributes (e.g. you may have 10
selections of the same attribute).

Page Editing
Add to Category Metas - You can choose whether custom meta tags should be added to the meta tags of the category page or used instead of them.
Page Title, Meta Description, Keywords, Canonical URL - It is possible to specify meta title, meta description, meta keywords and canonical URL for the page with the selections.
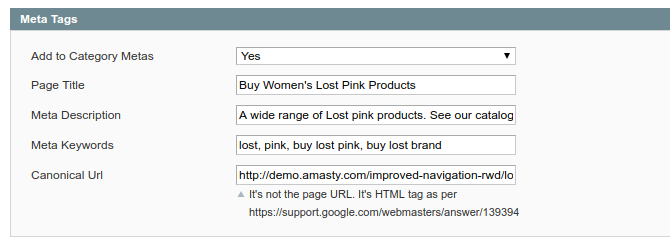
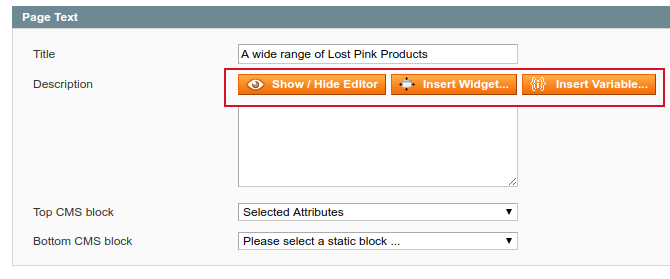
Page Text - This title will be displayed on the product list page once the appropriate attribute values are selected. If you would like to display some CMS block at the page, specify the block identifier in the CMS block field.
Use convenient WYSIWYG editor for the description field of the custom pages.
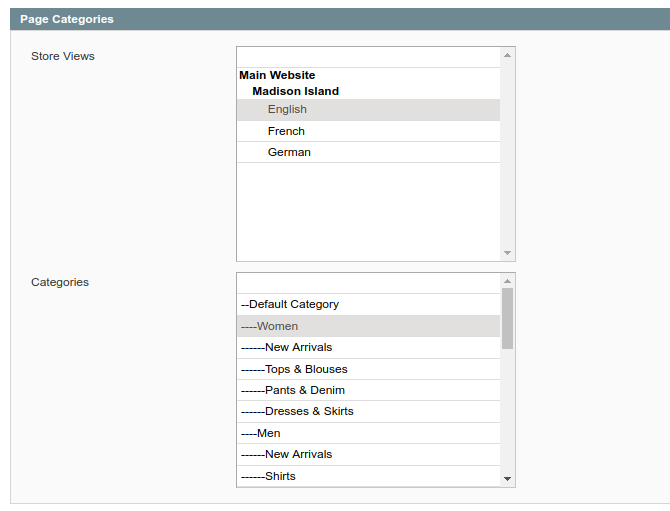
Select Store Views and specify Categories.
Custom Layout Update XML - You can add additional CMS blocks on top or below the product list or below the filter navigation blocks for certain pages.

Selection - Specify the attribute values to which the meta tags should be applied. We specified 2 at the selections page, so now we can choose 2 attribute values. It is possible to choose 2 values of the same attribute.
Please, read our Magento Layered Navigation: best settings for SEO blog article to learn more about special tips and tricks of the SEO settings.
6. Advanced categories menu
Activate ‘Advanced categories’ feature
To activate Advanced categories feature go to Admin panel → Catalog → Improved Navigation → Settings → General and choose advanced categories option.
When the option is selected, you can configure it in the Advanced Categories section.
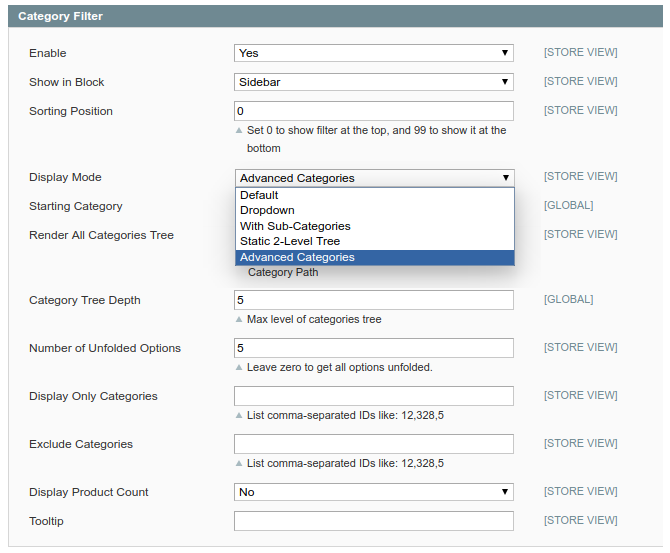
Set Display Product Count for Yes to show the number of the products assigned to a category.
Render All Categories Tree - Set Yes here if you want the whole category tree to be shown.
An example of the whole category tree with displayed number of products: 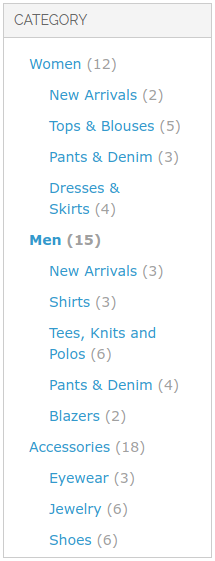

Categories Depth - You can choose the number of category levels to be shown.
Render Categories Level - specify to which category level the Category Depth settings should be applied to.
An example of a category tree where Category Depth equals 2. 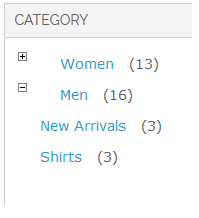

Subcategory thumbnails and names on category pages
To create a block with thumbnails for subcategories, please go Admin Panel → CMS → Static Blocks → Add new block
Add the following code to the Content field :
{{block type=amshopby/subcategories template=amasty/amshopby/subcategories.phtml columns=2 order=name height=30 width=30 shownames=1}}
Use columns parameter to specify the number of columns in the block. Name and position options are available for order parameter. If you want to show subcategory names, put 1 for shownames, if no – 0 (zero). You can also define the height and width of the thumbnails in pixels.
Then you can add the block to the needed category page. For this go to Catalog → Manage categories. Choose the category you need (ex. Apparel) and choose the block you’ve created in cmsblock dropdown.
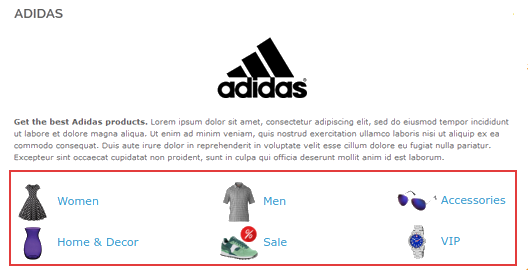
Here’s an example of a block with subcategory thumbnails and names on category page: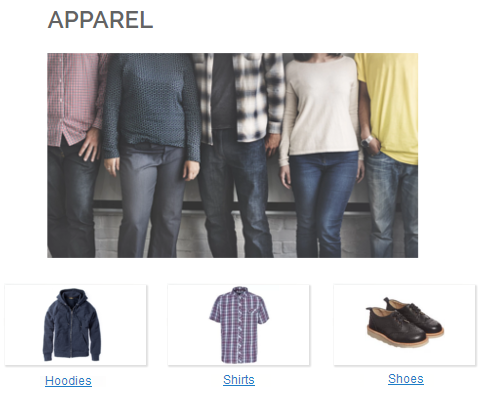

Apply filters to Category Name and Category Description
Please open Catalog → Improved Navigation → Filters → [open filter] → Options → [open option] in order to define Title, Description, Image and CMS block for your filter options.
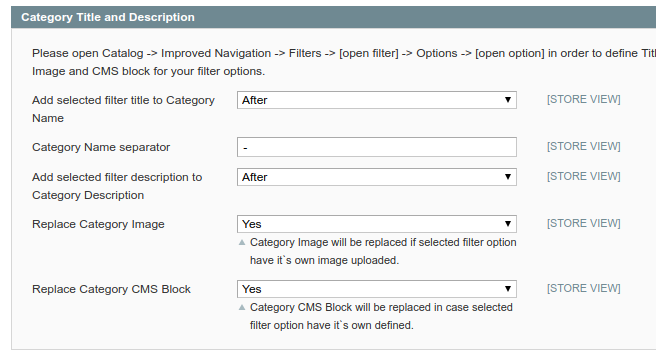
Add selected filter title to Category Name - You can apply defined filter title to Category Name: after, before and instead of it (=‘replace’).
For example, if you’ve selected black as filter title, it can be added to Category name in such manner:
* black – shoes
* shoes – black
* black
Moreover, you’re able to apply several filters to Category name. For example:
* men – black – shoes
* shoes – men – black
* men – black
Category Name separator - In this tab you can specify a symbol which separates Category Name from filter title.
Add selected filter description to Category Description - In the same way you’re able to apply filters to Category Description.
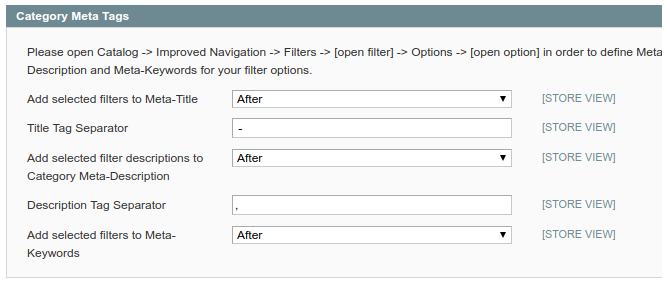
Select the order of category meta tags
Category Meta Tags - These settings allow you to select the order of category meta tags. The principle has been described on the previous page.
Description Tag Separator - Specify a symbol which separates Description from filter word.
7. Ajax Layered Navigation
With AJAX mode you can make the interaction between user and your e-store easy and quick. Extension’s possibilities:
- AJAX-based navigation
- Quick AJAX filtering
- Display of attribute descriptions and images on the category page, which get updated in AJAX-mode
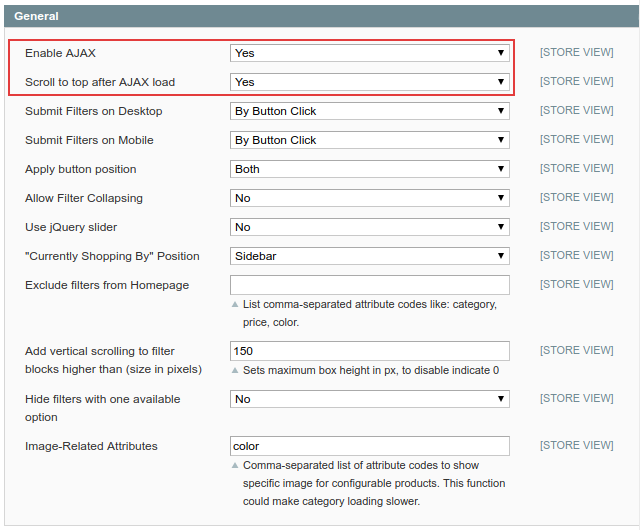
You can enable AJAX navigation in the General section. For AJAX to work properly, make sure that you have updated list.phtml file according to the installation manual.
Currently shopping by - is the block, where current navigation selections are displayed. You can choose whether to display it in the sidebar (Left) or in the middle column (Top) on front end.
The same display options are available for Category, Price and Stock blocks.
Add vertical scrolling to filter blocks higher than (size in pixels) - You can add scrolling to attribute filters. If the box height exceeds the specified size (in pixels), the scroll will be enabled. In case you don’t want to switch scroll on the page, specify zero (0) size.
Submit Filters (on Mobile/Desktop) - There are two types of applying chosen filters: instantly (via AJAX without full page reload) or by clicking the Apply Filters button (in this case a customer can select multiple filters and then apply all of them in one go). You can specify the preferable method for mobile and desktop separately.
Apply Button Position - Specify where to display Apply button: Sidebar, Top, Both (Apply button will be displayed either in a sidebar, or at the top of a page, next to filters.
When Submit filters by button mode is selected, customers can choose necessary values for multiple filters and then apply them by a button click. 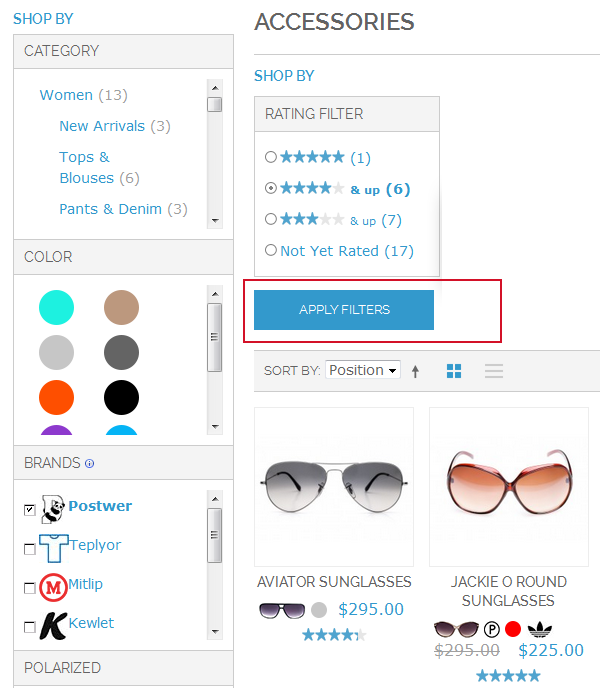

jQuery Slider - Set to Yes for a proper slider performance, specifically on mobile. Disable if you have older versions of Magento or experience issues with theme compatibility.
Image-Related Attributes - Display only specific attributes on all products pages. E.g. you can display only red color images of simple products.
8. Additional Settings
Manage the module cache
To manage the module cache, please open Admin Panel → System → Cache Management
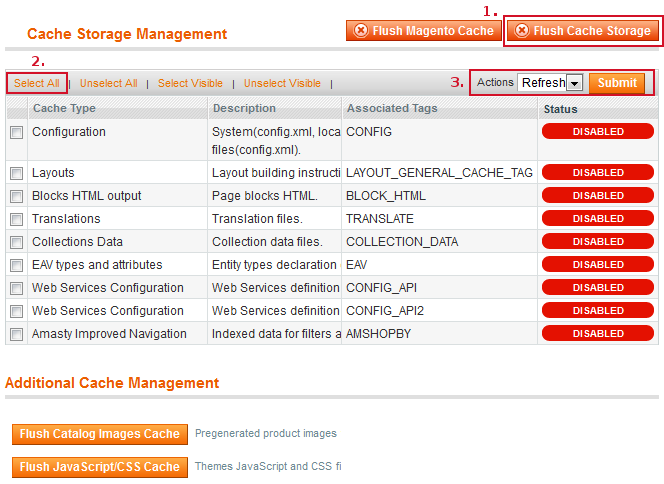
Here you can manage the module cache in accordance to your needs: enable, disable or refresh it. For this aim tick off the field and choose the required action in the top right corner of the tab. Then click the Submit button.
To refresh cache do the following: 1.Flush Cache Storage 2.Select All 3.Submit Refresh Action
magento_1/improved_layered_navigation.txt · Last modified: 2019/07/22 13:49 by skudrov


