Sidebar
magento_2:auto_add
Table of Contents
For more details see how the Free Gift extension works.
Ultimate Guide for Magento 2 Free Gift
Get four additional promo actions to automatically add free items to cart. Display custom banners to inform visitors about special offers and let them select a gift among available promo products.
- 5 extra auto add promo actions
- Informative banners on product pages
- Offer to add non-free products as a gift
- Add only in-stock products as promo items
- Full support for coupons functionality
- Convenient rule setting via Free Gift Rules Wizard
- Different product types support
- Rest API support
- WCAG compliance for Luma Theme
- Compatible with Adobe Payment Services
In Free Gift FAQ you can find answers to the most popular questions about the extension functionality.
Magento 2 Free Gift extension is compatible with GraphQL Application Server. You can find the amasty/module-graphql-application-server-compatibility package for installing in composer suggest.
![]() Any concerns about module configuration and implementation?
Any concerns about module configuration and implementation?
Book an individual training session to explore how the extension works and what practices to implement to achieve the desired result. Save time spent searching for the right settings - discuss configuration cases suitable for your business with the experts and work out the flow that your team needs.
Extension Configuration
To configure the extension settings, please go to Stores→ Configuration→ Amasty Extensions→ Free Gift.
General Settings
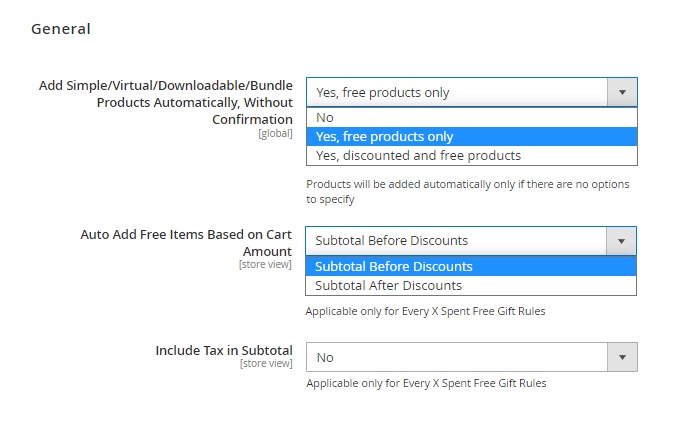
Add Simple/Virtual/Downloadable Products Automatically, Without Confirmation - enable automatic adding promo products to the cart. Select Yes, discounted and free products if you want non-free products to be added to cart automatically as well.
Pay attention, that if you want to offer more than 1 gift, this option will work only if you set Type: 'All the SKUs below' in the cart price rule.
Auto Add Free Items Based on Cart Amount - specify the cart amount type, basing on which a free gift will be automatically added. You may choose Subtotal Before Discounts or Subtotal After Discount.
Include Tax in Subtotal - Set to 'Yes' include tax in subtotal. Applicable only for Every X Spent Free Gift Rules.
Please note that this option only affects the Discount Step Qty (Buy X) field in the “Auto add promo items for every $X spent” action, but it does not affect the default Magento Subtotal condition.
Messages & Notifications and Displaying Settings
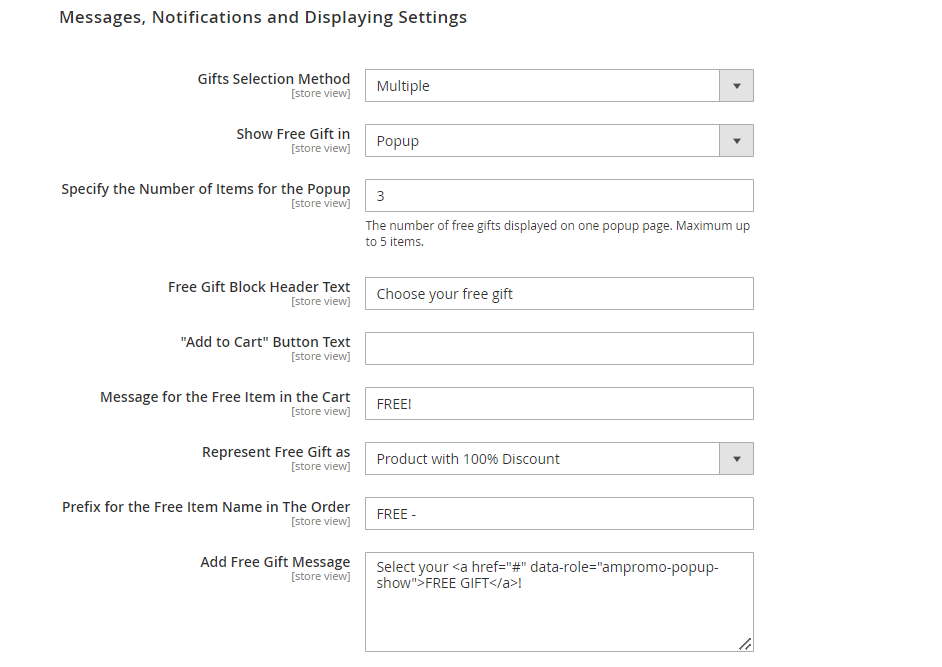
Gifts Selection Method - Сhoose here the way customers will select gifts in the pop-up window in the cart.
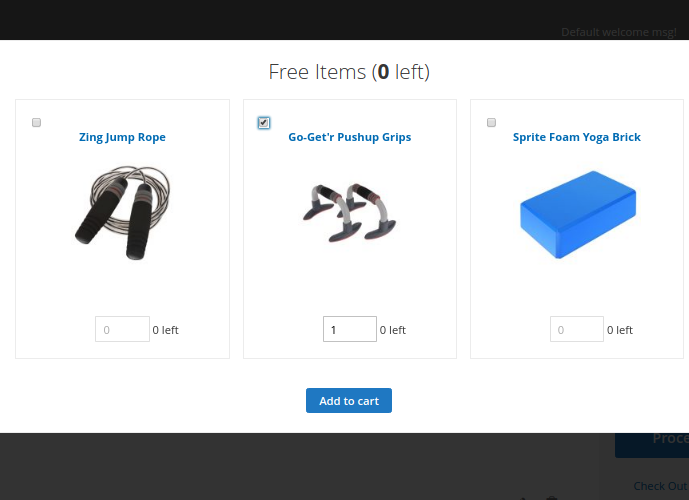
Multiple - a customer selects item(s) by using checkbox(es) and then click 'Add to Cart' button.
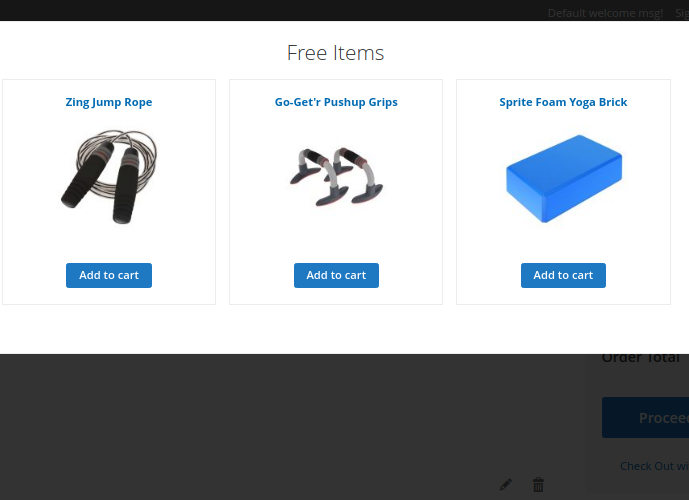
One By One - a customer adds item(s) by using 'Add to Cart' buttons.
Show Free Gift in - Select the method where the free gift will be displayed.

Please note that “Show Free Gift in = Banner” setting is available in Free Gift Pro version when installing a separate module amasty/module-free-gift-extended-view. You can find the amasty/module-free-gift-extended-view package for installing in composer suggest.
Specify the Number of Items for the Popup- The number of free gifts displayed on one popup page. Maximum up to 5 items.
Free Gift Block Header Text - Specify the pop-up window or banner slider header text you want to be displayed to customers.
'Add to Cart' button text - Enter the text for the 'Add to Cart' button.
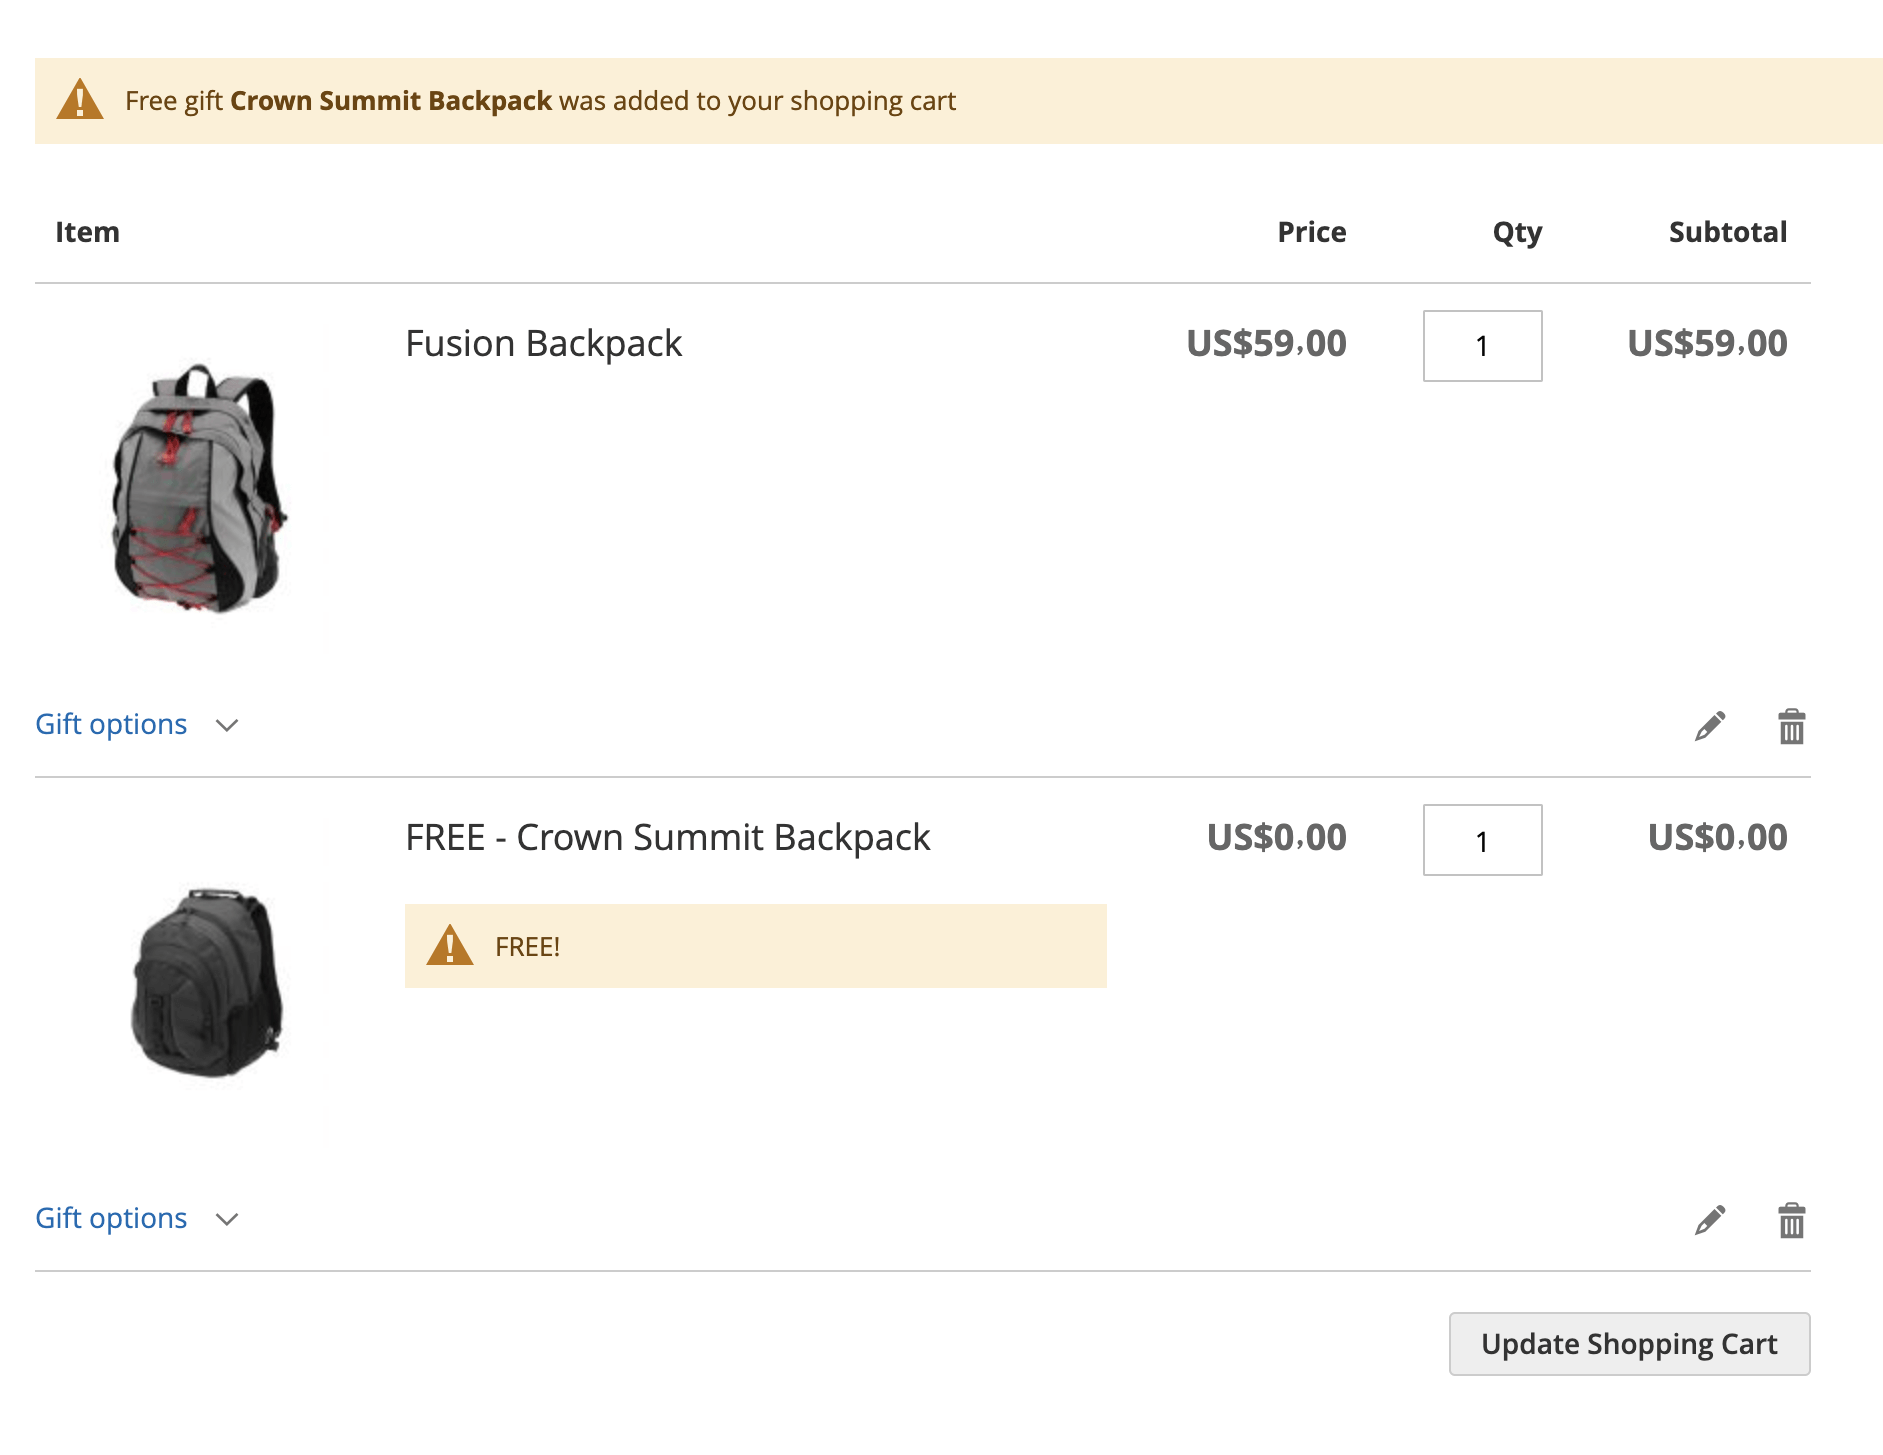
Message For The Free Item In The Cart - Specify the default message to display it next to free or discounted items in the shopping cart.
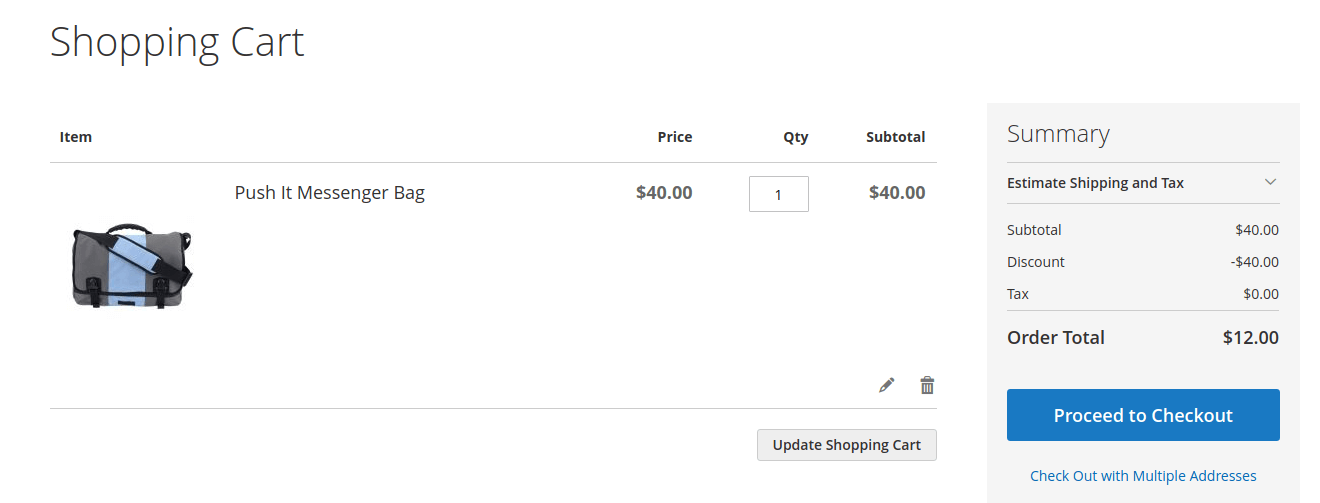
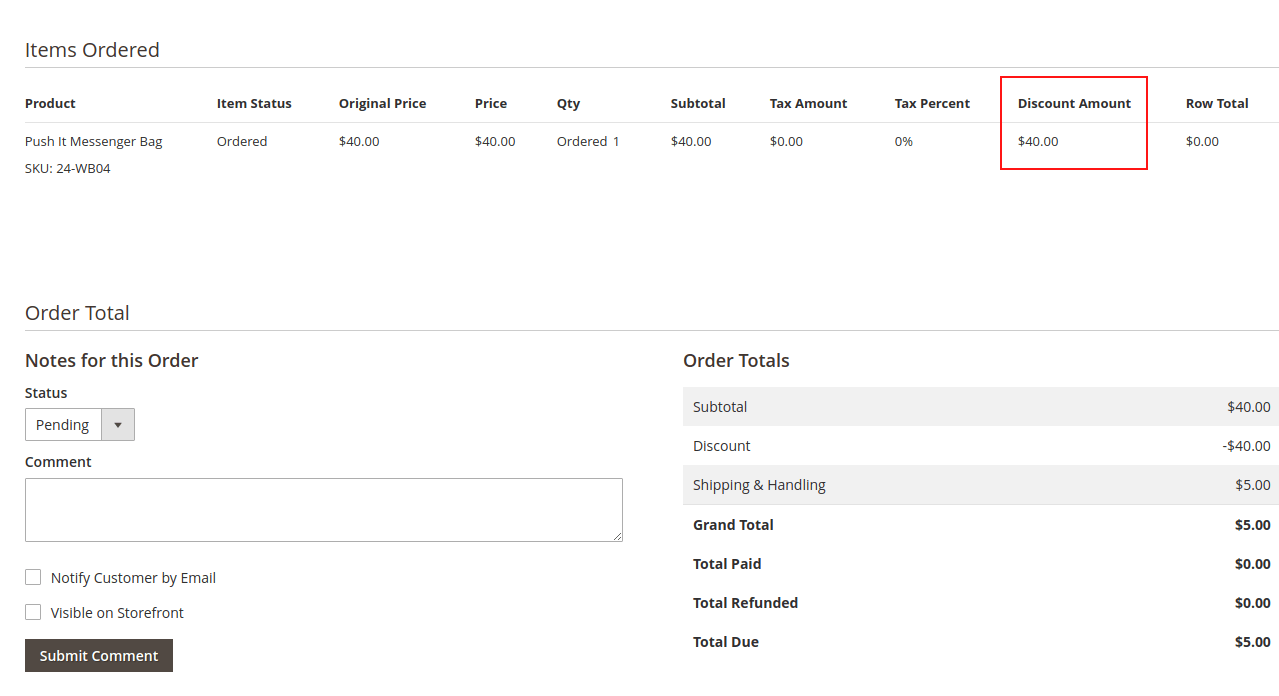
Represent Free Gift As - Choose how to represent your free gift: as a 100% discount or as a product with $0 price.
Please note that when configuring the “Represent Free Gift As - 100% discount” rule, the cost of the free gift is included in the subtotal calculation. This occurs because when calculating the subtotal, the total value of all items before any discounts are applied is taken into account, including the cost of the free gift.
Prefix For The Free Item Name In The Order - Indicate the default prefix that will be used with promo items on order pages in the admin panel.
Add Free Gift Message - Specify the message that will be displayed in the pop-up window with promo items.
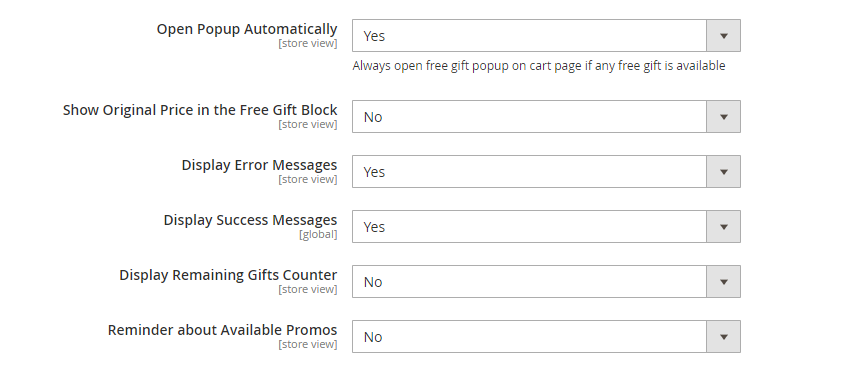
Open Popup Automatically - If the option is set to ‘Yes’, customers will see the pop-up automatically when rule conditions are met.
Show Original Price in the Free Gift Block - If the option is set to ‘Yes’, the discounted products in the pop-up or banner slider will be displayed with a strike-through old price and a new price. If you choose 'No' - a customer will see only a new price.
Display Error Messages - Set to ‘Yes’ if you need error messages to be displayed.
Display Success Messages - Enable success messages when a promo item is added to cart.
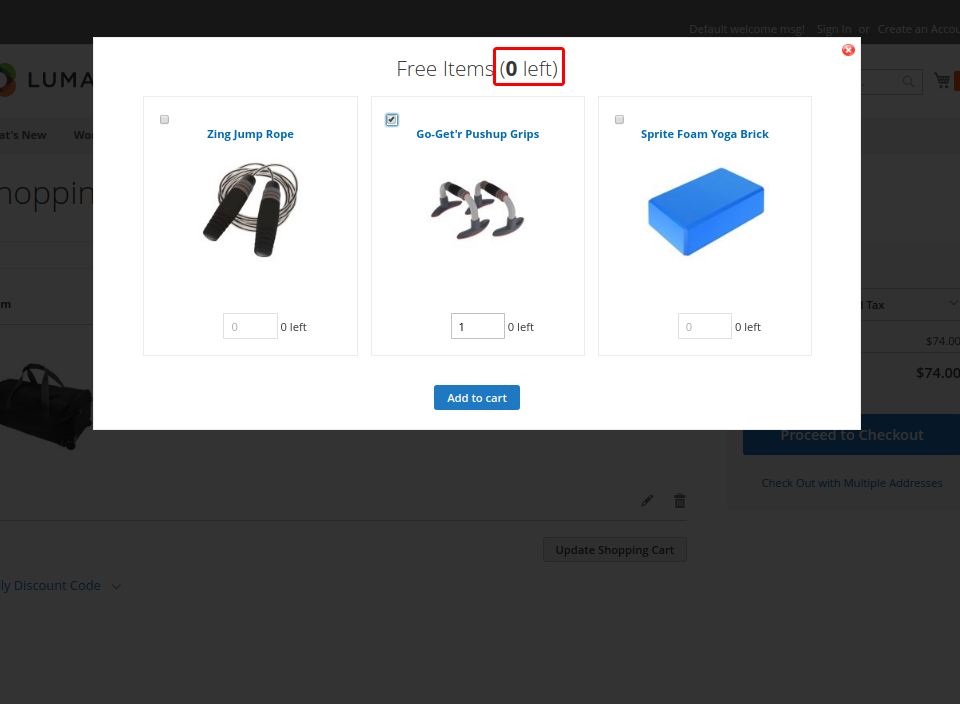
Display Remaining Gifts Counter - With this option, you can display in the pop-up the number of available gifts.
Remaining Gifts Counter example

Reminder about Available Promos - Use this option to show a special reminder message on the frontend catalog pages to inform customers about available gifts. Set the option to 'Yes' to specify a custom message.
Notification Message - Specify the text of a notification message.
Limitations
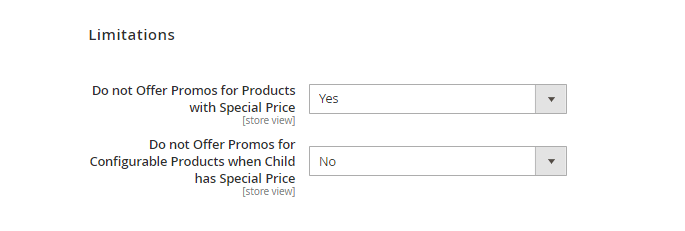
Do not Offer Promos for Products with Special Price - Enable the setting if you don't want to apply promo rules to products with special price. This will help to avoid double discounts application. When the setting is enabled, tune up the next field:
Do not Offer Promos for Configurable Products when Child has Special Price - Enable, if you want not to apply promo rules to configurable products if one (or more) of its child product has a special price.
Gift Images
In this section you can configure the promo items display.
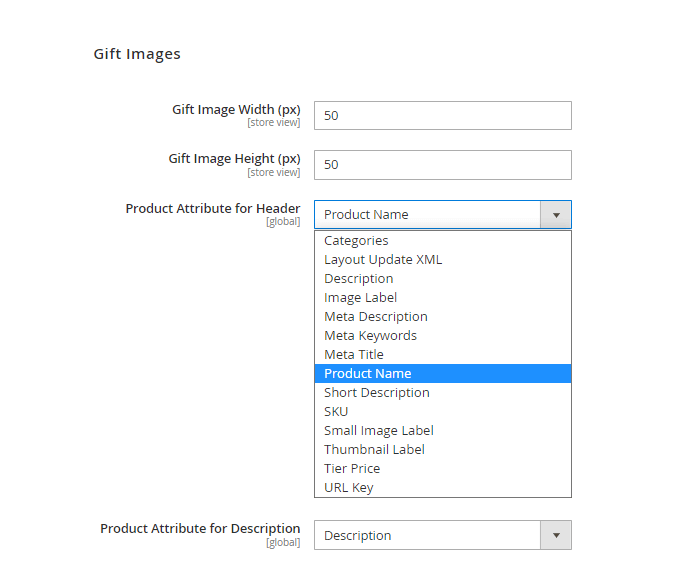
Gift Image Width (px) - Set promo images width.
Gift Image Height (px) - Set promo images height.
Product Attribute for Header/ Description - Use text attributes like Name and Short Description to display additional info about promo items when a customer hovers the mouse over the promo item image.
Promo Banners Lite
To configure this section, please navigate to Stores → Amasty Extensions → Promo Banners Lite
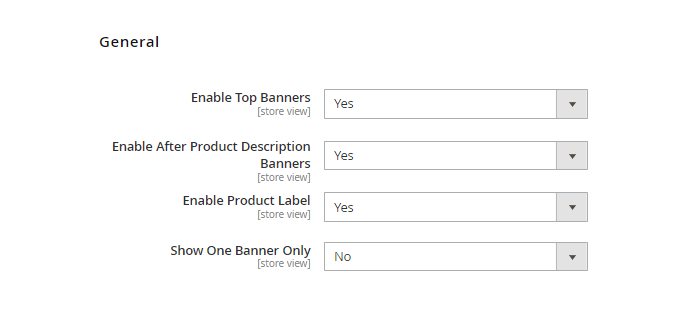
Enable Top Banners - Use the option to display promo banners on top of a product page.
Enable After Product Description Banner - This option shows banners above the 'Add to Cart' button.
Enable Product Label - set this setting to 'Yes' to enable product label.
Show One Banner Only - If the option is set to 'Yes' only one banner from the matched rules (depending on the priority of the rule) will be shown. Select `No` to show all banners from matched rules.
Rules Configuration
Create numerous cart price rules and quickly view the most important rule information. To view the list of rules or create a new one please go to Marketing → Cart Price Rules.
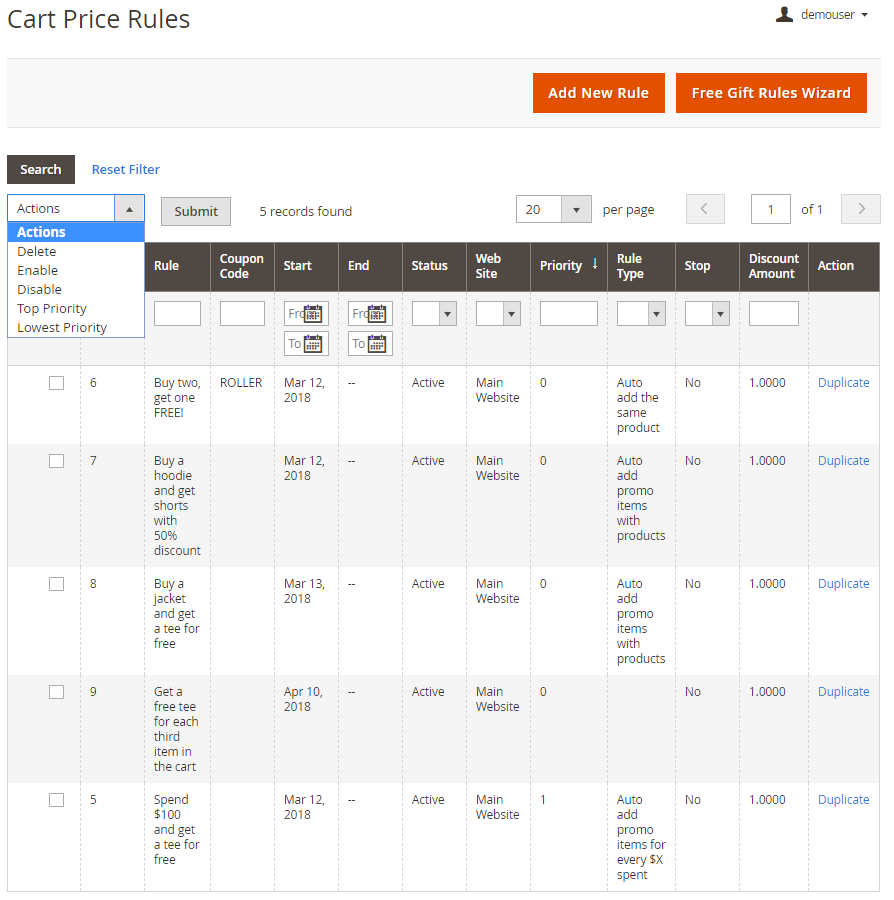
On a convenient grid, all the rules are displayed. You can Edit a rule by clicking the necessary one or Duplicate it via Actions column.
To perform mass action, tick them and expand Actions dropdown menu. It is possible to Delete, Enable/Disable rules, set Top Priority or Lowest priority right on the grid. Click Submit to apply an action.
To create a new rule, click Add New Rule or use our handy Free Gift Rules Wizard.
To enable free gifts for Virtual or Downloadable product types, you need to enable Shipping Methods for these product types. For example, you can create a bundle product from Simple and Virtual/Downloadable Products. Otherwise, if the customer adds only Virtual/Downloadable products to a cart, the free gift suggestions will not be displayed.
The Free Gift extension for Magento 2 supports the following product types:
- Simple products
- Configurable products
- Virtual products
- Downloadable products
- Bundle products
- Gift Card (Magento Commerce)
- Amasty Gift Card Pro/Premium
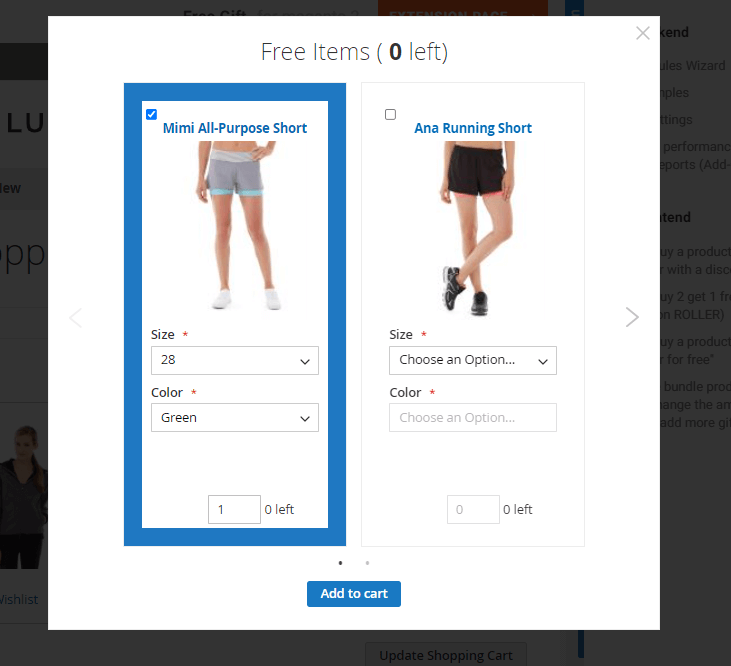
See an example of how different products might look on the Free Gift popup in the shopping cart.
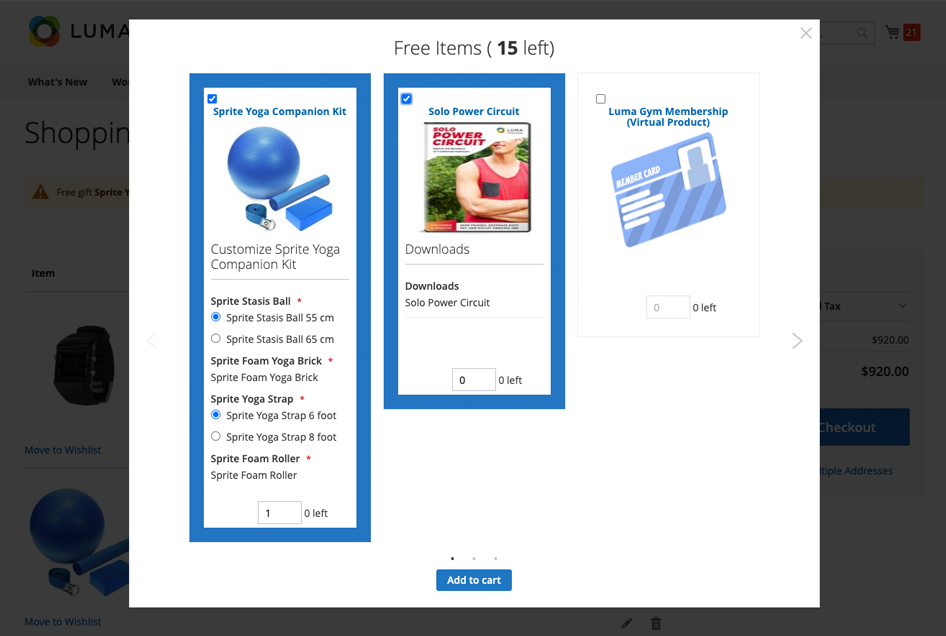
You can also check this short overview video to see how to apply Magento 2 Free Gift rules after other discounts based on subtotal.
Rest API support
The extension allows you to create Free Gift Rules via REST API.
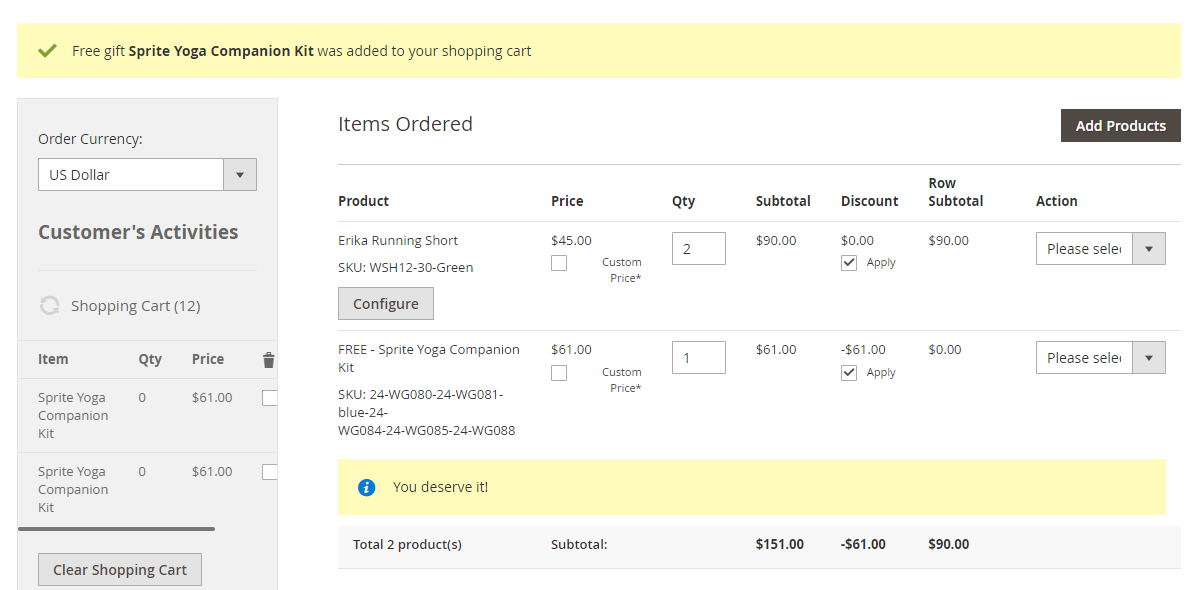
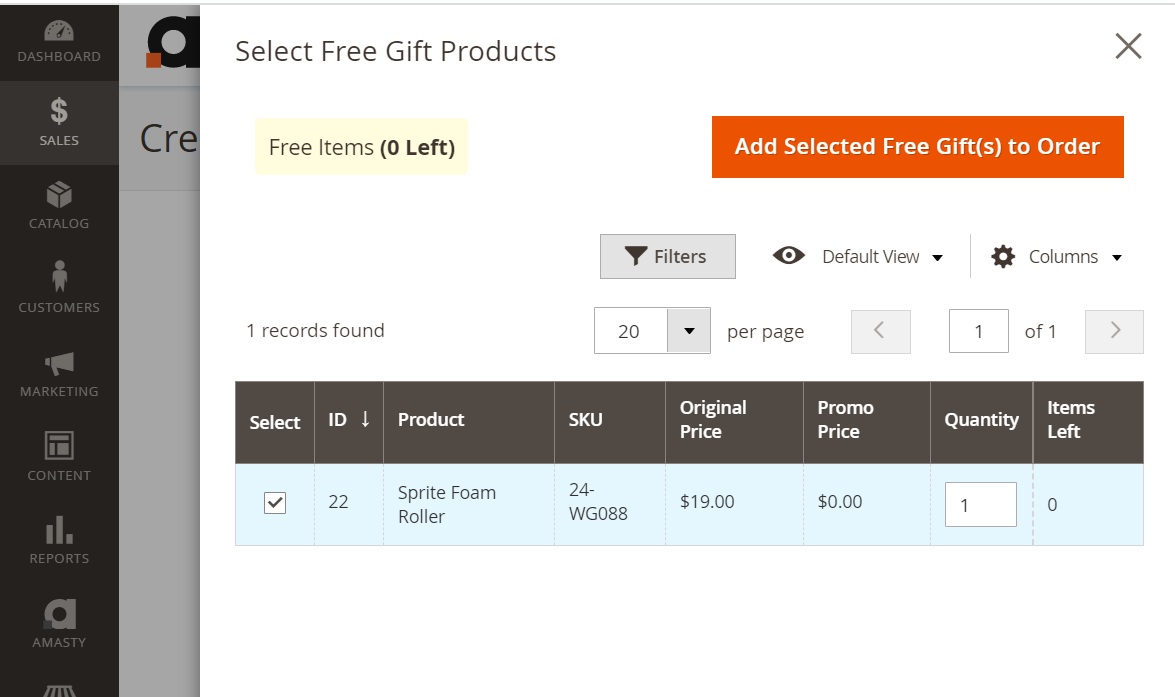
Create orders with free gifts from the backend
Now you can easily add free gifts when creating orders from the admin panel automatically or using a slide-in grid.
1. Add free gifts automatically
2. Add free gifts via slide-in grid
Free Gift extension for Magento 2 is read compatible with GraphQL. Now you can use GraphQL queries to get:
- list of free gifts on the cart
- list of free gifts on the checkout
- add or delete free gifts from the cart
Please, note that version 2.14.0 backward is incompatible:
- We renamed the Model/ItemRegistry/PromoItemRegistry.php class to PromoItemsGroup.php. and removed its use in all constructors. In the same constructors, we added a dependency on Model/PromoItemRepository.php. since getting data about free gifts goes through \Amasty\Promo\Model\PromoItemRepository::getItemsByQuoteId()
- We've removed Model/ItemRegistry/PromoItemFactory.php and now a default factory is used instead.
Now you have to pass $quoteId to methods:
- \Amasty\Promo\Block\Add::hasItems()
- \Amasty\Promo\Block\Add::isOpenAutomatically()
- \Amasty\Promo\Helper\Data::getNewItems()
- \Amasty\Promo\Model\Registry::addPromoItem()
You also need to pass $quote to methods:
- \Amasty\Promo\Block\Add::getAvailableProductQty()
- \Amasty\Promo\Helper\Data::getPromoItemsDataArray()
- The \Amasty\Promo\Model\ItemRegistry\PromoItemData::isDeleted() method has been renamed to isItemDeleted().
Free Gift Rules Wizard
Free Gift Rules Wizard allows to create all basic rules simply in 4 steps. It will help you to avoid complicated settings and configure a rule quickly.
To create a rule via Wizard, press Free Gift Rules Wizard on the grid page or go to Marketing → Free Gift Rules Wizard.
Step 1. Scenario
Determine the type of the desired promotion and action mechanics.
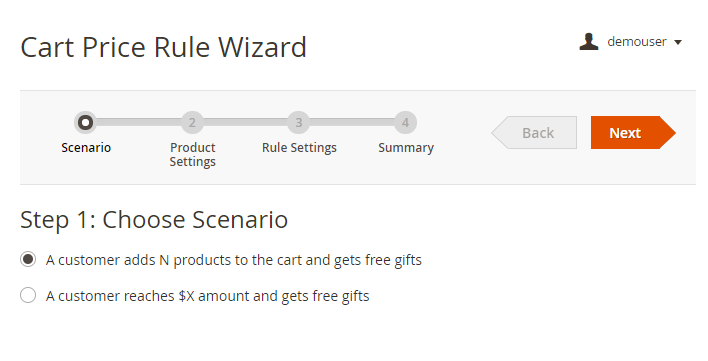
Two scenarios are possible:
- A customer adds N products to the cart and gets free gifts - choose this scenario to create a rule based on the number of products in a cart;
- A customer reaches $X amount and gets free gifts - choose this one to configure a rule according to the total amount.
Step 2. Product Settings
This step allows to configure the general mechanics of your promo action according to the scenario you’ve chosen in Step 1.
For N products rule
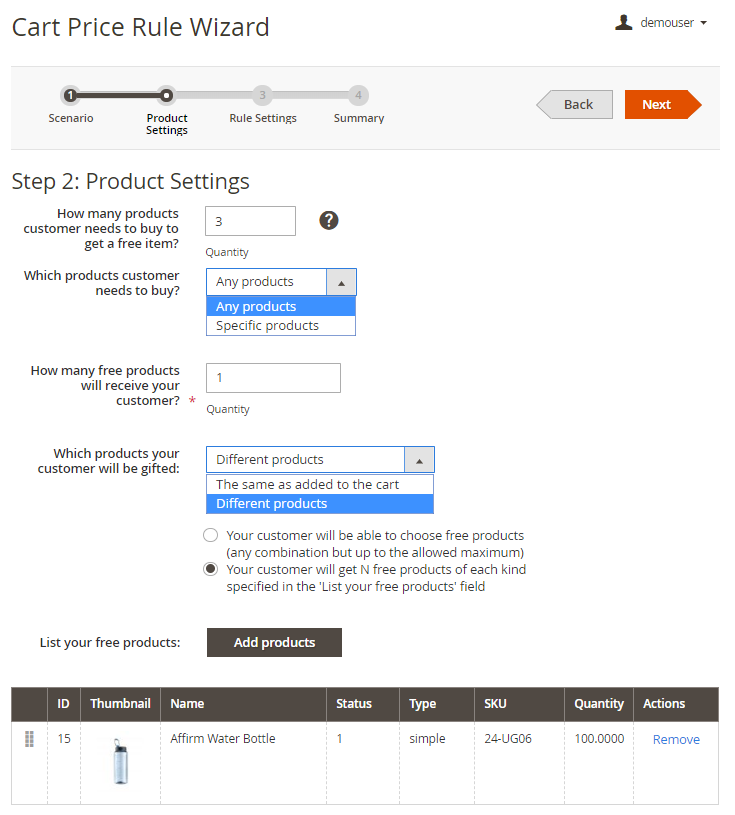
How many products customer needs to buy to get a free item? - specify products quantity that the customers need to buy to get a free gift.
Which products customer needs to buy? - choose Any products to give a free gift according to the products number only, or choose Specific products to which the promotion will be applied.
If you set Specific products, set the conditions according to which particular items will include a free gift.


How many free products will receive your customer? - specify the quantity of free products you want your customers to get.
Which products your customer will be gifted - choose which product your customers will get as a gift: The same as added to the cart or Different products.
In case Different Products are set, decide if:
- Your customer will be able to choose free products (any combination but up to the allowed maximum);
- Your customer will get N free products of each kind specified in the 'List your free products' field.
List your free products - add your promo products.
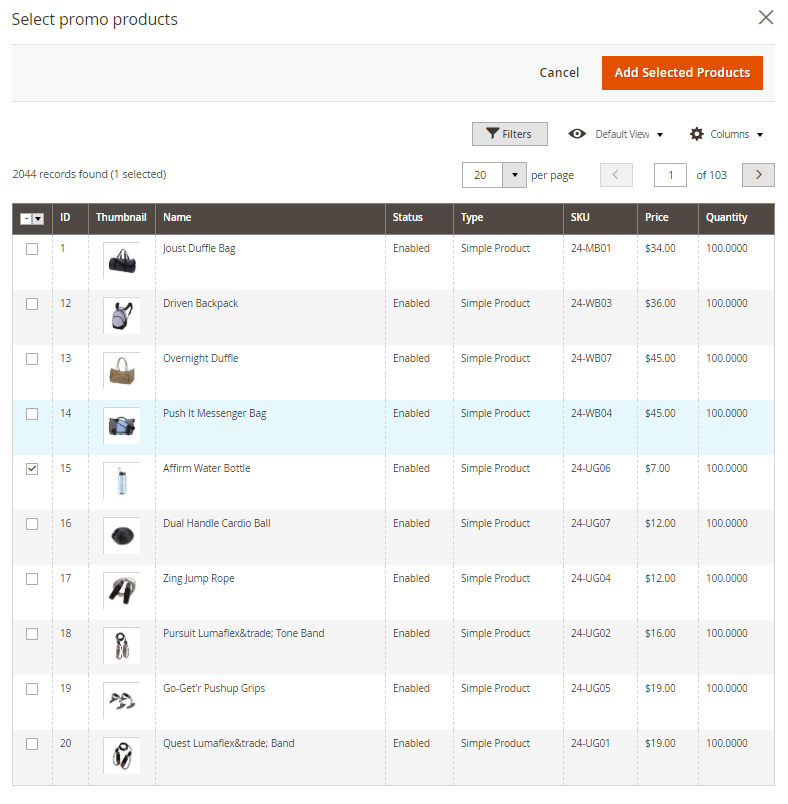
Click Add products button to choose the needed ones from your list. Tick them and hit the Add selected products button.
For $X amount rule
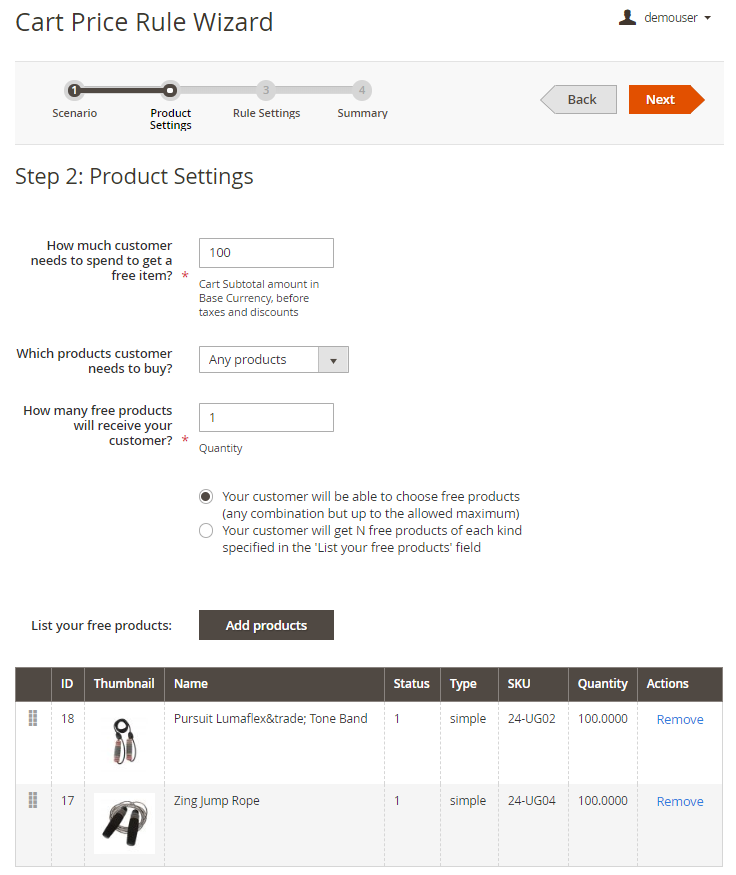
Here specify Cart Subtotal amount in Base Currency, before taxes and discounts that a customer should spend. Then, similar to N products rule, select products that a customer need to buy, how many free products your customer will receive and choose promo products.
Step 3. Rule Settings
Configure general settings of the rule.
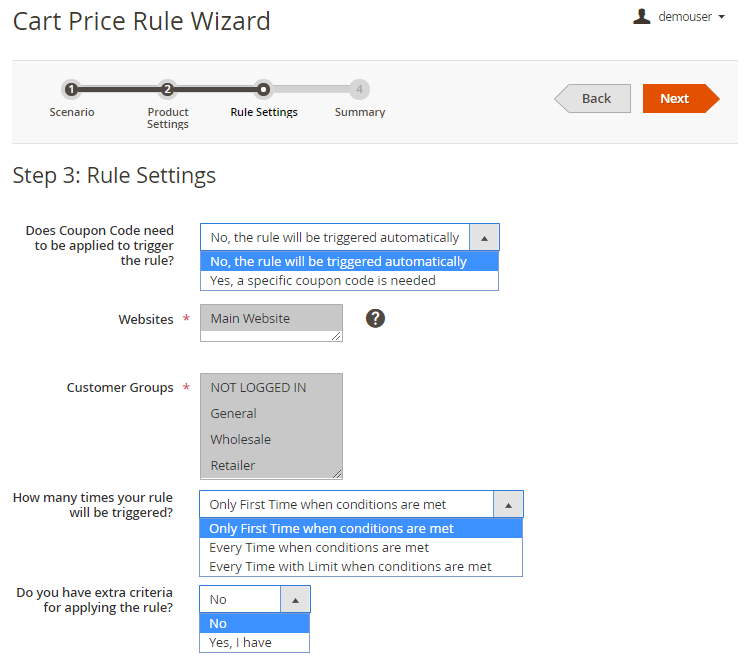
The extension allows to apply the rules only after a particular coupon is used. Specify if the rule will be triggered automatically or a specific coupon code is needed.
Websites - specify the websites on which the rule should be applied.
Customer Groups - select customer groups for which the rule will be applied.
How many times your rule will be triggered? - specify how many times a customer can get a free gift:
- Only First Time when conditions are met;
- Every Time when conditions are met;
- Every Time with Limit when conditions are met.
If you want to apply the rule Every Time with Limit, in the next field set the maximum number of times your rule will be triggered.


Do you have extra criteria for applying the rule? - set special conditions for applying the rule if needed via conditions tree.

Step 4. Summary
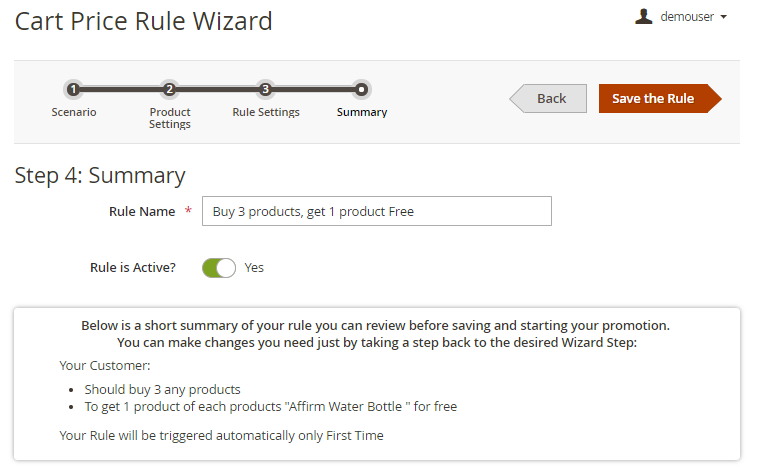
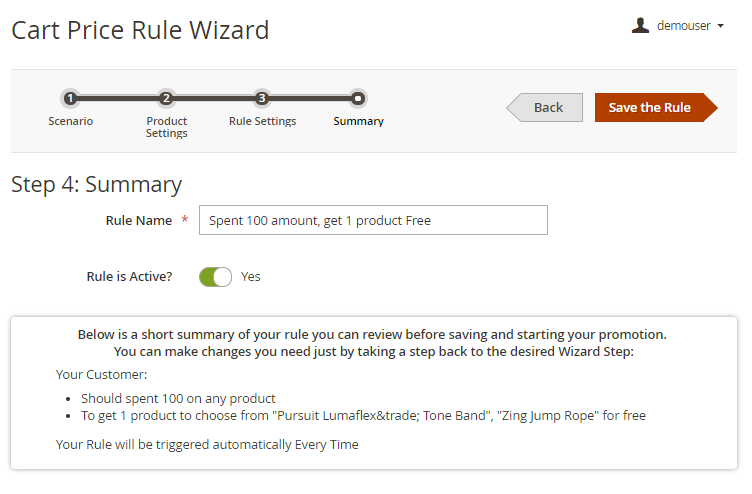
In this block you will see an auto generated preview of the rule: it helps to check without leaving the page how the rule will work. If the summary does not match your requirements, you can easily go to the necessary step and change the settings.
Rule Name - the title of your promotion will be generated automatically.
Rule is Active? - enable/disable the rule.
Summary For N products rule
Summary For $X amount rule
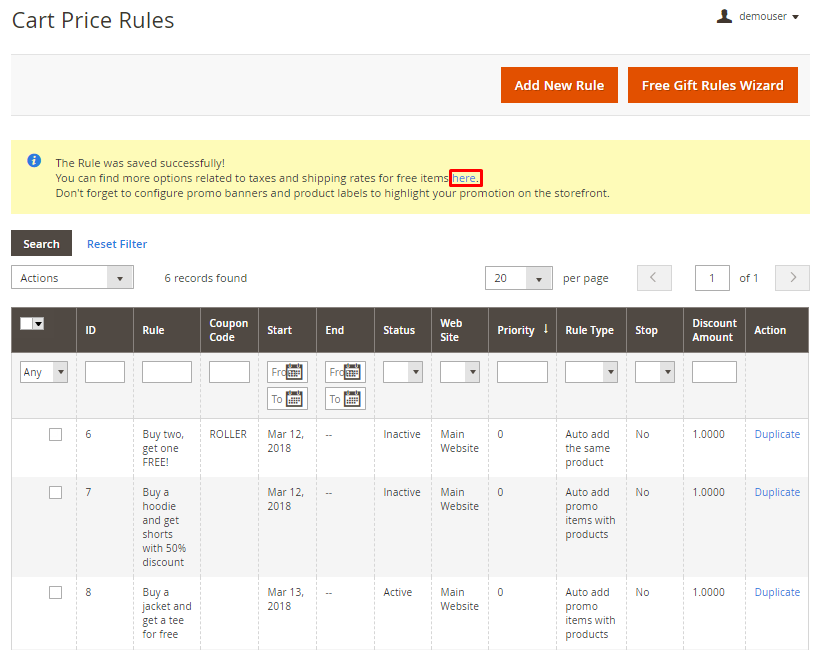
In case everything is set correctly, Save the Rule.
You will be redirected to the Cart Price Rules grid. In the convenient pop-up you can use a link to set more advanced configuration such as promo banners, product labels, etc.
Discount Rule Settings
To create a specific rule, go to Marketing → Cart Price Rules. Click Add New Rule.
Here the example of a discount rule is presented.
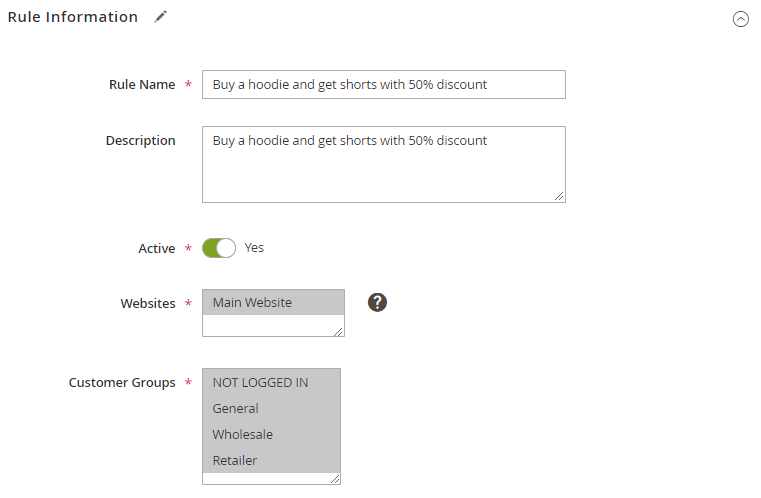
Rule Name - Indicate the rule name that will be shown on the Rules grid.
Description - Specify a short rule description (optional).
Status - Activate/Deactivate the rule at any time.
Websites - Specify websites on which the rule should be applied.
Customer Groups - Select customer groups for which the rule will be applied.
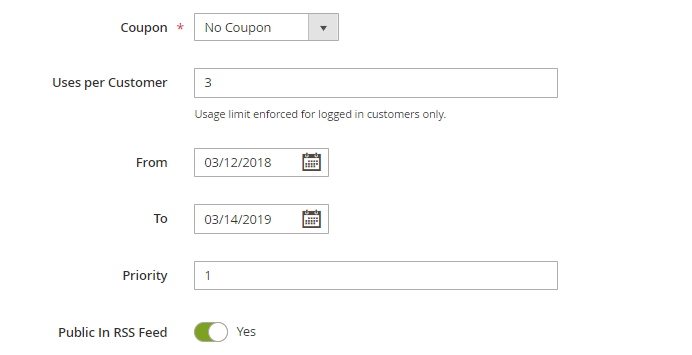
Coupon - you can either enable the coupon option and specify a particular coupon code with the usage limit or disable the option to automatically add free gifts to cart.
Uses per Customer - specify how many times the rule can be used by one customer. The option works for logged in customers only.
From/to - Specify the time period during which the rule will be active.
Priority - Set the rule priority to regulate the order of rules application.
Public In RSS Feed - enable this option to notify your subscribers about special promotions.
Set up Rule Conditions
Specify as many rule conditions as you need. You can apply the rule to specific product categories,
products with specific attributes etc. Easily combine different parameters according to your needs.
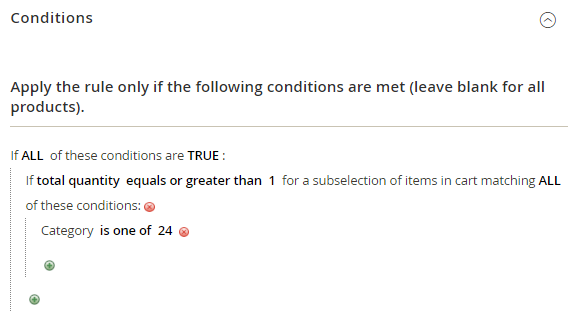
Conditions define in which case your promo will be applied.
Configure Promo Actions
Actions determine what benefits a customer will get if he/she fulfills the promo conditions.
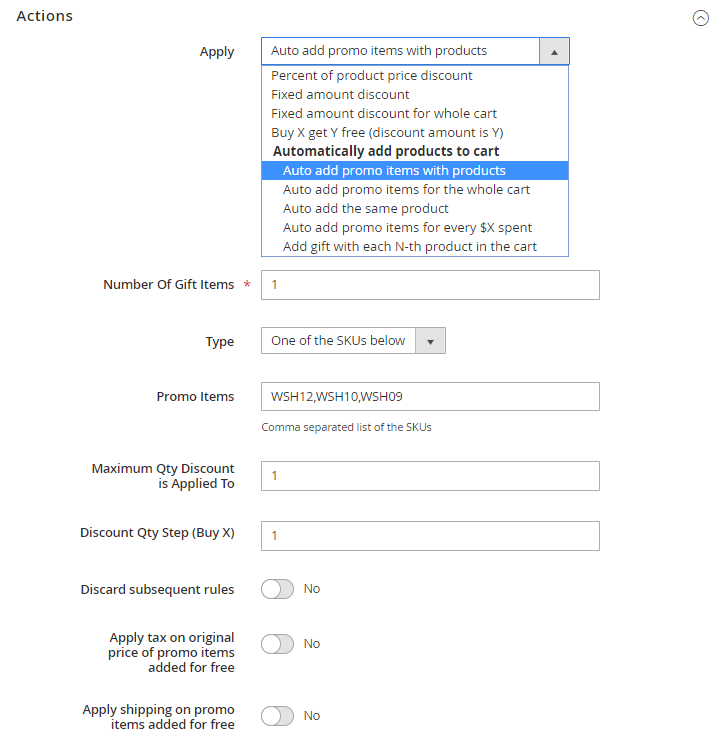
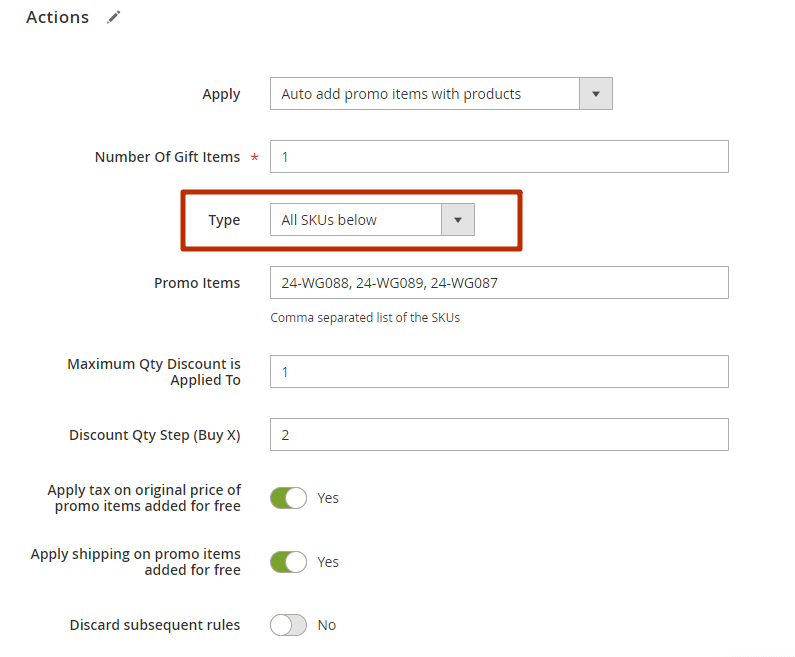
Apply - select one of available promo actions.
With this extension you get 5 unique discount actions to enrich your promotional possibilities:
- Auto add promo items with products
- Auto add promo items for the whole cart
- Auto add the same product
- Auto add promo items for every $X spent
- Add gift with each N-th product in the cart
Number Of Gift Items - Specify the number of promo items provided for each discount step.
Type - Choose ‘All SKUs below’ option to automatically add to cart all promo items. ‘One of the SKUs below’ option will allow customers to choose one of the available promo items, specified in Promo Items field.
Please note that the final number of gifts is determined by the combination of the 'Type' and 'Number Of Gift Items' settings. If you select the 'One of the SKUs below' option, then any listed SKUs will be available for selection, in total not exceeding the number specified in the 'Number of Gift Items' setting. If you choose the 'All SKUs below' option, customers can select each SKU in the quantity specified in the 'Number Of Gift Items' settings.
Promo Items - Define the SKUs of products that will be granted as gifts.
Maximum Qty Discount is Applied To - it’s possible to specify the maximum number of products with discount a customer can get per order.
Discount Qty Step (Buy X) - choose per how many paid products one free item should be added.
Discard subsequent rules - if the option is set to 'Yes' all subsequent rules will not be applied.
Apply tax on the original price of promo items added for free - it's possible to tax gift products based on their original price.
Apply shipping on promo items added for free - if 'No', free gifts won't be counted when the shipping price is calculated, i.e. gifts will be shipped for free.
NEW
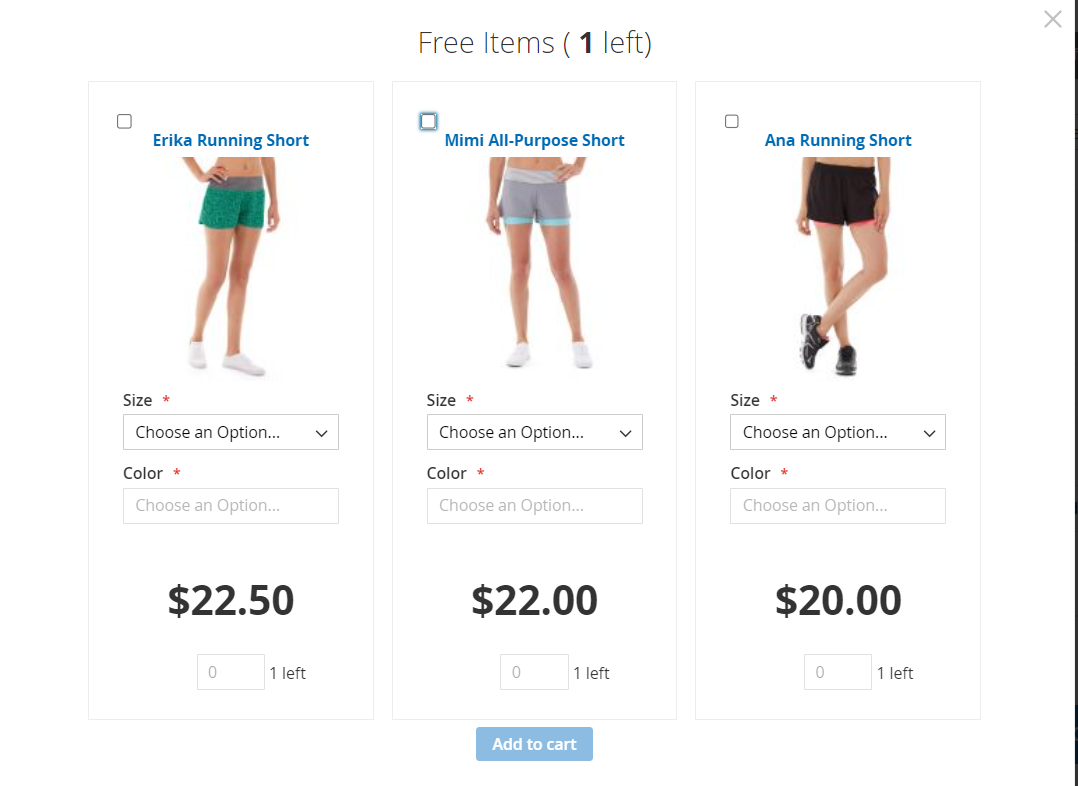
Now you can sort free gifts in the popup by position in a rule. Products will be displayed in the order in which gift SKUs are set in the Promo Items configuration.
See an example:
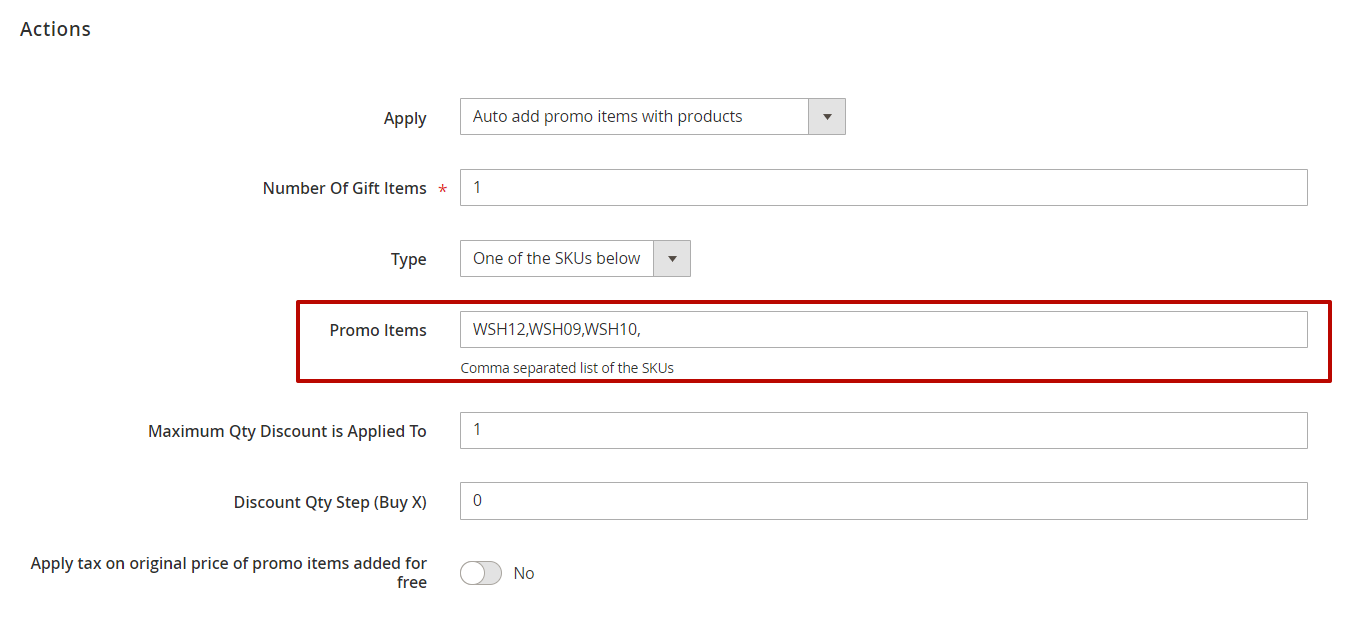
On the frontend, promo products in popup are displayed in the same order as in the rule settings:
Promo Items With Discount

With this option, you can offer your customers not only free items but discounted products as well.
Promo Items Discount - here you can set a fixed price (e.g. 20), a fixed discount (e.g. -20) or a percent discount (e.g. 50%). If you want to add a product for free, leave this field empty.
Minimal Price - here you can specify a minimal discounted price for the suggested promo items in the pop-up. For example, you set a 50% discount and a minimal discounted price to be '10'. In this case, if the product you offer in the pop-up costs less then $21, its price after the discount will be 10$.
Labels and Store View Specific Labels
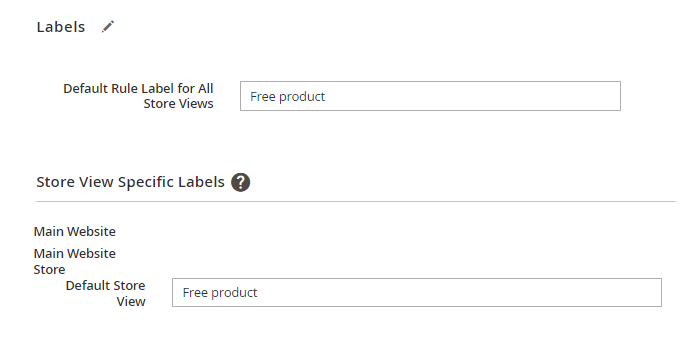
Default Rule Label for All Store Views - In the ‘Labels’ tab you can preset the promo text to display on in the shopping cart when the rule is applied. It's also possible to set different promo texts for different websites and store views.
Gift Card Compatibility
The compatibility with Amasty Gift Card is available as part of an active product subscription or support subscription. You can find the amasty/module-promo-gift-card package for installation in composer suggest. It is temporarily unavailable for the Hyvä Theme.
Please note that Compatibility is only supported with the Gift Card (Pro/Premium) and Free Gift (Lite and Pro) modules installed.
To start, please go to General Settings in Gift Card Module and find Apply Cart Price Rules to Gift Card setting.
Apply Cart Price Rules to Gift Card - enable this option to make Cart Price Rules available for gift cards.
Highlight Promotion


Show For - choose from the dropdown the scope of display for the highlights.
The available options are:
- All products - choose it to apply highlights configurations for all products of your catalog;
- Product SKU - choose this option to specify a list of SKUs, separated by commas;
- Categories - choose this option to specify certain categories for highlights display.
Please note that highlights will be displayed on pages of products associated with the specified categories, but NOT on category pages itself.
Top Banner On Product Page
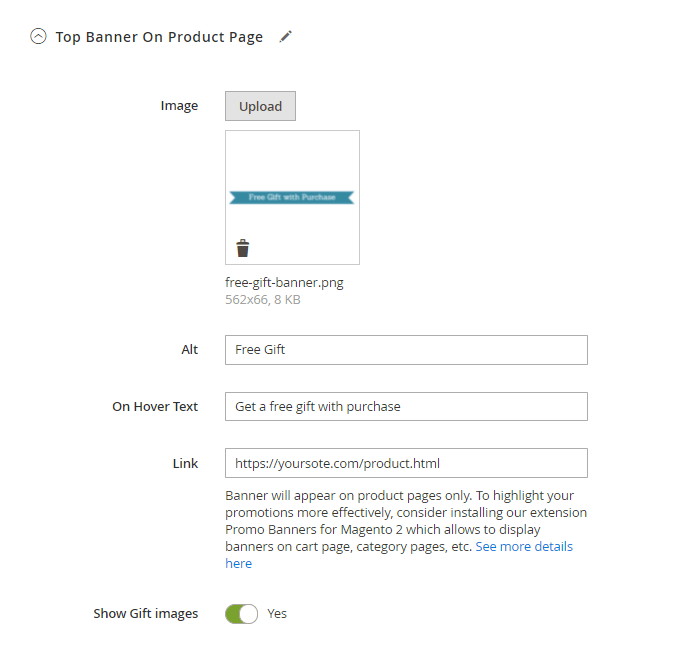
Upload a custom image for the top banner and specify its parameters, like Alt, according to your needs.
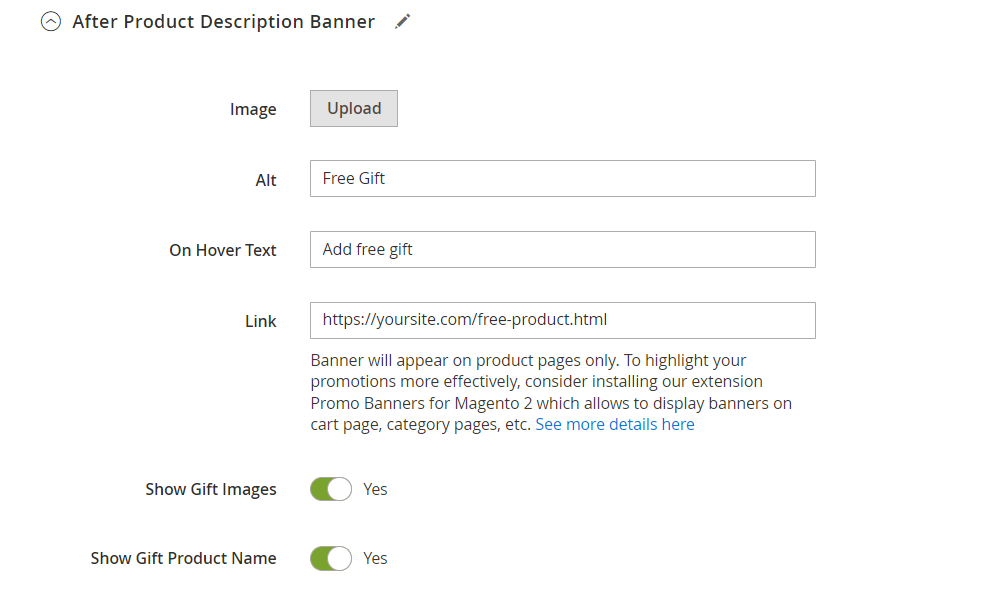
On Hover Text - Specify the text that will be shown on a mouse hover.
Link - Specify the page to which the banner should lead.
Banner will appear on product pages only. To highlight your promotions more effectively, consider installing our extension Promo Banners for Magento 2 which allows to display banners on cart page, category pages, etc.
Show Gift images - Choose whether to display promo items.
After Product Description Banner
Configure the display of the 'After Product Description Banner' section in the same way as the 'Top Banner On Product Page' section.
Product Label
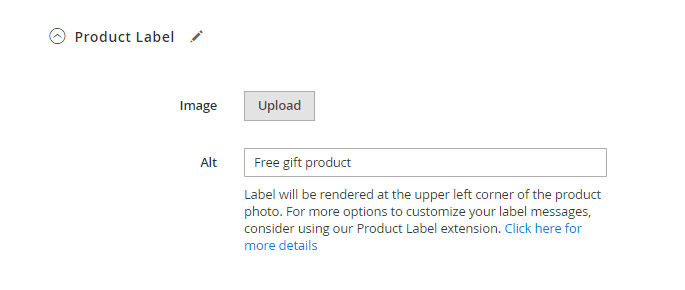
Upload custom image for the label and specify its Alt parameter according to your needs.
Label will be rendered at the upper left corner of the product photo. For more options to customize your label messages, consider using our Product Label extension.
Free Gift Frontend Examples
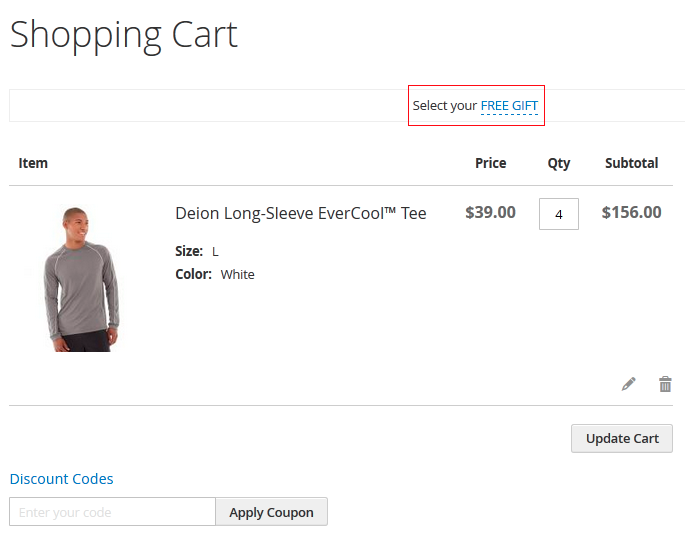
The link with available promo items is added to the shopping cart page.
Here is the example of a special popup that appears on the shopping cart once a customer clicks on the Free Gift link.
All promo items added to the cart are marked with a special label.
Banner Examples
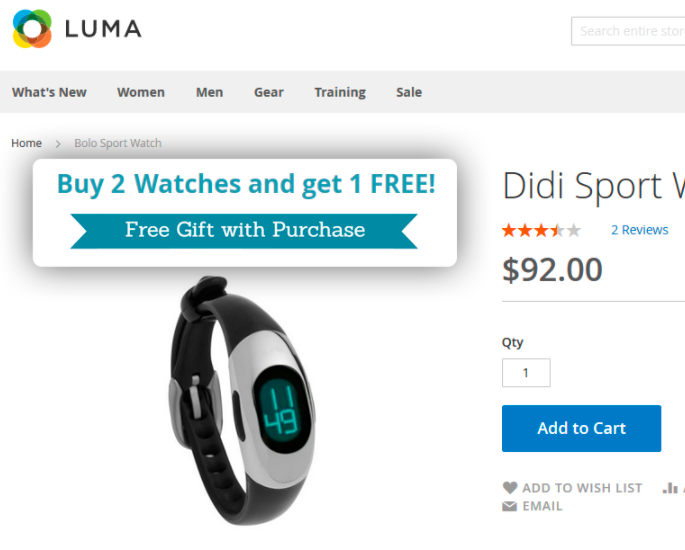
Promo banner placed on top of a product page.
Promo banner with an additional text. It's also possible to the display the text only without showing the banner.
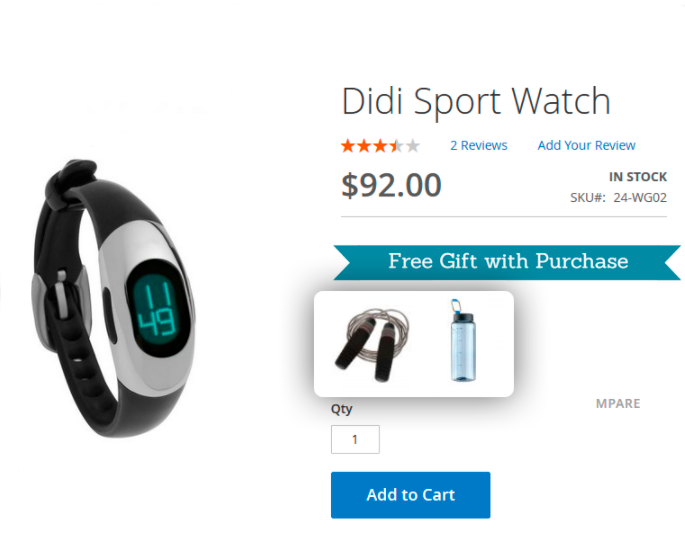
Display available promo items right on a product page.
Complement the free gift solution with Magento 2 Coupons to shift customer loyalty to a new higher level by offering a wider range of promotions.
Free Gift PRO
Free Gifts Reports
The advanced Free Gift PRO functionality allows you to see a detailed overview of rules' performance on a handy dashboard. Get actionable insights on how special offers impact sales to timely manage your marketing strategy and save money.
The functionality described in this section, can be enabled only after purchasing a Free Gift PRO.
With the PRO version, you can see the efficiency of your promo campaigns in one click. To see the reports, please navigate to Admin Panel → Reports → Marketing → Free Gift Reports
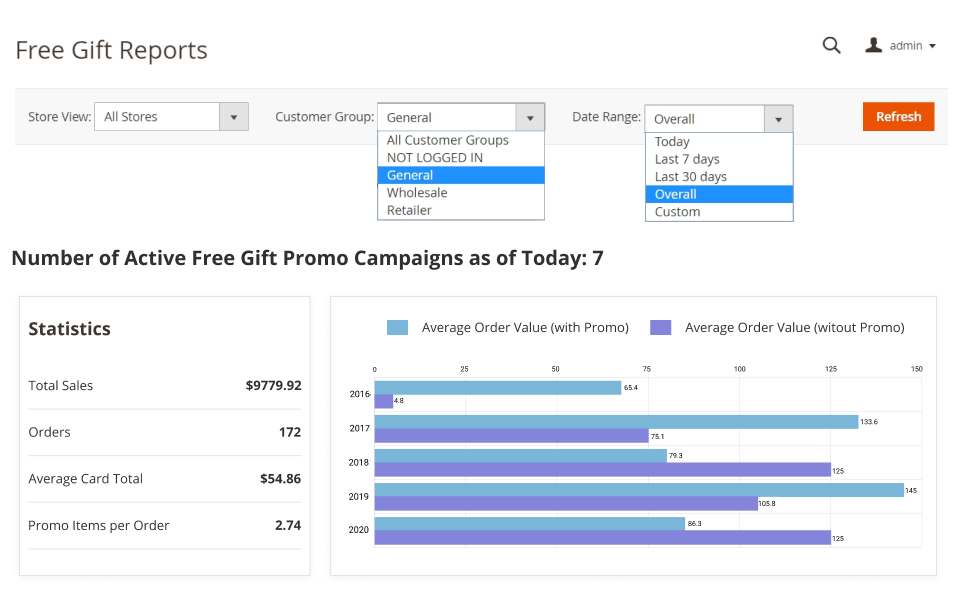
On a dashboard, you'll see the sections with statistics and charts.
You can also select the Customer Groups and Date Range. After choosing the inputs you need, press the Refresh button. The reports for specified selection will be displayed on a dashboard below.
On a Statistics block, the following data is presented:
- Total Sales - the sum of all purchases that were completed during the chosen timeframe.
- Orders - total number of orders that were completed during the selected period.
- Average Cart Total - a calculated average cart value includes both types of purchases (with and without promotion rules applied).
- Promo Items per Order - an average number of promotional items that were placed in the cart. Applicable only for carts that had one or more rules triggered.
The chart compares the Average Order Values for orders with and without promo rules applied. This way, you can see clear numbers of how promotional rules impact sales.
Please kindly note that the reports will be generated only for time periods AFTER Free Gift PRO installation. Due to certain Magento limitations, it can't display reports for orders that were created before the PRO version installation.
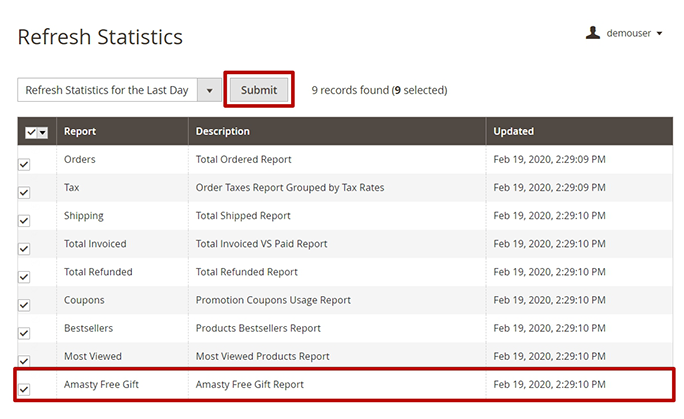
To update the statistics, please go to Reports → Statistics → Refresh Statistics. Then, on a grid, select the Amasty Free Gift report and press the Submit button.
Highlight Promotions
There are two new options for highlighting your promotions with free gifts added in the Pro version of the extension: Free Gift Bar and Countdown Timer.
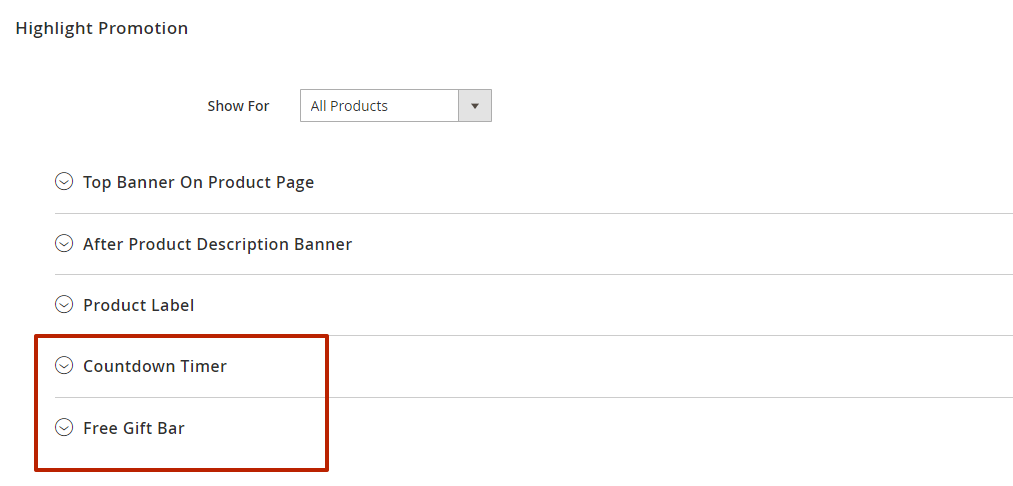
Free Gift Bar
To enable a Free Gift Bar, go to Marketing → Cart Price Rules. Then create a new rule with the ‘Auto add promo items for every $X spent’ condition or edit existed rule with that condition (you can configure Free Gift Bar only in this type of condition). After that, go to the Free Gift Bar settings.
Please note, that Free Gift Bar for 'Auto add promo items for every $X spent' condition is available only in the Pro version of the module or as a part of an active product subscription or support subscription.
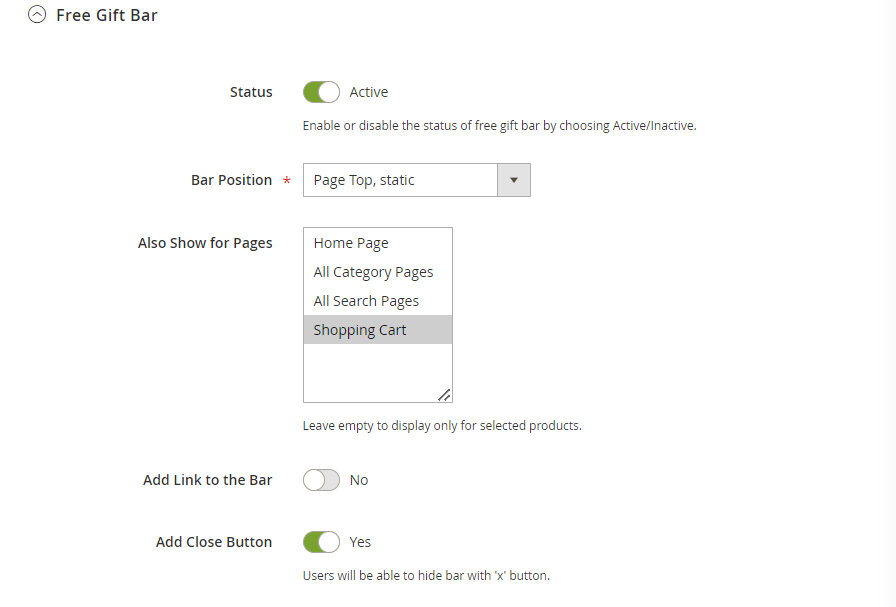
Status - Enable or disable the status of free gift bar by choosing Active/Inactive.
Bar Position - choose any position for free gift bar: page top and page bottom. You can fix the bar so that the customers will not lose it. It helps to continuously motivate customers for purchasing.
Also show for Pages - put the bar on different pages of your online store: home page, all category pages, all search pages, and shopping cart. Leave empty or select all to show bar on all pages.
Please note that the main display of highlights is configured in the 'Show For' section within the Highlight Promotion block.
Add Link to the Bar - set to Yes to add a link and help your customers easily find important information. The bar will be clickable if you add the link.
Link Address - specify the link to provide a customer with necessary information.
Add Close Button - enable this option if you want the users to be able to hide the bar with ‘x’ button.
 Initial Message - enter an informative message about free gift conditions that will motivate a customer to make a purchase.
 In Progress Message - fill in the message to inform your customers about the amount left for free gift.

Achieved Message - specify the content of the success message. A customer will get it, when the cart total achieves the needed amount to get a free gift.
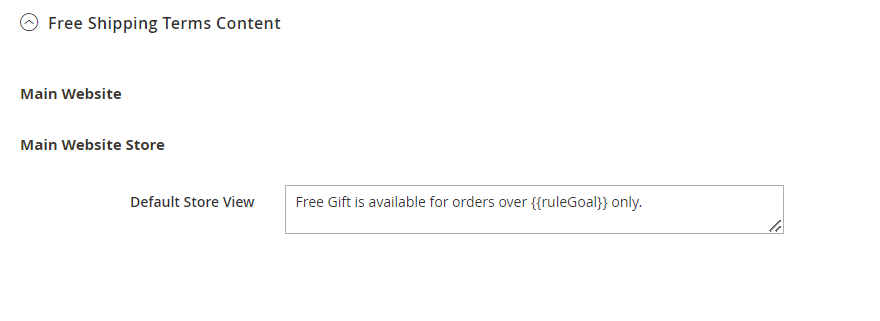 Free Gift Terms Content - fill in the message to provide customers with important information right on the bar.
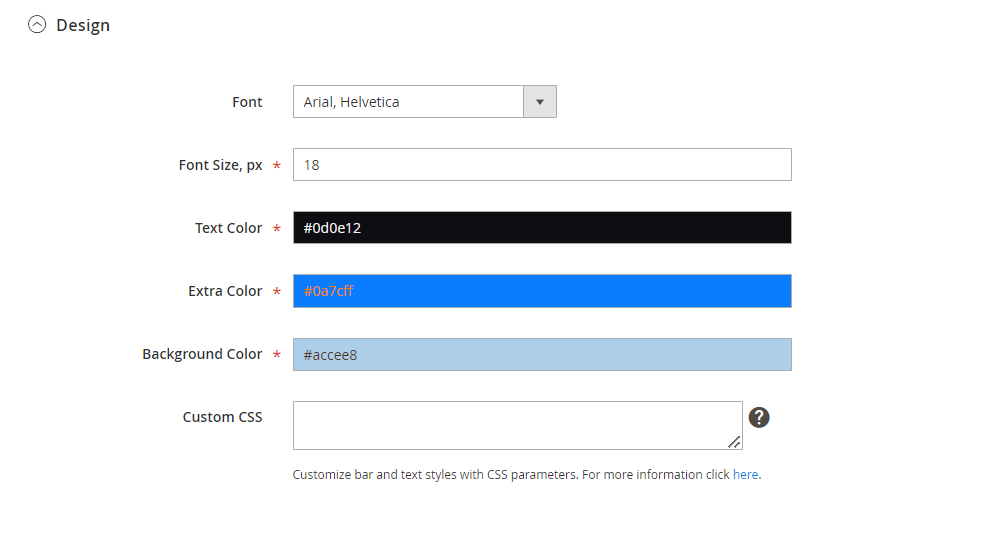
Design
Font - choose Google font from the dropdown menu to fit your website style.
Font Size - adjust the font size of the messages displayed on the bar.
Text Color - set the colors of the messages specified in the Content tab.
Extra Color - adjust any extra color to attract the attention on the cart subtotal goal.
Background Color - specify the background color with a handy color picker tool.
Custom CSS - customize bar and text styles with CSS parameters.
Additional packages (provided in composer suggestions)
To make additional functionality available, please install the suggested packages you may need.
Available as a part of an active product subscription or support subscription:
For Basic and Pro versions:
amasty/module-free-gift-hyva- Install this package to ensure the Free Gift extension works with the Hyvä Theme.
amasty/module-auto-add-promo-items-graphql- Install this package module to activate Graphql and Free Gift integration.
amasty/module-promo-gift-card- Install this package to enable compatibility with Gift Card Pro/Premium extension (Note: Compatibility is only supported with the Gift Card and Free Gift modules installed).
For Pro tariff plan only:
amasty/module-free-bar-promo- Install this package in order to use the Free Gift Bar functionality.
amasty/module-free-gift-timer- Install this package for Amasty Countdown Timer compatibility.
amasty/module-free-gift-extended-view- Install this package to activate the Free Gift Banner displaying functionality.
Compatibility with Checkout Routines and Solutions
The extension fully supports Magento's default two-step Checkout, extra Checkout steps provided by payment gateway extensions, and One Step Checkout by Amasty.
The extension is compatible with most non-default Checkout routines which require a single Shipping address.
The extension is not intended to be used with Order splitting of any kind.
Compatibility with Amasty Countdown Timer extension
The Free Gift Pro extension is fully compatible with Amasty Countdown Timer so it is possible to display countdown timer for Free Gift rules. (Note: the compatibility is available as a part of an active product subscription or support subscription).
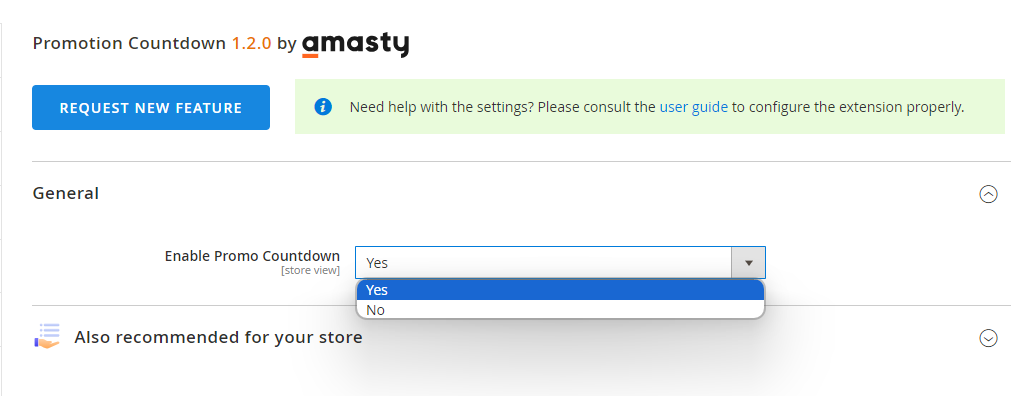
To enable the extension, go to Stores → Configuration → Amasty Extensions → Promotion Countdown.
See how to configure the general settings for Countdown Timer here.
To configure the extension for Free Gift Pro, go to Marketing → Cart Price Rules. Then create a new rule or edit existed rule with that condition. After that, go to the Countdown Timer settings.
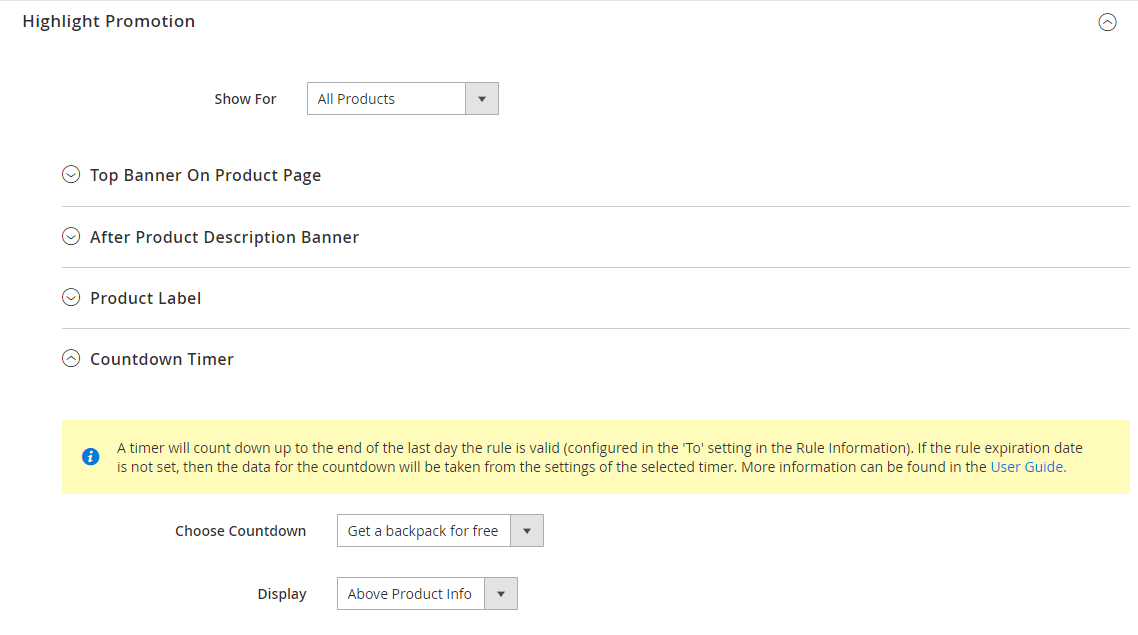
Choose Countdown - choose one of already created timers.
Display - specify how to display countdown timer - above or below product info.
Please note that the main display options of the Countdown Timer are configured in the 'Show For' section within the Highlight Promotion block.
In the Enterprise version, the data for the countdown will be taken from the settings of the selected timer widget. Please make sure that the timer is set to the correct 'Start Time' and 'End Time' settings according to the expected duration of the rule.
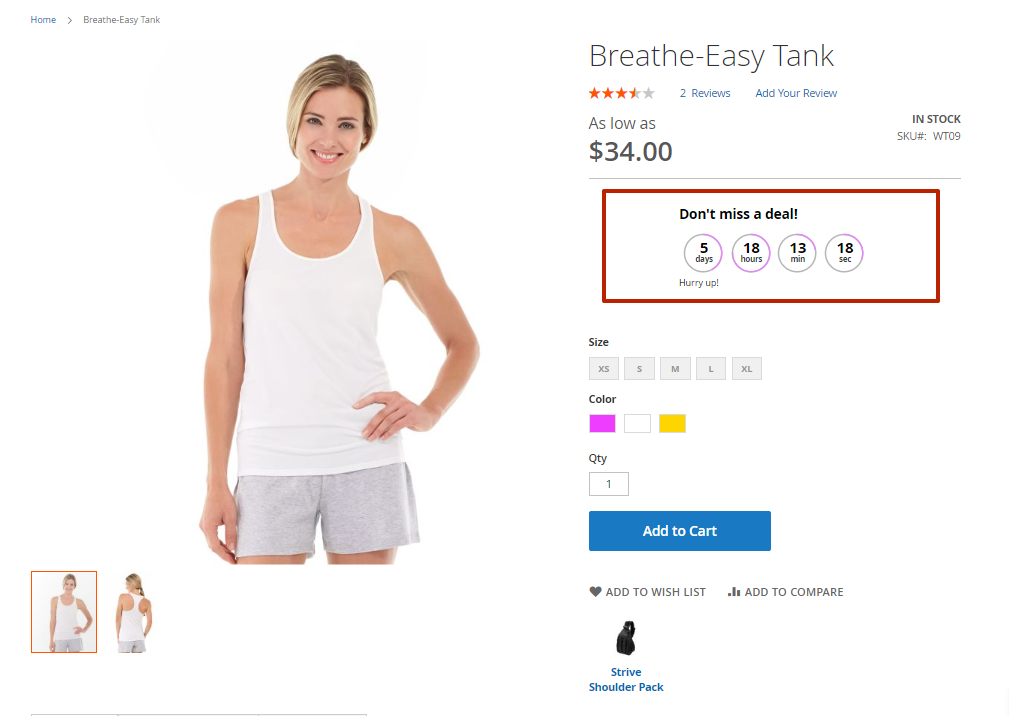
Frontend example:
FAQ
magento_2/auto_add.txt · Last modified: 2025/05/21 10:04 by avronskaya

