User Tools
Site Tools
Trace: • Guide for Countdown Timer for Magento 2 • Guide for Pre Order • Guide for Custom Form for Magento 2 • Guide for Advanced Permissions for Magento 2 • FAQ & Product Questions • Guide for Age Verification for Magento 2 • Guide for Advanced Search for Magento 2 • Guide for CMS Upgrade Scripts for Magento 2 • Guide for Improved Sorting for Magento 2 • Guide for Elastic Search for Magento 2
Sidebar
magento_2:elastic_search
Table of Contents
For more details see how the Elastic Search for Magento 2 extension works.
Guide for Elastic Search for Magento 2
Elastic Search for Magento 2 is an advanced tool to provide your store with optimized search performance and highly relevant search results.
- Display advanced autocomplete window
- Use spell corrections
- Add alternative product names by synonym results
- Configure full text content search
- Specify the search types for each product attribute
- Set promo rules to promote certain products
- Analyze customers’ activity via Search Analytics dashboard
- OpenSearch compatibility
- REST API support
- ADA & WCAG compliant (for Luma Theme)
- Hyva-ready storefront
Before Installing
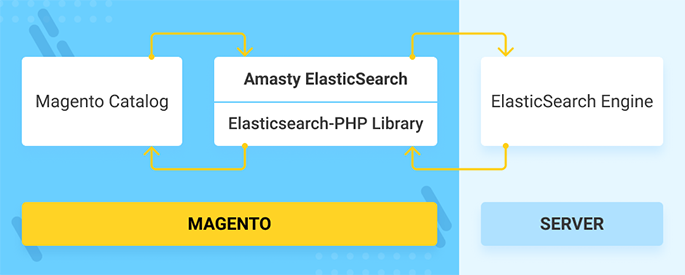
Please, consider that there are three main entities, which constitute the extension's work:
- Elasticsearch engine - versions 6.х-7.x
- Amasty Elasticsearch 8 - versions 8-8.х
- Amasty Opensearch
Please note: when upgrading to Amasty Elasticsearch 8, please specify Elasticsearch Server Hostname and Elasticsearch Server Port in extension general settings appropriate for Amasty Elasticsearch 8. This way you will avoid errors when executing the “setup:upgrade” command.
After the upgrade, the new option 'Amasty Elasticsearch 8' becomes available in the Search Engine dropdown. So you can choose and apply it.
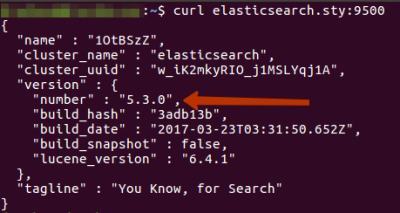
You can check the version via curl request, for example:
- Elasticsearch-php, which is the Elasticsearch library;
Please note that the Elasticsearch-php library and Elasticsearch engine itself are different things. In its composer.json dependencies, the extension has “elasticsearch/elasticsearch”: “>=5.1” specified, which means that 5th version of the PHP-library will be installed via Composer. However, along with that, you have to install Elasticsearch engine as well.
- Amasty Elastic Search for Magento 2 extension, which is a configurable bridge between Elasticsearch engine and Magento platform.
The Elastic Search extension for Magento 2 is read compatible with GraphQL. Now you can expose the data you need via GraphQL queries.
In Elastic Search FAQ you can find answers to the most popular questions about the extension functionality.
Installing ElasticSearch engine
Prior to all the extension's settings, please, make sure that Elasticsearch engine is properly installed.
If you are experiencing any difficulties with the Elasticsearch engine installation process, you can get our Elasticsearch installation service.
Elasticsearch is provided in the various packages formats. The most commonly servers work on Debian-based or RPM-based systems.
Install ElasticSearch Engine with Debian Package
Debian Package can be used to install Elasticsearch on any Debian-based system such as Debian and Ubuntu. You can install and run the Elasticsearch Debian package with the following:
wget https://artifacts.elastic.co/downloads/elasticsearch/elasticsearch-6.3.0.deb
wget https://artifacts.elastic.co/downloads/elasticsearch/elasticsearch-6.3.0.deb.sha512
shasum -a 512 -c elasticsearch-6.3.0.deb.sha512
sudo dpkg -i elasticsearch-6.3.0.deb
sudo update-rc.d elasticsearch defaults 95 10
sudo -i service elasticsearch start
For more details on the installation aspects, please, visit the official Elasticsearch documentation.
Install ElasticSearch Engine with RPM
It can be used to install Elasticsearch on any RPM-based system such as OpenSuSE, SLES, Centos, Red Hat, and Oracle Enterprise. The RPM for Elasticsearch v6.3.0 can be downloaded from the website and installed with the following commands:
wget https://artifacts.elastic.co/downloads/elasticsearch/elasticsearch-6.3.0.rpm
wget https://artifacts.elastic.co/downloads/elasticsearch/elasticsearch-6.3.0.rpm.sha512
shasum -a 512 -c elasticsearch-6.3.0.rpm.sha512
sudo rpm --install elasticsearch-6.3.0.rpm
sudo chkconfig --add elasticsearch
sudo -i service elasticsearch start
For more details on the installation aspects, please, visit the official Elasticsearch documentation.
How to configure the connection to Elasticsearch in Magento 2
The extension is compatible with Hyvä Theme. You can find the 'amasty/module-elastic-search-hyva-compatibility' package for installing in composer suggest.
For the correct Hyvä compatibility work, the GraphQL module should also be installed. You can find it in the composer suggest 'amasty/module-elastic-search-graphql'
Note: the compatibility is available as part of an active product subscription or Support Subscription.
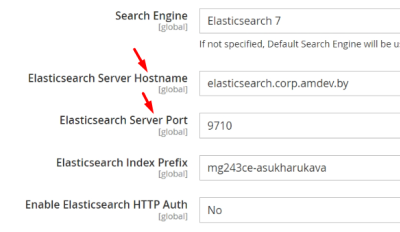
According to Elasticsearch tutorial for Magento 2, to manage a connection to Elastic Search you should go to Admin Panel → Stores → Configuration → Elastic Search → Connection
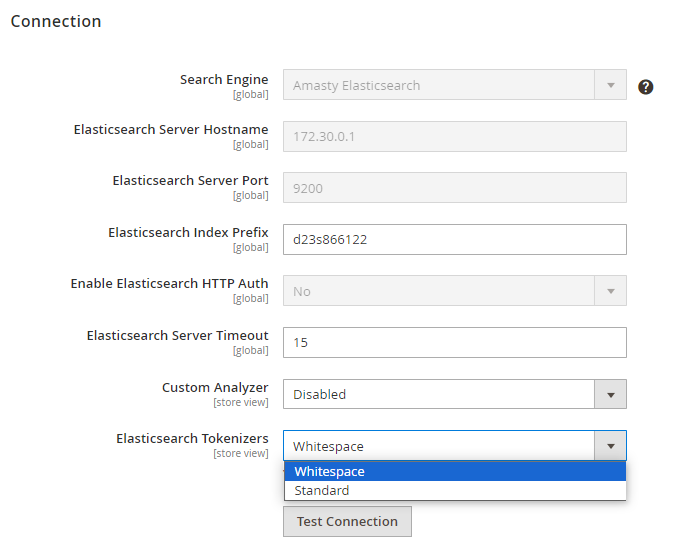
To enable the extension, in the Search Engine field, select the Amasty ElasticSearch. Alternatively, select MySQL, to disable the extension.
Elasticsearch Server Hostname - Specify a host name or IP address of a machine that runs Elasticsearch. (localhost or 127.0.0.1 by default).Get this value via Magento Cloud.
Elasticsearch Server Port - Set the Elasticsearch web server proxy port. In our example, the port is 9200.Get this value via Magento Cloud.
Elasticsearch Index Prefix - Specify a particular prefix for each store that you employ elastic search for.
I.e. If you use a single Elasticsearch instance for more than one Magento installation (for instance, Staging and Production environments), specify a unique prefix for each installation.
Enable Elasticsearch HTTP Auth - Select 'Yes', if you have enabled authentication for your Elasticsearch server. Specify a user name and password in the pop-up fields.
Elasticsearch Server Timeout - here you can set the timeout. Enter the number of seconds before the system times out. The default value is 15.
Custom Analyzer - here you can specify the needed custom analyzer or leave this setting disabled. Here you can find some more information on available Custom Analizers.
Elasticsearch Tokenizers - this setting becomes visible when the Custom Analyzer setting is set to 'Disabled' and is accessible with an active product or support subscription. To upgrade and ulock this functionality, please follow the link. Currently, there are two available options for this setting: Whitespace and Standard.
Tokenizers impact synonym usage, mapping, stemming, and handling special characters. You can explore more about tokenizers here.
Click Test Connection.
The module is able to handle direct API requests for searching. Check this guide to explore some tips on how to build such requests properly.
Autocomplete suggestions & Spelling correction
To configure Elastic Search functionality, go to Admin Panel → Stores → Configuration → Elastic Search → Catalog
Wildcard Type - Specify the type of the autocomplete suggestion - the part of a word which will be auto-completed. Three types are available to set:

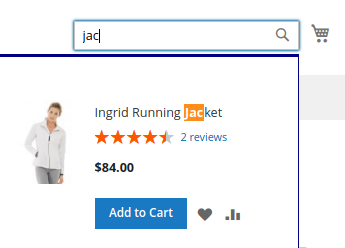
Enable Wildcard After - Specify a number of symbols, after which an autocomplete suggestion will be applied.

Autocomplete suggestions after 3 symbols.

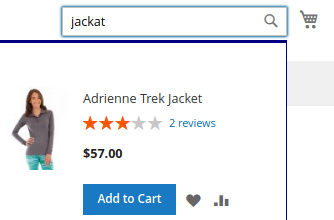
Enable Spell Correction After - Specify a number of symbols, after which a spell correction will be applied.

Spell correction after 4 symbols.

Allow Special Characters - Enable a long-tail search. The search will include the hyphens, slashes and any symbols. The feature provides precise results when searching by SKU and MPN (manufacturer part numbers).
NEW: If a customer searches by SKU of a child product that is not visible individually, the parent product will be shown as a result.

- A sample of the precise long-tail search by SKU.
- Note that the default search will not return any results for 24-MB04 request as it is based on the default product labels from a database, while the long-tail feature analyzes the keywords by patterns and “fixes” the query, returning the precise search results.

Use Amasty Meta Tags Templates Data - When set to /'Yes'/, the extension will utilize Amasty Meta Tags Templates extension data for the meta attributes used in the search.
For further configuration of Meta Tags, please navigate to Stores → Configuration → Amasty Extensions → SEO Meta Tags Templates
Please consult this user guide to set up SEO Meta Tags Templates configurations.

Allow to Search Within Results (Desktop) - Set this setting to 'Yes' to enable the additional search field will be added to the search results page.

Case Sensitivity of Synonyms - Set to 'Yes' if you want all synonyms to be case sensitive.
Use Case: Case Sensitivity of Synonyms in Search
Preconditions:
- Set the “Case Sensitivity of Synonyms” setting to “Yes”.
- Create a synonym pair: product, module.
- Specify different names for 4 items: product, Product, module, Module.
Steps to Reproduce:
1. Perform a search for the word “product” on the front end.
- Since “product” is in the synonym list, the search engine will look for “module” in a case-insensitive manner, finding all 4 matches (product, Product, module, Module).
2. Perform a search for the word “Product”.
- Due to case sensitivity, the synonym will not be matched. The search will be conducted only for “Product”, resulting in 2 matches (Product, Module).
3. Turn off the “Case Sensitivity of Synonyms” setting.
- Perform a search for the word “Product” again.
- The synonym will now be found, and the search will include both “Product” and “module” in a case-insensitive manner, finding all 4 matches.
Summary: The “Case Sensitivity of Synonyms” setting determines whether synonyms are matched in a case-sensitive manner. When enabled, it affects whether a synonym is found. The subsequent search behavior follows standard Elasticsearch rules.
Case Sensitivity of Stop Words - Set to 'Yes' if you want all stop words to be case sensitive.
Advanced Query Settings
Add a product attribute
A product attribute in advanced query settings.


To add a product attribute to a search query configuration, please go to Admin Panel → Stores → Attributes → Product → Select a needed product attribute → click a tab Storefront Properties → Enable Use in Search
Query
Specify the search type preferences for each product attribute:
Consider, that shoppers don't have to input neither asterisks, nor boolean operators in a search query. The functionality is fully implemented in the search logic.
- Wildcard search presupposes that shoppers can input a half-finished word, and get a relevant result.
- Match Mode is how the words in a search query are combined. Shoppers don't have to input AND/OR in a search query. Go to match mode settings.
- Spell Correction enables automatic spelling correction. Please note that enabling this function may affect the synonyms operation and they may not work correctly.
- Please note that Wildcard and Spell Correction are not able to work at the same time.
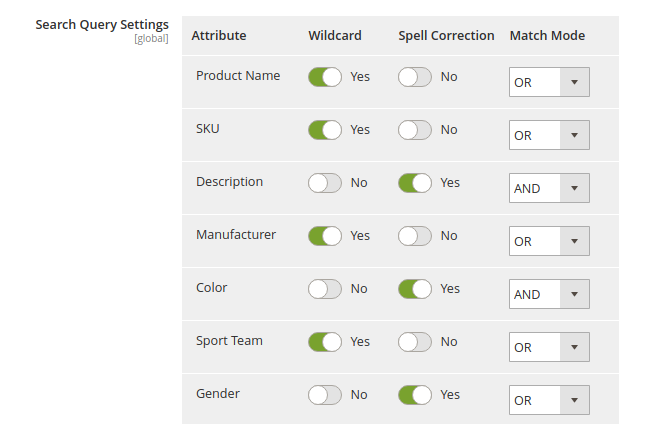
Product Name attribute with Wildcard vs with Spell Correction
Match Mode
Think over how would you like the keywords in a search query to be combined for each product attribute.
How it works?
For instance, a customer searches your web store looking for a velvet jacket. As you specify a boolean type for a Product Name attribute:
- AND logic will return only results that contain both velvet and jacket
- OR logic will return results that contain either velvet or jacket (velvet shoes, denim jacket, etc)
Indexation Settings
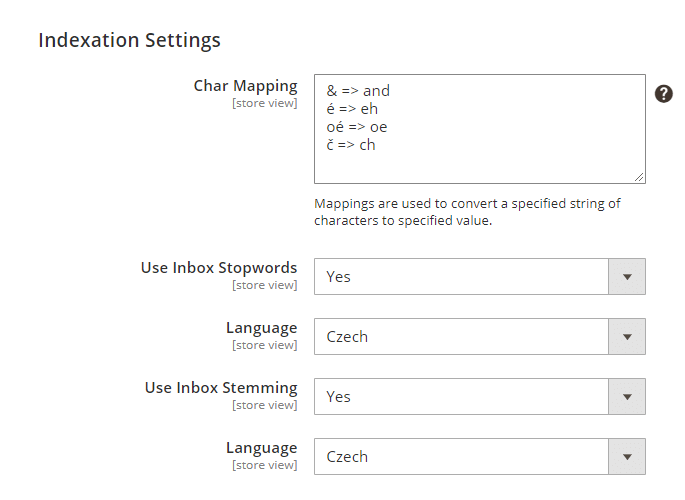
Char Mapping - Mappings are used to convert a specified string of characters to a specified value. The format of mapping should be the following: {key} ⇒ {value}
Note: Enter one mapping per line. The longest match is of higher priority.
Character mapping works for a single character or set of characters without spaces. If you want to match a multi-word phrase, you can do it by managing synonyms.
How is this setting helpful?
For example, customers will be able to search for the brand names with special characters like Chloé or Dolce & Gabbana easier, as there'll be no need to search for the unique symbol as its alternative will provide the same search results.
Use Inbox Stopwords - enable this option to apply a default set of stopwords. Specify the necessary language.
See how to manage custom stopwords here.
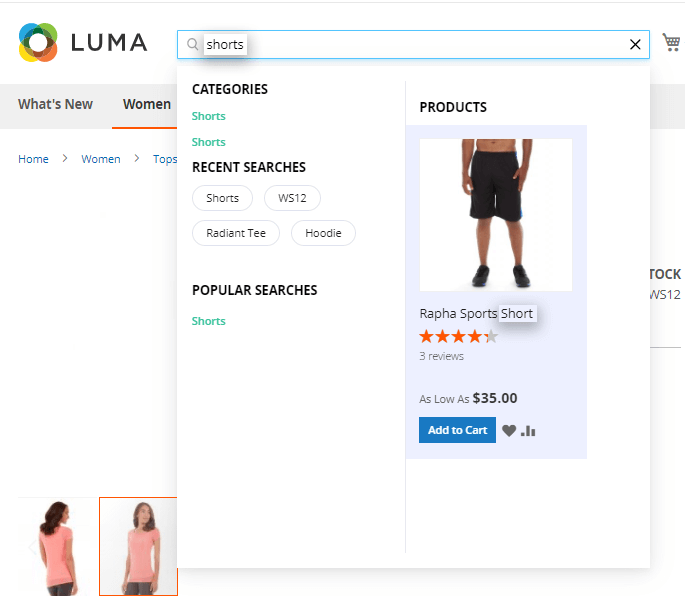
Use Inbox Stemming - set to Yes and select the language to use stemmed words in search. This feature allows customers to search by the root form of the word. For example, if a customer types “bags”, he will get results with a “bag” single form as well.
This is how the feature works:
Stop words
To keep index small by specifying the list of words to be ignored by the search engine, go to Admin Panel → System → Manage Stop Words.
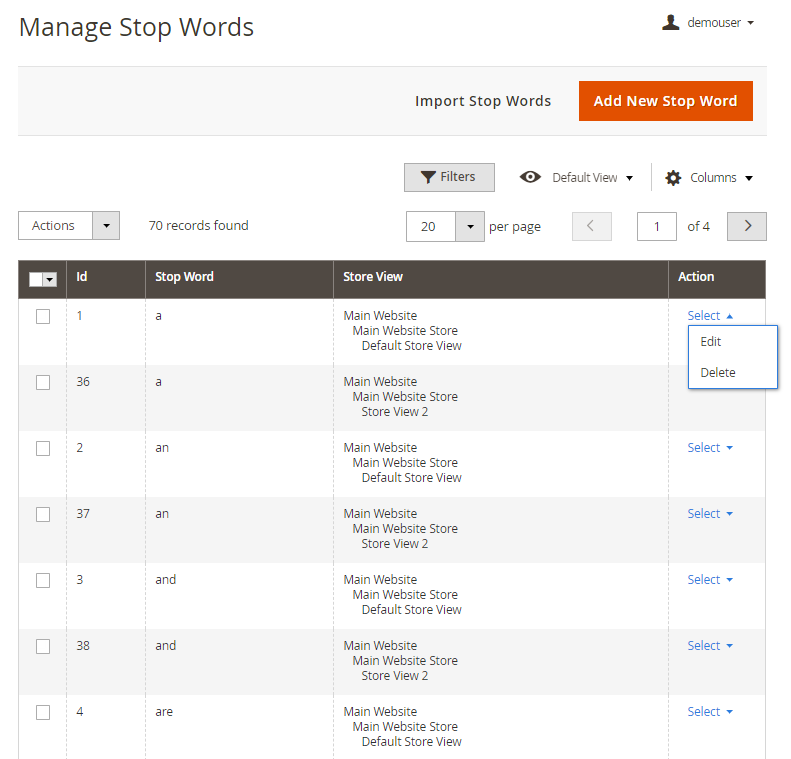
On the grid, the list of all stop words is displayed. Easily Edit or Delete each stop word via Action column.
Click Add New Stop Word. Specify a Stop Word and Store View for the word to be applied.
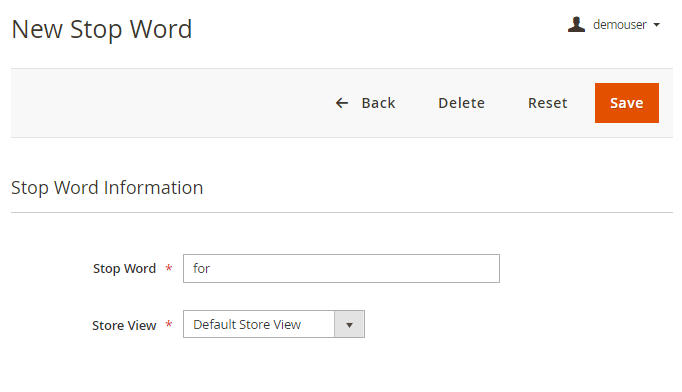
In the stop word, there should be no whitespaces. To prevent the admin from entering the whitespace, the extension automatically validates the field and returns the warning if the whitespace was found. 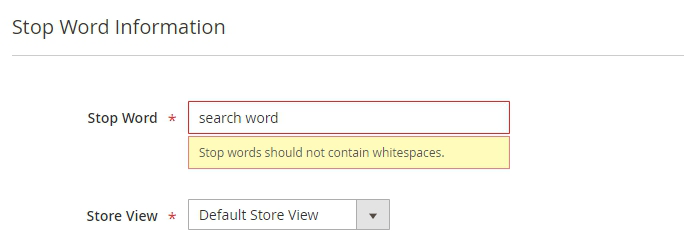

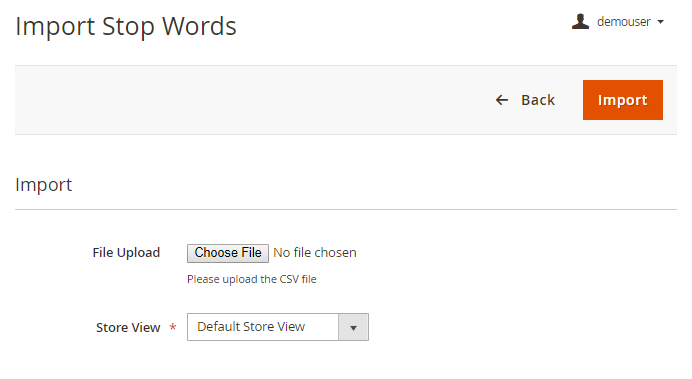
With the extension, it is also possible to Import Stop Words.
Synonyms
To build a dictionary of synonyms, navigate to Admin Panel → System → Manage Synonyms.
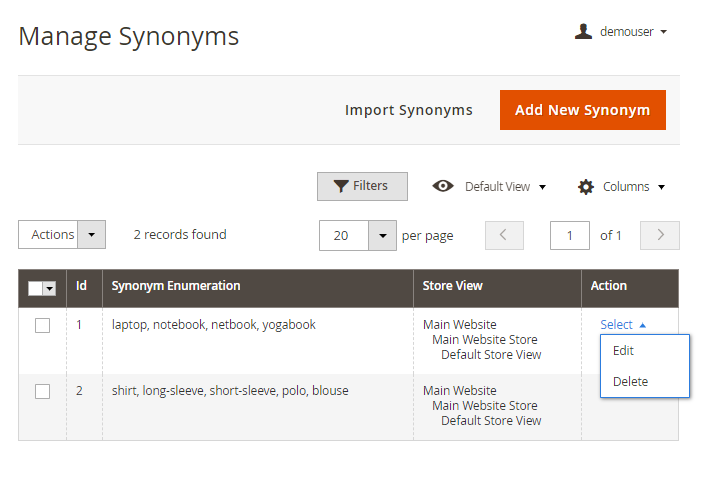
Click Add New Synonym to input a group of words that will be regarded equally by a search logic. Separate them with commas.
The module handles multi-word synonyms search.
Select a Store View.
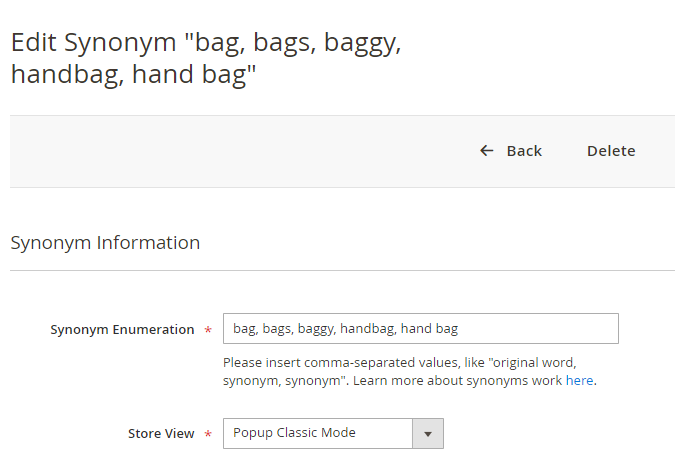
You can switch to edit an entry by clicking Select in Action column on the synonyms' grid.
Note that for the synonyms correct work the spell correction function must be disabled.
As an alternative, Import a CSV file with synonyms dictionary.
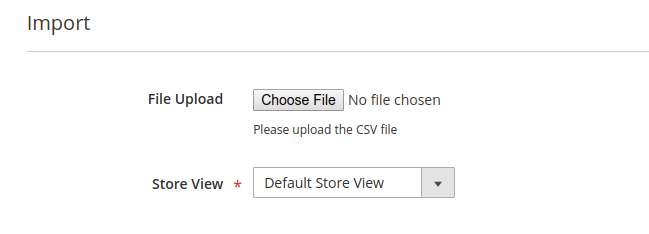
In a CSV file each group of words should be comma separated and placed on a separate line.
Click here to download the example.
Manage Relevance Rules
Please note that the Relevance Rules functionality can potentially impact store performance. To minimize this effect, it's advisable to use Relevance Rules cautiously, avoid overly complex conditions, and ensure your infrastructure can handle additional computational load.
To manage boost rules, navigate to Admin Panel → System → Search Page Relevance Rules.
In the Action column (Select drop-down) choose Edit, to edit the existing rules.
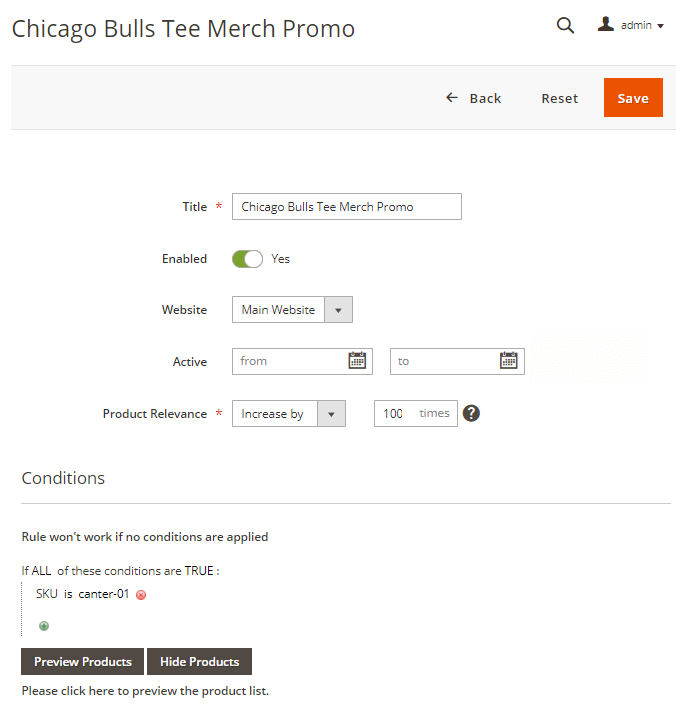
Click Add New Rule to specify search and return conditions for a new promo rule.
Specify the name for a relevance rule - input Title. Note, that it is used mainly for admin.
Enabled - Enable or disable a rule with a toggle.
Note, that you might need to re-index your Magento for the changes to take effect.
Website - Specify the particular stores, where you want the rule to be applied. Select from drop-down a needed store.
Activate - Set the dates (from-to), use a pop-up calendar or input directly with numbers.
Product Relevance - There are two modes available to work with relevance rules: Increase by and Decrease by:
- Select Increase by to boost a certain group of products in the search results;
- Select Decrease by to lower a product or a certain group of products in the search results;
Specify to what extend you want to boost or lower the products by setting a number from 1 to 100.
Elasticsearch engine uses so called Scores, when it manages the order of the search results' return. The module can increase or decrease these scores selectively by a set number of times.
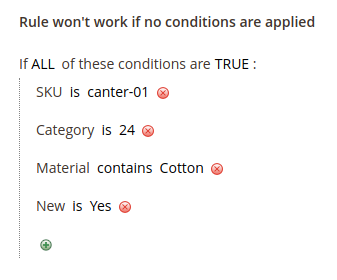
Conditions - Set the conditions, according to your marketing needs.
- To boost or lower a certain product in the search results, you can click + button and select SKU from the condition drop-down, and specify its value.
- To boost or lower a certain group of products, click + button and select a Category from the condition, and specify a pass to the directory, where this group of products belong to. Next, additionally, you can select a Brand, for instance, and specify it. Also, in case this is a new collection, select NEW and set to Yes.
[Premium] Relevance Rule 'Bestseller Sales'
Please note that this condition becomes available only if you install Premium version of the Elastic Search extension and the Improved Sorting extension is also installed and configured.
To configure the 'Bestseller Sales' relevance rule, please navigate to Admin Panel → System → Search Page Relevance Rules and start creating new relevance rule.
In the 'Conditions' section choose 'Improved Sorting → Bestseller Sales' and specify a certain number of bestseller sales to trigger the start of the rule, for example: 'Bestseller Sales is 3' for the X last days.
Custom Analyzer
With the extension you can use 3 custom analyzers: Chinese, Japanese and Korean.

Please note that installation of additional plugins is required.
To avoid irrelevant search results after applying one of these analyzers, please make sure you product titles and descriptions do not contain English words.
Chinese Analyzer
To activate this custom analyzer, please install Chinese Analysis Plugin first.
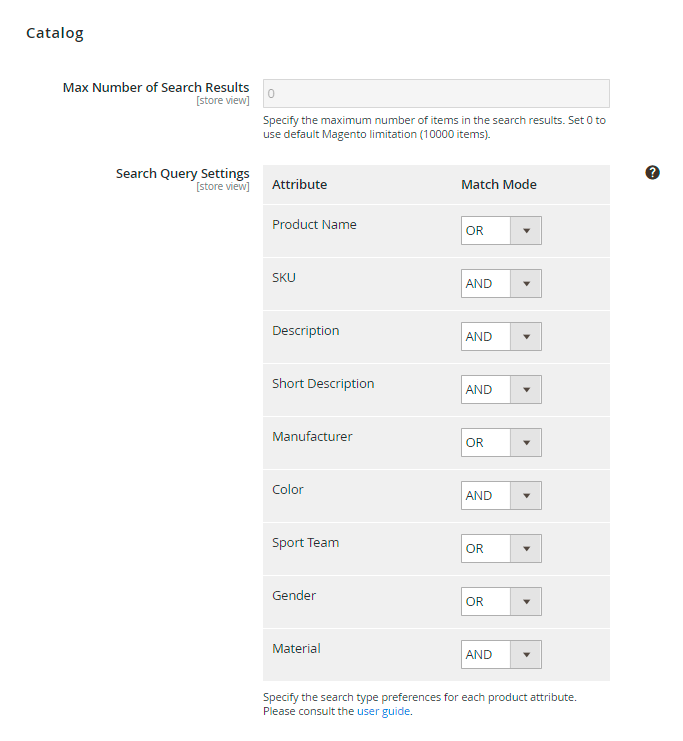
The Chinese analyzer is not customizable, you can still limit the max number of search results and set different match modes for the attributes.
Japanese Analyzer
Click here to install the Japanese (kuromoji) Analysis plugin.
Go to the Indexation Settings tab.
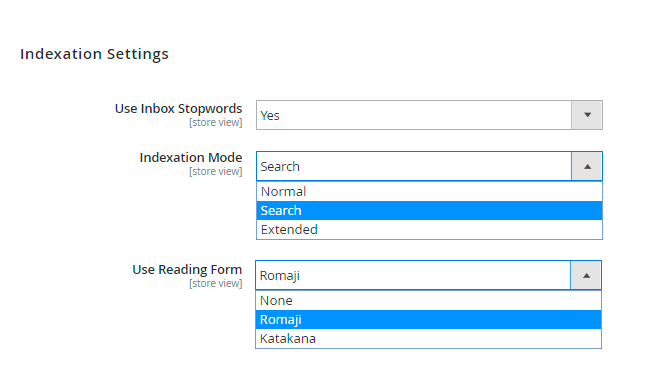
Use Inbox Stopwords - select Yes to apply the default list of words to be ignored by search engine.
Indexation Mode - this setting determines how engine handles compound and unknown words under indexation.
3 modes are available:
Normal - applies the segmentation without decomposition for compounds.
The output sample:
関西国際空港
アブラカダブラ
Search - choose this mode if you want to decompound long words and include the full compound token as a synonym.
The output sample:
関西, 関西国際空港, 国際, 空港
アブラカダブラ
Extended - select this one to output unigrams for unfamiliar words.
The output sample:
関西, 国際, 空港
ア, ブ, ラ, カ, ダ, ブ, ラ
To get more accurate search results, please test the Extended mode efficiently, as it may consider particular cases (e.g. English words) as unfamiliar.
Use Reading Form - choose the algorithm to replace words with their reading forms in either katakana or romaji set of characters.
Find out more about Japanese Analyzer modes here.
Korean Analyzer
Download Korean Analysis plugin here.
To customize the analyzer, go to the Indexation Settings tab.
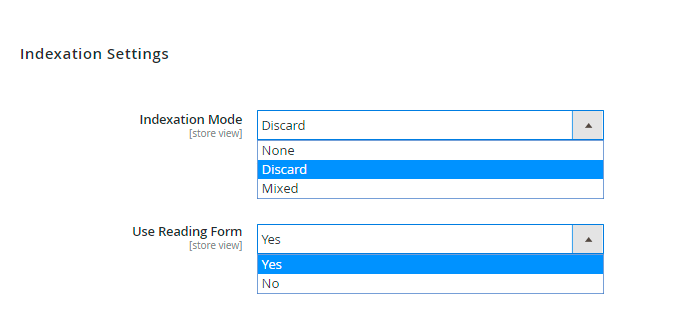
Indexation Mode - this setting determines how engine handles compound and unknown words under indexation.
3 modes are available:
None - the extension do not apply decomposition for compound words.
The output sample:
가거도항
가곡역
Discard - this mode applies decomposition of compounds and discarding the original form.
The output sample:
가곡역 => 가곡, 역
Mixed - applies decomposition of compounds, but keeps the original form.
The output sample:
가곡역 => 가곡역, 가곡, 역
Use Reading Form - enable to rewrite words written in Hanja to their Hangul form.
Find out more about Korean Analyzer modes here.
Advanced Search
Go to Admin Panel → Stores → Configuration → Advanced Search, to configure the advanced search features.
Expand the General tab.
General Settings
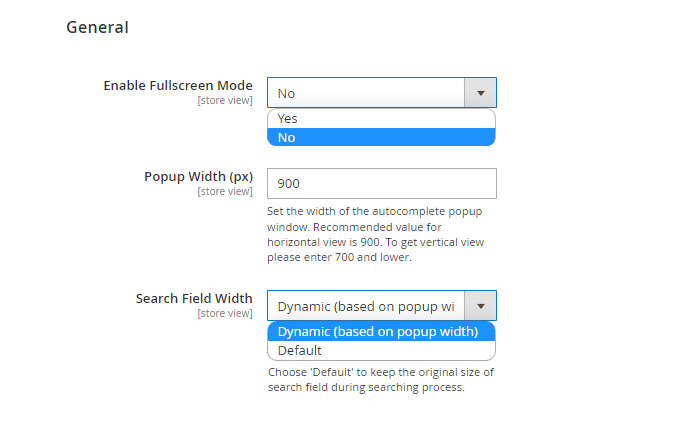
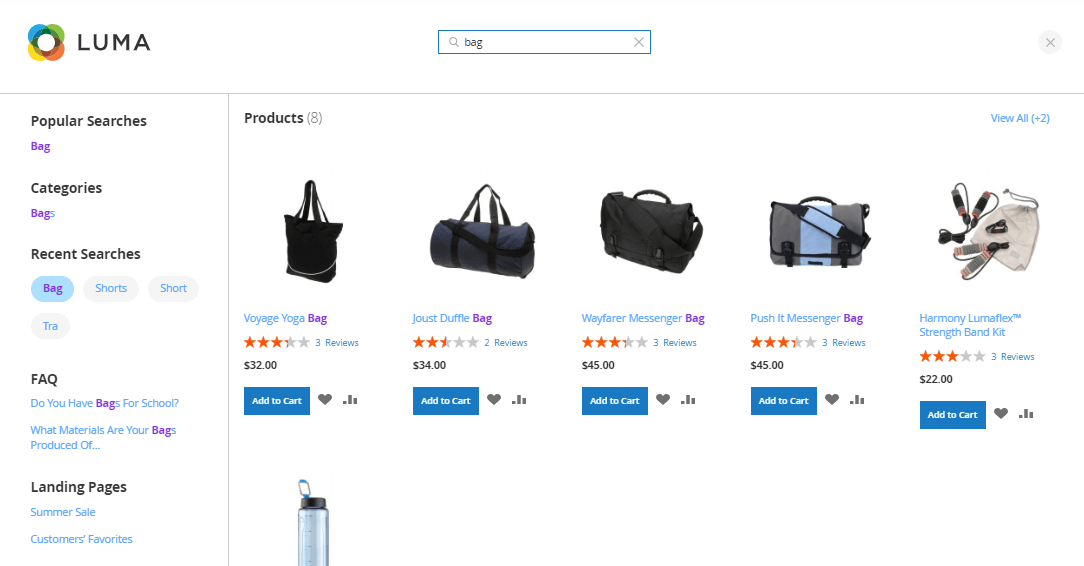
Enable Fullscreen Mode - Set this setting to 'Yes' to enable the fullscreen mode of the autocomplete popup.
Please note that id the setting 'Enable Fullscreen Mode' is set to 'Yes' then the settings 'Popup Width (px)' and 'Search Field Width' won't be available.
Popup width (px) - indicates the width of the autocomplete popup window to make it fit in with other page elements. The recommended value for the horizontal view is 900. To get the vertical view, please enter 700 and lower.
Search Field Width - Choose the 'Default' option to keep the original size of the search field during the searching process or enable the 'Dynamic' (based on popup width).
Please note: that the “Search Field Width” setting doesn't operate the same way on Hyva Theme as it does on Luma. When you set the “Search Field Width” to “Default”, it affects the “Popup Width (px)” setting. This occurs because the default field takes up the full width.
Min Characters - specify the minimal number of characters that customers should type in to trigger the search process. By default, the number is three.
Search Pop-up Delay (seconds) - Reaching minimum number of characters will trigger search after a set delay. Please use delay value between 0 and 10 seconds. The default value is '0.5'.
Display ‘Search’ Button - Set 'Yes' to display the 'Search' button near the search field.
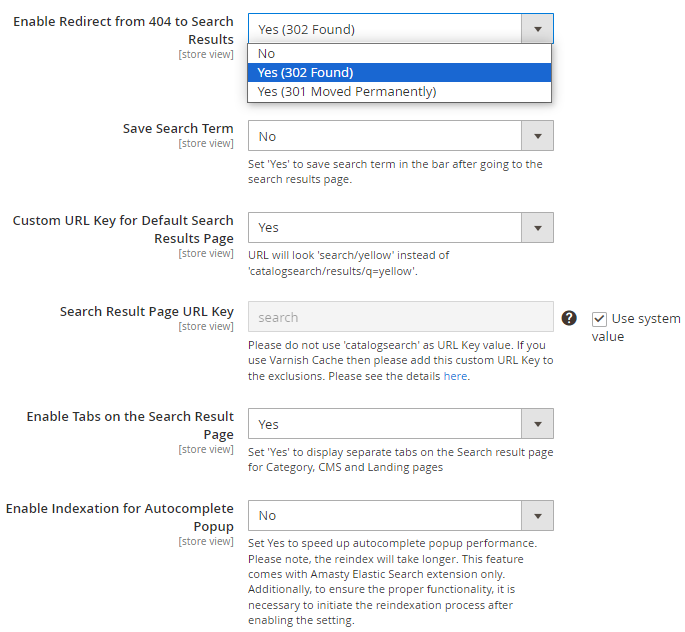
Enable Redirect from 404 to Search Results - If the option is enabled, when navigating to a broken URL or a non-existing page, a customer will be redirected to the store search results page instead of the '404 Not Found' page.
Custom URL Key for Default Search Results Page - enable to set SEO-friendly short URLs. URL will look 'search/yellow' instead of 'catalogsearch/results/q=yellow'.
Search Results Page URL Key - specify the URL alias for the search results' page.Please do not use 'catalogsearch' as URL Key value.
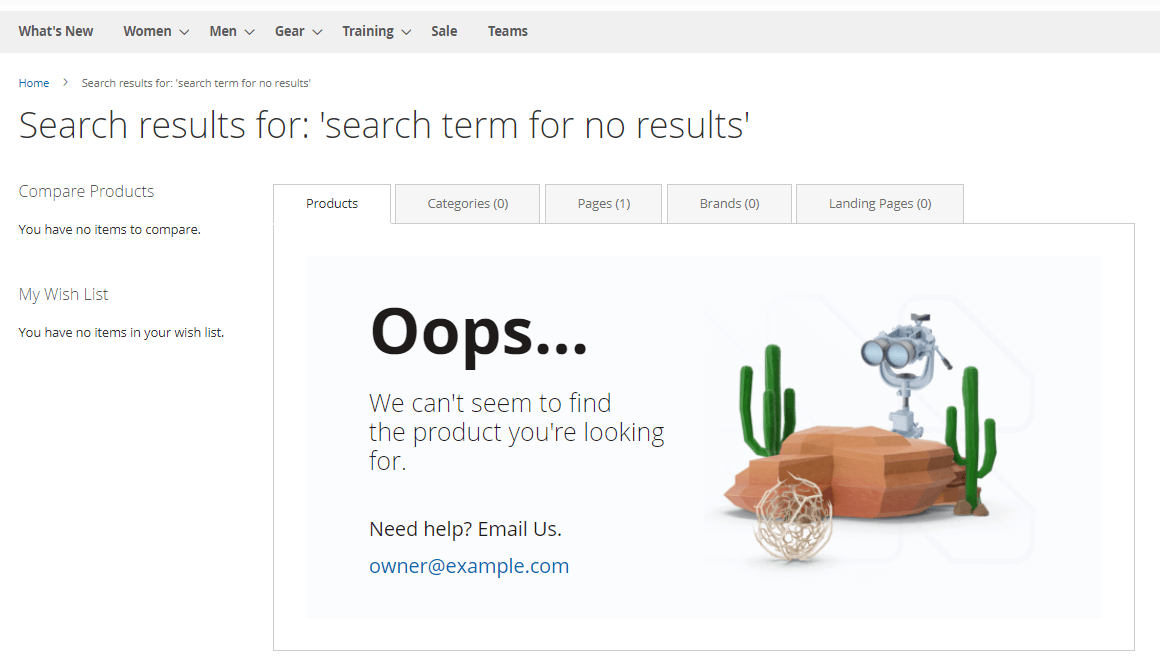
Enable Tabs on the Search Result Page - set to 'Yes' to enable the tabs that sort search results by Category, CMS, and Landing on the search results page.
See on the image below how the tabs will look like if other extensions compatible to the Elastic Search by Amasty are also installed. These two extra tabs on the image become available if the Amasty Landing Pages for Magento 2 and Amasty Improved Layered Navigation for Magento 2 are installed. Some other extensions will add other tabs.


Enable Indexation for Autocomplete popup - Set 'Yes' to speed up autocomplete popup performance. Please note, the reindex will take longer. This feature comes with the Amasty Elastic Search extension only.
To ensure smooth operation, it's important to run a reindexing process upon initially enabling the 'Enable Indexation for Autocomplete popup' setting. Otherwise it may result in performance issues in the frontend search autocomplete popup and trigger 500 errors in the console.
Please note, that when using the extension with Live Search, the indexation will not work.

Show Related Search Queries in Search Results - this option helps customers to get relevant results anyway if it's enabled. Choose one mode of the related search results display from the three available options:
- disable ('No, Disabled');
- enable permanently ('Yes, Show Always');
- enable only for a narrow case ('Yes, Show Only when search returns 0 results').
To learn how to assign related terms, please go to the Related Search Terms part of the guide.
Show Related Search Queries Result Numbers - enable or disable showing related search queries result numbers.
Please note that the Related Search Terms counter is displayed only when the default Magento setting is enabled at Stores → Configuration → Catalog → Catalog → Catalog Search → Show Results Count for Each Recommendation = Yes.
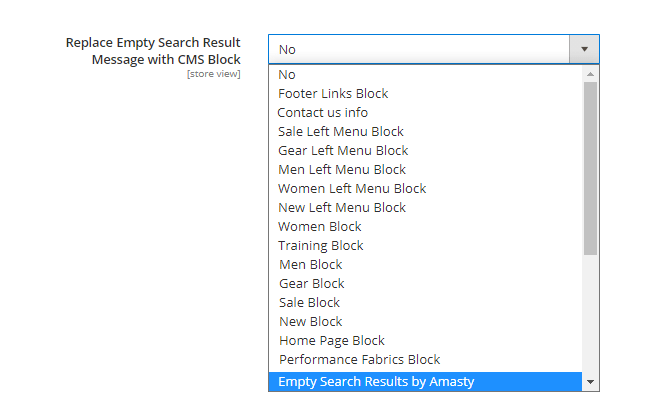
Replace Empty Search Result Message with CMS Block - Choose 'No' from the dropdown if you want the zero search results page to remain empty. Or just pick up any CMS block from the list of your blocks to be displayed in case there are no search results matching the search term.

Old Search Requests Auto-Cleaning - Set to 'Yes' in order to clear the data from the amasty_xsearch_users_search table. Please consider, that Search Analytics, Recent Activity and Most Wanted reports use this data. Therefore, enabling the auto-cleaning feature can affect analytics.
Auto-Cleaning Period in Days - Here you can specify the period for which you want to auto-clean the data from the amasty_xsearch_users_search table.
Please note that id the setting 'Enable Fullscreen Mode' is set to 'Yes' then the settings 'Popup Width (px)' and 'Search Field Width' won't be available.
Please note, that for the correct operation of the module (EE and ECE Magento versions), we do not recommend using the setting Live Search - Enable Product Listing Widgets=Yes (Admin → Stores → Configuration → Live Search → Storefront Freatures)
Search Requests Limitation
With the Advanced Search extension, you can block IP addresses that send lots of spam requests. This helps prevent your databases from cluttering with unnecessary entries. The functionality is available as part of an active product subscription or support subscription.
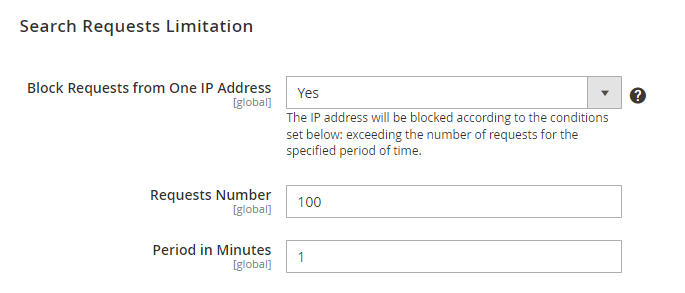
Block Requests from One IP Address - set to 'Yes' to enable the option. In such a case The IP addresses will be blocked according to the conditions set below: exceeding the number of requests for the specified period of time.
Requests Number - set the number of requests.
Period in Minutes - set the period in minutes.
If more than the specified number of requests were sent from one IP address during the specified period, then the IP address will be blocked until the set period of time has elapsed since the last request.
Please note, that for the correct work of this functionality you will need to install the additional library: GitHub - symfony/rate-limiter, that will provide a Token Bucket implementation to rate limit input and output in your application.
Search Attributes
Include any available product attributes in search algorithm. For each attribute, you can set a priority (weight).

Click Add to create a new attribute. Use the bin icon in the Action column to delete attributes in one click.
Nuances of Searching by 'Product ID' Attribute
- Wildcard and Spell Correction: These features do not work when searching by Product ID.
- Weight Setting: We recommend assigning a high weight to this setting.
- Minimal Query Length: In Magento search, there is a parameter called “Minimal Query Length,” which is set to 3 characters by default. This means that for IDs less than 100 (fewer than 3 characters), the search feature will not work. You can configure the Minimal Query Length by navigating to: Stores → Configuration → Catalog → Catalog → Catalog Search → Minimal Query Length.
The configuration settings are limited up to 500 attributes. If you have more than 500 attributes created, please manage them through the Product Attributes grid (Stores → Attributes → Product)
Click Add to create a new attribute. Set its Weight from 1 to 10 - select from a drop-down. Use the bin icon in the Action column to delete attributes in one click.
If there is a color attribute with weight 10 and description attribute with weight 5, and the query is red, search results will be more visually relevant, because the algorithm will choose color attribute prior to the words in description.
You'll also see in results such configurable products that have simple ones with the relevant attribute (e.g. like the tee with the product option 'red color').
How to locate the search bar in other places than the default?
By default, the advanced search bar is located at the top right corner of the screen, near the shopping cart. But using widgets you can overcome Magento limitations and place the search bar anywhere you need all through the store, like on a sidebar, in the footer, on the CMS pages, and even in Customer Account.
There are two ways of how to configure some non-trivial location for the search bar:
- configure the widget and specify 'Layout Updates';
- configure the widget, configure a custom block with it, and then use this block (for example, on a CMS page).
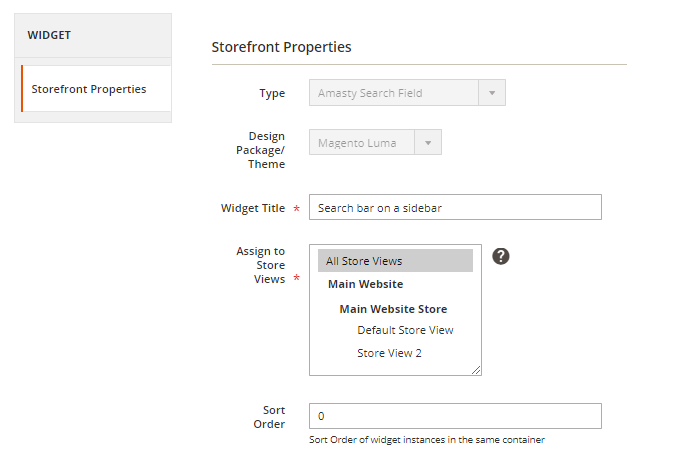
For using the first way, please navigate to Content → Widgets and click on the 'Add Widget' button. Choose the relevant theme to be applied for this widget and the widget type 'Amasty Search Field'.
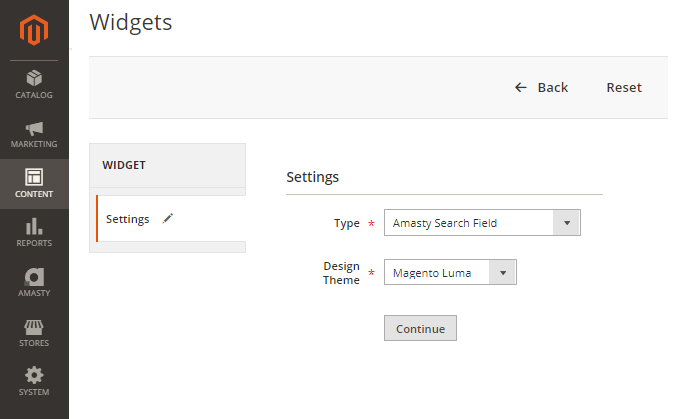
Specify widget title, needed store views, and the widget sort order.
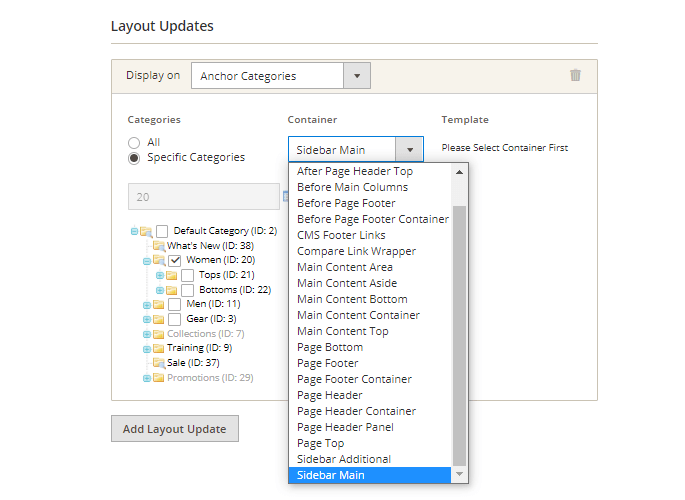
First, please choose if you want to embed your widget on Categories (anchor or non-anchor), Products (depending on the product type), or Generic Pages. Depending on that choice you'll see the available containers for that type of a store page.
As per products and categories you can choose whether to display the widget on all store product/category pages in bulk or on the specific only.
As per Generic pages, there's the choice from three options, depending on which you'll see the unique set of the available containers:
- All Pages;
- Specified Page;
- Page Layouts.
When you're ready with all configurations, please refresh the page where you're expecting to see the widget and try flushing Magento Cache ('System → Cache Management → Flush Magento Cache') to see the result on the frontend immediately.
For the second way of locating the search bar anywhere else than the default please create the 'Amasty Search Field' widget first and then please go to 'Content → Blocks' to integrate that widget on some of the existing blocks or for creating new.
Products
Expand this tab to configure products display in a popup window.
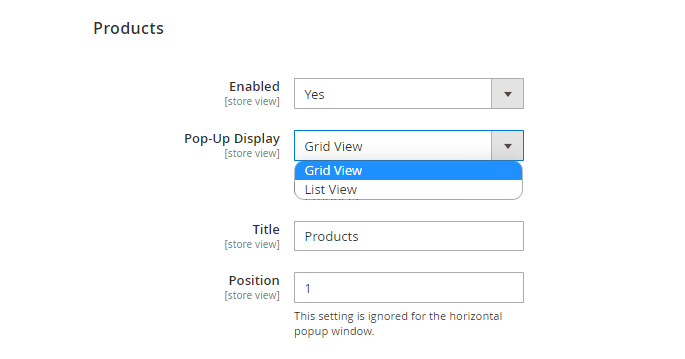
Enabled - set to 'Yes' to enable search in products and display search results in the autocomplete popup.
Pop-Up Display - Choose one of the popup display modes from the dropdown.
Title - customize the title for the products block.
Position - specify products block position in the popup. This setting is ignored for the horizontal popup window.
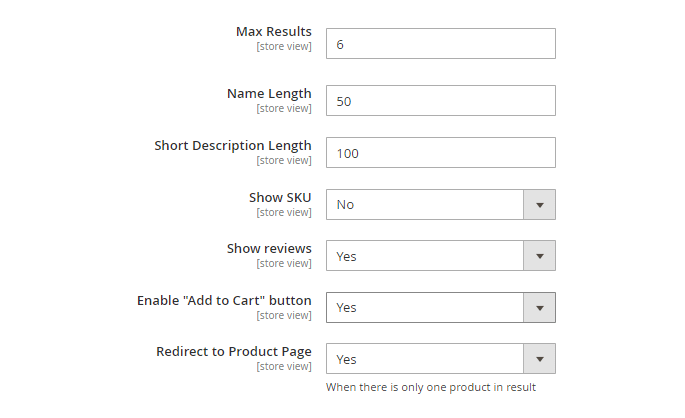
Max Results - set the max number of displayed results.
Name Length - indicate the max number of characters of a product name that will be displayed in a popup window.
Short Description Length - set the number of characters for a product short description to be shown in a search window.
Please note that if you are using the default extension settings, the short description display for a product will be enabled. If you want to disable it, please specify the 'Short Description Length' as 0 (zero).
Show SKU - Enable this setting to show thee SKU highlighted in the search autocomplete popup.
Show Reviews - enable reviews display in the autocomplete popup to help customers make the purchase decision much faster.
Enable 'Add to Cart' button - set to 'Yes' to show Add to cart button in the popup to let customers purchase necessary products right away.
Redirect to Product Page - enable this option to redirect in case there is only one search result available.
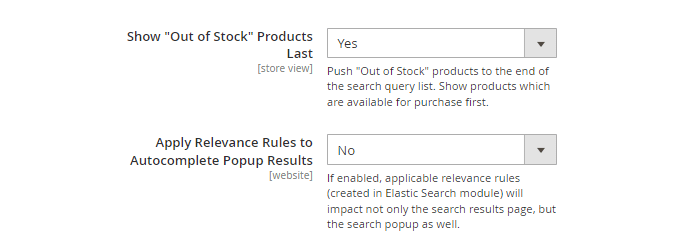
Show 'Out of Stock' Products Last - enable this feature to place the out-of-stock items last in search results. When disabled, these products are displayed according to their relevance.
To make this feature work properly with out-of-stock items being displayed correctly, please make sure that out-of-stock items' visibility is enabled.
- Go to Admin Panel → Stores → Configuration → Catalog → Inventory → Stock Options.
- Navigate to a Display Out of Stock Products field → Uncheck Use system value and set to 'Yes'.

Apply Relevance Rules to Autocomplete Popup Results - Set 'Yes' to apply Relevance Rules to search autocomplete popup results.
Please note that if this setting is enabled, applicable relevance rules (created in Elastic Search module) will impact not only the search results page, but the search popup as well.
Multi-Store Search
To adjust the settings for multi-store search please go to Stores → Configuration → Amasty Extensions → Advanced Search → Products → Multi-Store Search. (Note: this functionality is available as part of an active product subscription or support subscription)

Enabled - Set to 'Yes' to enable multi-store search.
Stores - Select the stores among which the search will be conducted.
Title - Specify any custom title for the 'Multi-Search' block.
Position - In this field, you can specify the position (display order) of the 'Multi-Search' block within the search autocomplete popup.
Max Results - Here you can set the maximal number of results from the multi-search that will be visible in the popup. Or you can just use the system value which is 4 (four).
See the example of how 'Multi-Search' block may look on the frontend:

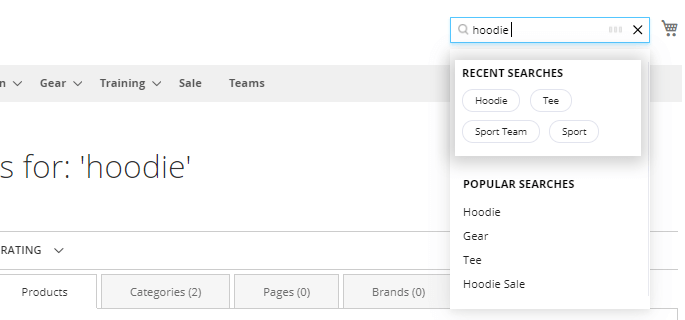
Popular Searches
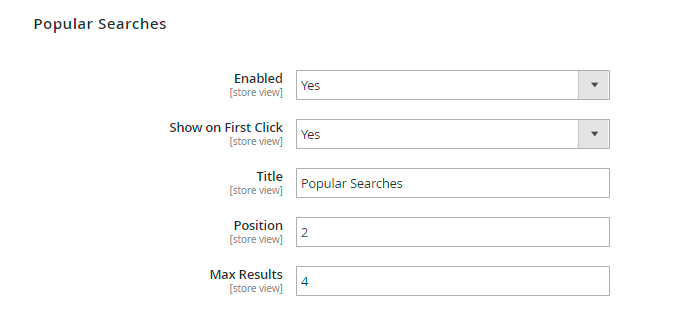
Enabled - enable the display of the Popular Searches block.
Show on First Click - set the option to Yes to let customers see the Popular Searches block in the autocomplete popup once they click on the quick search field.
Title - specify the title of the block.
Position - set the position for the Popular searches block.
Max Results - set the maximal number of popular search results that will be displayed in the search autocomplete popup.
Browsing History
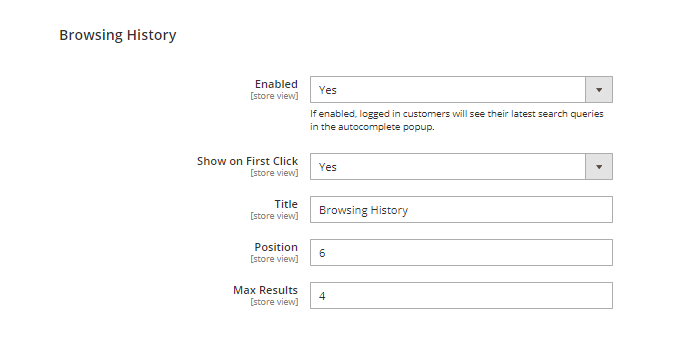
Enabled - Set this setting to 'Yes' to allow the logged-in customers to see their latest search queries in the autocomplete popup.
Please note that this option ('Browsing History' display) is available for the registered (logged-in) customers only.
Show on First Click - Set this option to 'Yes' to enable showing the 'Browsing History' block at the first user's click in a popup.
Title - In this field, you can specify any custom title for the 'Browsing History' block.
Position - In this field, you can specify the position (display order) of the 'Browsing History' block within the search autocomplete popup.
Max Results - Here you can set the maximal number of results from the browsing history that will be visible in the popup. Or you can just use the system value which is 4 (four).
Recent Searches
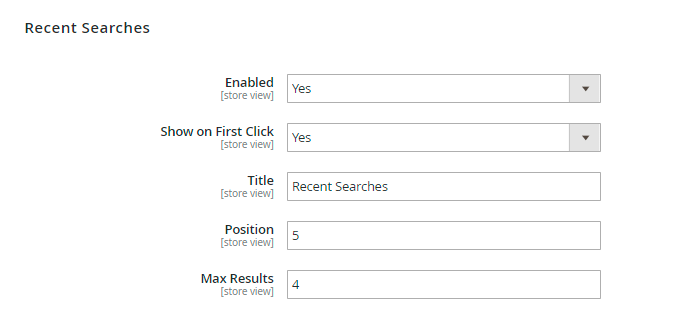
Enabled - select Yes to display the Recent Searches block.
Show on First Click - set the option to Yes to let customers see the Recent Searches block in the autocomplete popup once they click on the quick search field.
Specify the Title, Position and Max Results to be displayed.
Blog
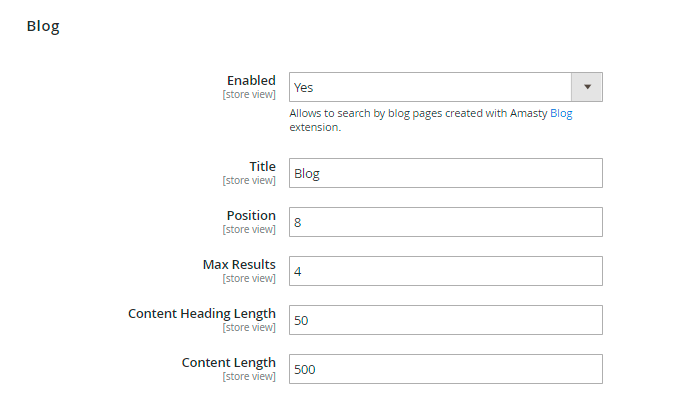
Enabled - set to Yes to enable search by blog pages and to display a blog section in the search window popup to help store visitors find the required content throughout your corporate blog.
Allows to search by blog pages created with Amasty Blog Pro extension.
Title - input a name for the section in the search popup, where the blog results will be displayed.
Also specify the Position, Max Results.
Set Content Heading Length and Content Length to be displayed to make your search autocomplete window look informative and clear.
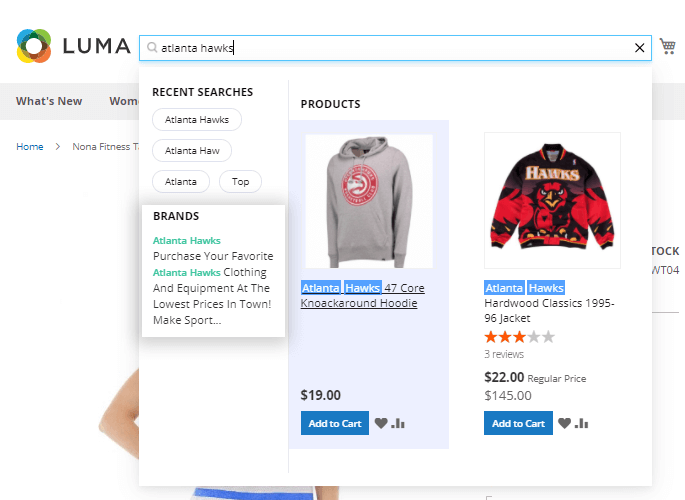
Brands
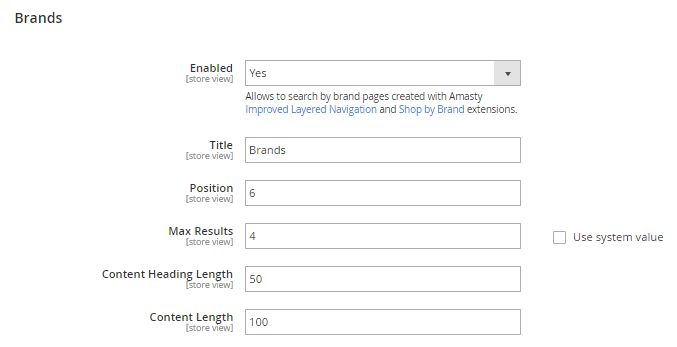
Enable to display a Brand section in the search window popup.
The option allows to search by brand pages created with Amasty's Improved Layered Navigation and Shop by Brand extensions.
Specify the Title, Position, Max Results, Content Heading Length and Content Length for Brands block.
Categories
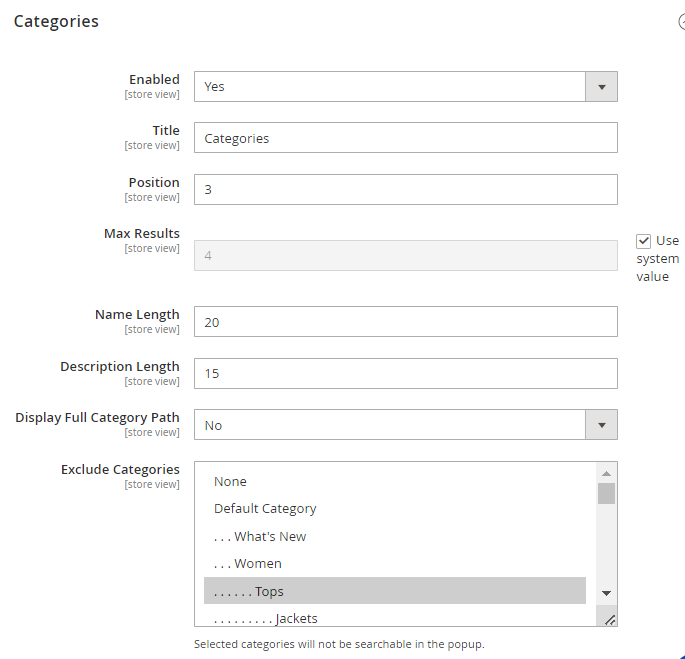
Enable the option to let the extension search among category attributes and display the results in the autocomplete popup.
Specify Categories block Title, Position and the max number of displayed Results.
Name Length - indicate the number of characters of a category title that will be displayed in a popup window.
Description Length - set the number of characters for a product short description to be shown.
Display Full Category Path - set to Yes to show full path to the results displayed in the popup.
Exclude Categories - here you can select the categories that you want to exclude from the search via the popup.
СMS Pages
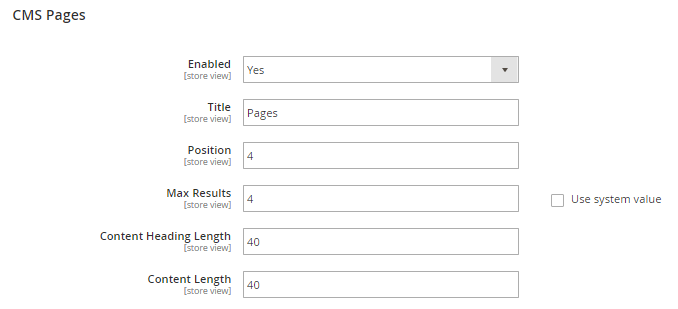
Enable search on CMS pages to provide customers with detailed search results.
Specify the Title, Position and the Max Results.
Also, set the maximal number of characters for Content Heading and Content that will be shown.
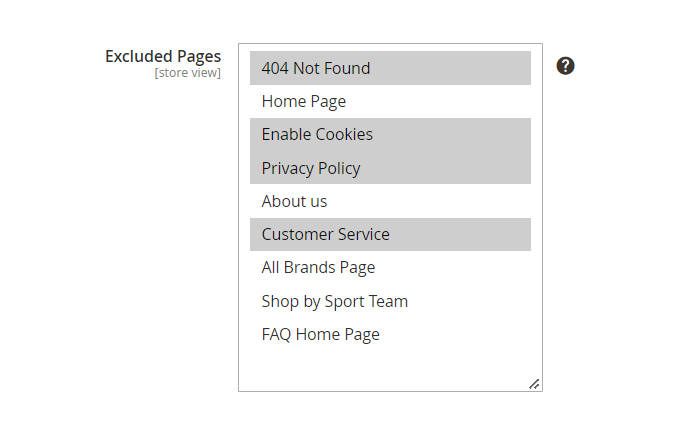
Excluded Pages - Please select the CMS pages that will not be searchable in popup.
Recently Viewed
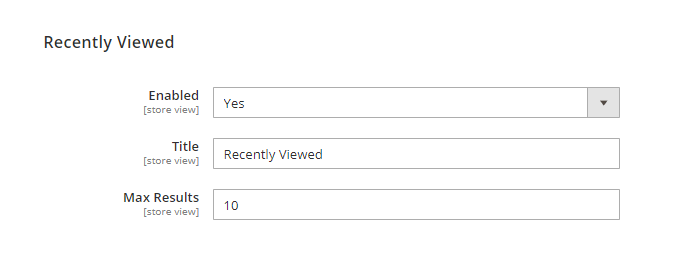
Enabled - Set 'Yes' to enable the 'Recently Viewed' widget in the autocomplete popup.
Title - In this field, you can specify a custom title for the widget.
Max Results - Here you can specify the max number of products to be displayed in the slider.
Please note that the 'Recently Viewed' widget (in a form of a slider with recently viewed products) will be displayed only till the moment a user starts typing.
Bestsellers
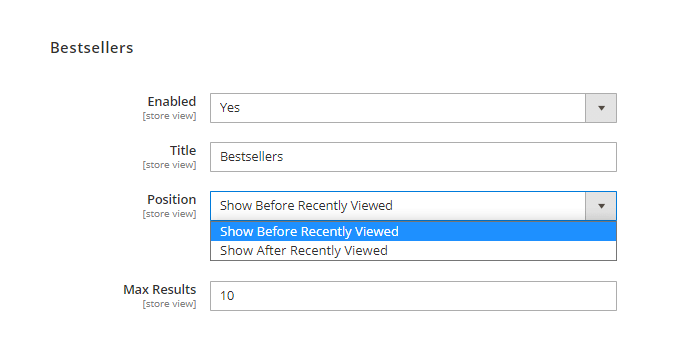
Please note that this widget will work only if the Improved Sorting for Magento 2 by Amasty extension is also installed.
Enabled - Set 'Yes' to enable the 'Bestsellers' widget in the autocomplete popup.
Title - In this field, you can specify a custom title for the widget.
Position - If the widget 'Recently Viewed' is enabled, you can specify in which order these two widgets will be displayed (which one first).
Max Results - Here you can specify the max number of products to be displayed in the slider.
Please note that the 'Bestsellers' widget (in a form of a slider with recently viewed products) will be displayed only till the moment a user starts typing.
Landing Pages
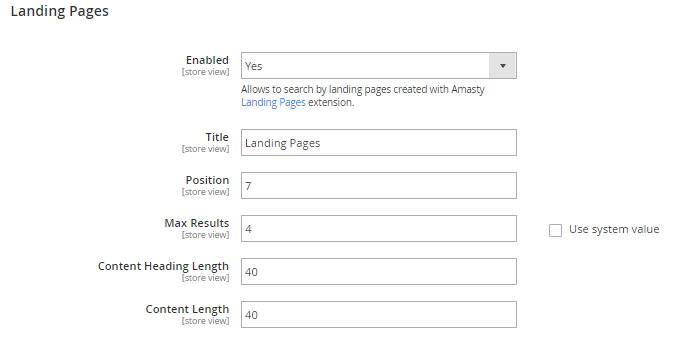
Enable search landing pages in the popup, specify the Title, Position and the Max Results. Set the maximal number of characters for Content Heading and Content that will be shown is the search popup.
Allows to search by landing pages created with Amasty Landing Pages extension.
FAQ Question
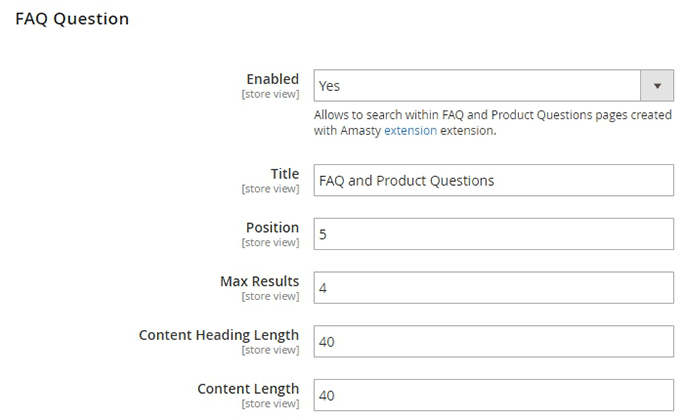
Enable search FAQ pages in the popup, specify the Title, Position and the Max Results. Set the maximal number of characters for Content Heading and Content that will be shown in the search popup.
Compatibility with Store Locator
The Advanced Search extension is compatible with our Store Locator extension (the compatibility is available as a part of an active product subscription or support subscription). This means that if you have both modules installed, you can also search by store locations created with Amasty Store Locator extension.
For the functionality correct operation you will additionally need to install the 'amasty/module-store-locator-advanced-search' package, you can find it in amasty/xsearch module composer suggest.
Navigate to Advanced Search extension general settings to enable the compatibility.
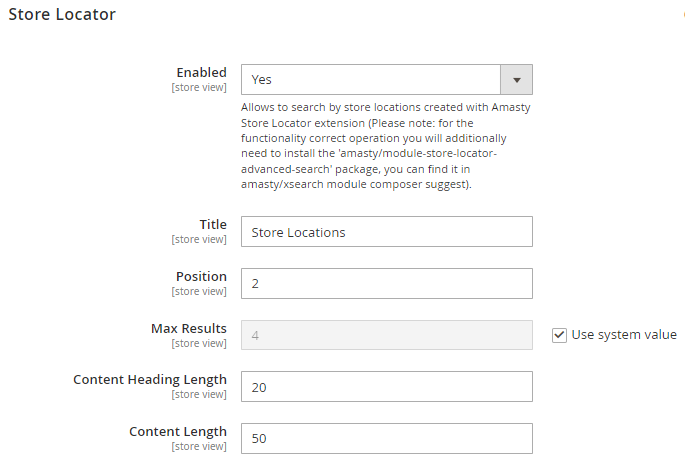
Enable search by Store Locations in the popup, specify the Title, Position and the Max Results. Set the maximal number of characters for Content Heading and Content that will be shown in the search popup.
Here's an example of how this functionality may appear on the fronten:
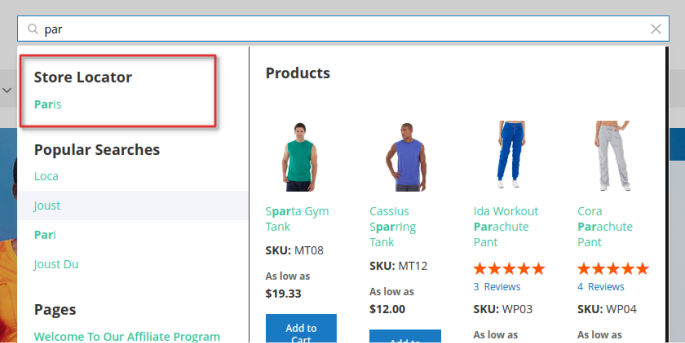
After clicking on a specific store in the search popup, the customer will be redirected to the page of that store's location.
Compatibility with Improved Sorting
The extension is compatible with Amasty Improved Sorting module. This means that if you have both modules installed, the sorting of search results in the Search Popup can be configured according to the settings of Default Sorting on Search Pages. To enable this functionality please navigate to Amasty → Improved Sorting → Configuration → Sorting by Default → Default Sorting on Search Pages:

Use in Search Popup - If enabled, products in the Amasty Advanced Search popup will follow the default sorting configured for search pages. Otherwise, products will be sorted by relevance.
This compatibility also enables the display of Bestsellers widget in the autocomplete popup.
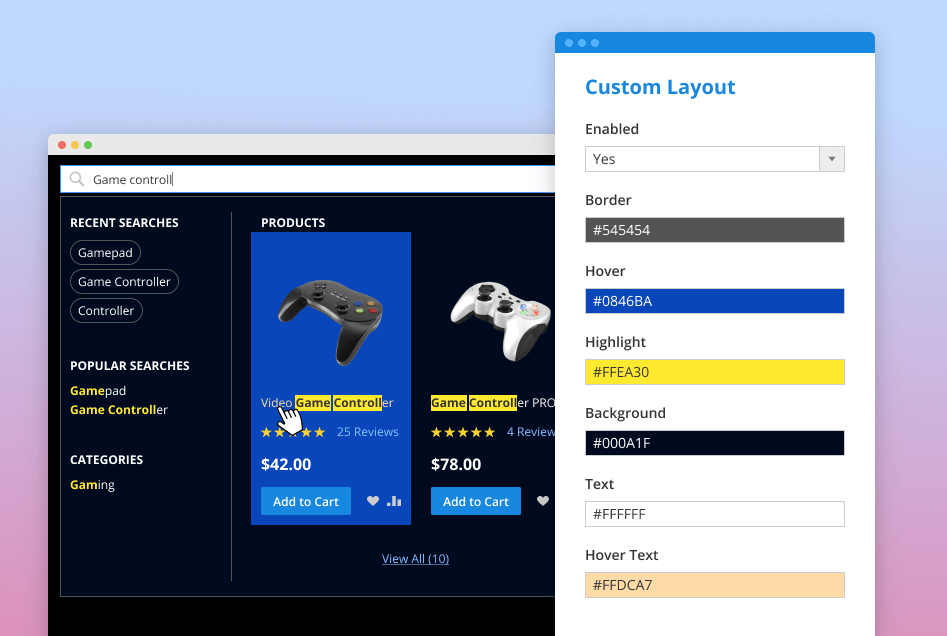
Custom Layout
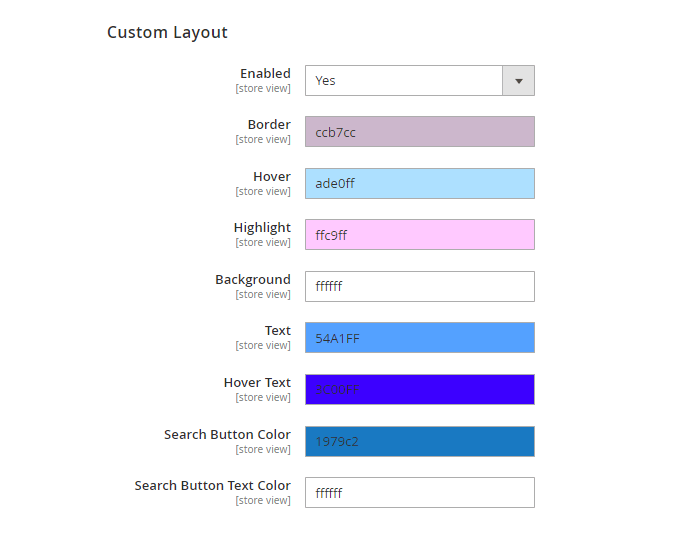
Enable this option to customize popup design.
Set colors for a Border, Hover, Highlight, Background, Text and Hover Text using convenient color picker tool.
We have added the ability to delete data from our amasty_xsearch_users_search table, as it can become very large over time.
This is implemented by adding our key to the search_query Magento table, so that when it is cleared, our table is also cleared. Both tables have a query_id column. And as soon as the particular ID is deleted from Magento table, the records with the same query_id are deleted in our table as well.
Analytical Dashboard
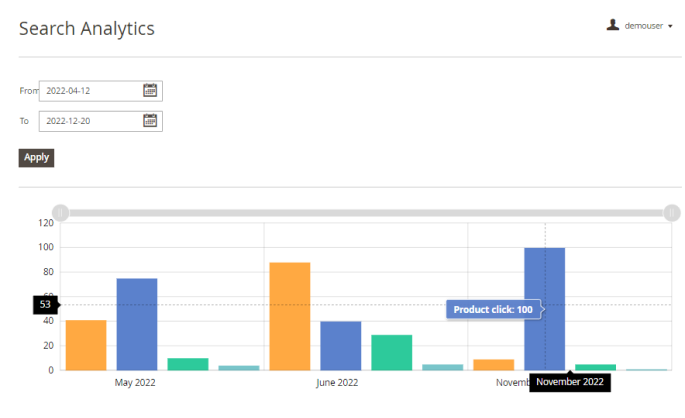
The Advanced Search extension allows to maximize profits by analyzing visitors' searching activity and the data gained.
To see the Search Analytics dashboards, go to Admin Panel → Reports → Search Analytics.
Here you can see the following values: total searches, unique searches, the number of users and users’ engagement. The Engagement statistics includes the page jumps to Brands, Categories, Blog, CMS & Landing pages.
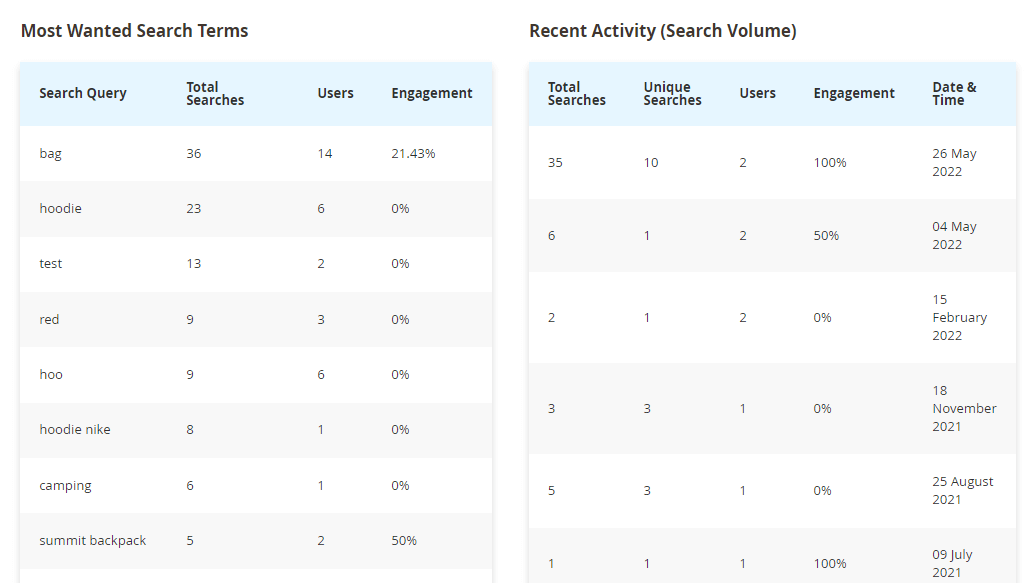
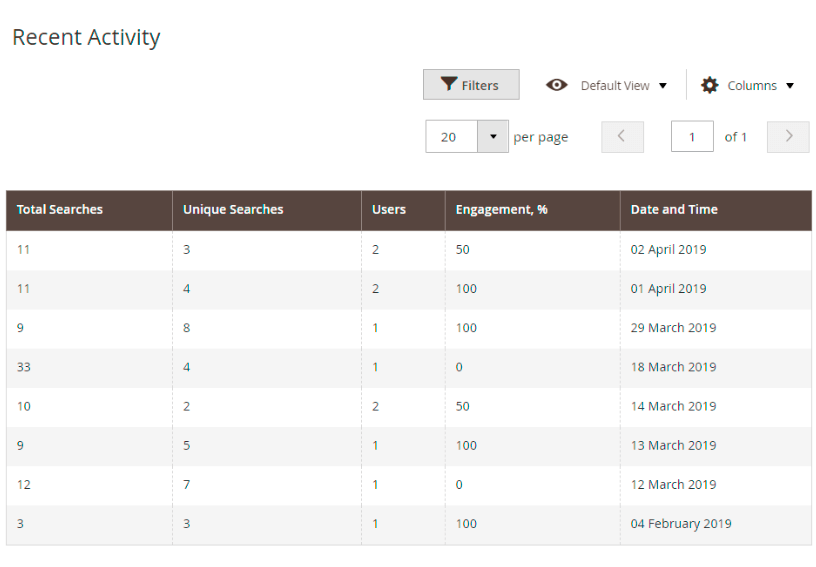
Easily check customers’ demand in the Most Wanted Search Terms and Recent Activity blocks. The extension automatically records the activity of users on the front end and converts it into reports on the back end.
Also in this report you can filter information by a specific period of time.
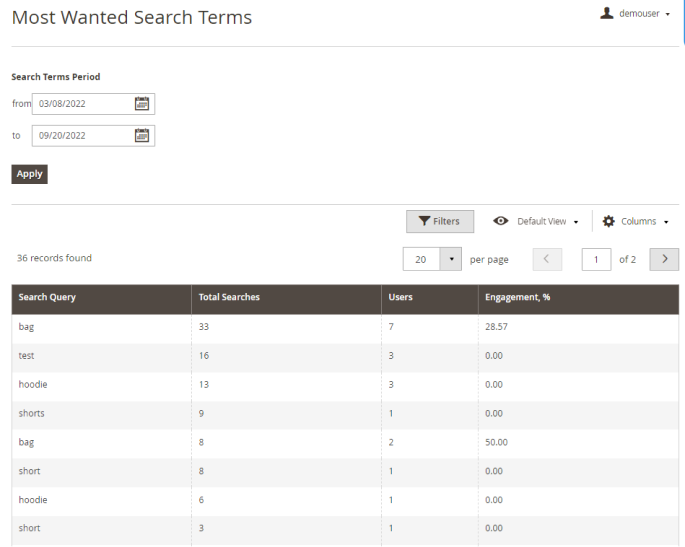
To see more details on Most Wanted Search Terms, go to Admin Panel → Reports → Most Wanted.
Please note that the Engagement metric is about the engagement with the autocomplete popup of the extension only, i.e. if shoppers click on the links in a popup, add products to cart etc. If they just type a search term and press 'Enter' without any extra popup engagement, then such action will not be counted in the engagement stats.
In this report, you can explore the most popular search queries, total searches of terms, the number of users who were searching for particular terms and engagement level. You can also filter the Most Wanted Search Terms report by date.
To see more details on customers' Recent Activities, go to Admin Panel → Reports → Recent Activity.
Related Search Terms
This extension lets store admins construct a seamless search flow with the related search terms. It is highly useful for customers, as it helps to navigate the store with relevant search suggestions.
Start by overseeing all search terms, that users created in the store by organically entering search requests in the autocomplete search window. To access it, please go to the Admin Panel → Marketing → SEO & Search → Search Terms.
Here, you can see how each search word performs. You can also export it in the CSV or Excel XML formats just in one click. Also, easily add new search terms or edit them.
Press on the required search term to modify it.
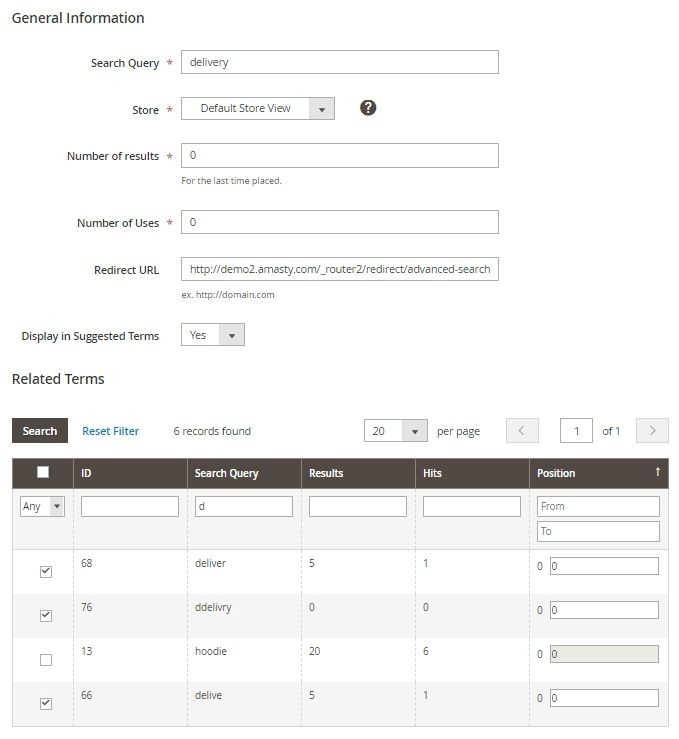
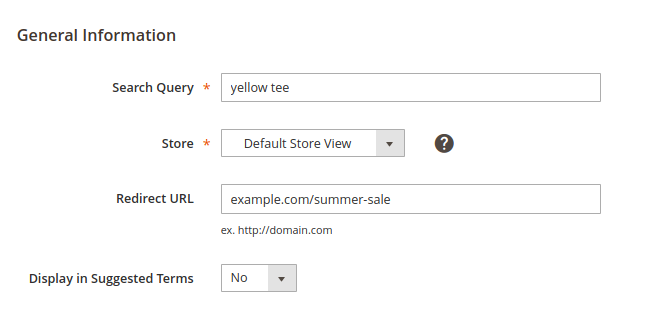
Here, the admin can adjust the general information and assign related terms.
Search Query - enter the search request a user needs to type into the search field.
Store - assign the store view for a specific keyword.
Number of Results - it specifies, how many search results will be returned.
Number of Uses - this number signifies how many times visitors have requested this specific search query.
Redirect URL - enter the URL you want to redirect users to when clicking on search results.
Display in Suggested Terms - set to Yes to show this search word in the Related Terms list for other search requests.
In the Related Terms table you'll get a list of all search terms that are enabled for display in suggested terms. Mark the necessary ones that match your goal by ticking the checkmark. This way, it will be much easier for a customer to navigate your store even if they've misspelled the search requests. Also, it's a great opportunity for a store owner to promote relevant searches that might be interesting for a customer and therefore motivate them to purchase in your store.
[Premium] Сonfigure the Improved Sorting module for Elastic Search Premium
Please note that this set of configurations is available out of the box for the Elastic Search Premium for Magento 2 only.
See the full guide on how to configure the Improved Sorting for Magento 2 extension here.
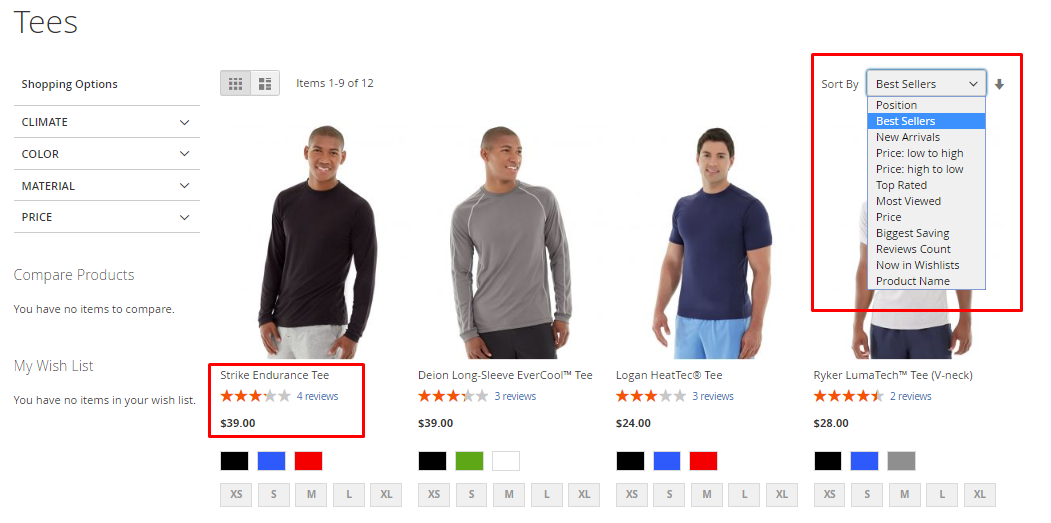
New sorting options on front end
The new sorting options and widgets are added to standard Magento ones on the front end and enable your customers to find the right products faster. Also Ratings and reviews of other people can be really helpful for your customers.
Compatibility with Yotpo Reviews
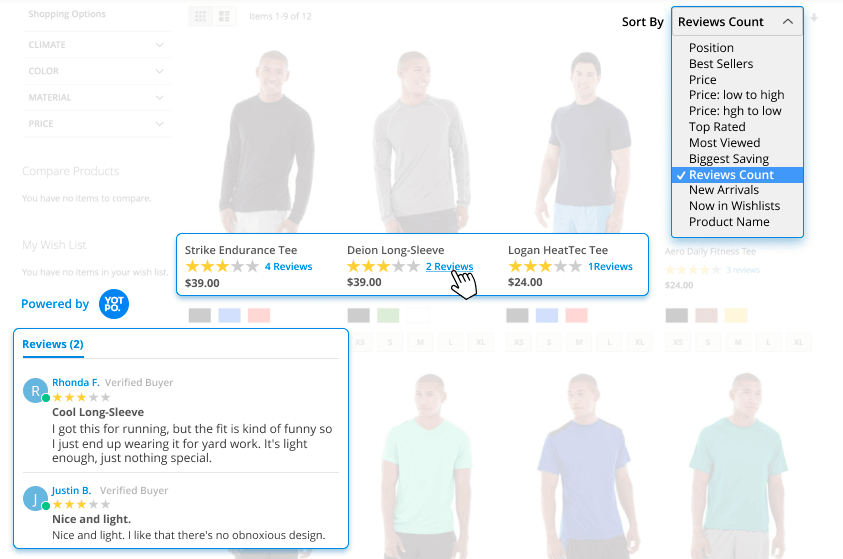
As well as with the Magento default reviews, you can use a 'Reviews Count' feature with popular Yotpo Reviews extension. Easily collect customer reviews and then display them on site pages to help buyers with purchase decisions. Moreover, analyzing customers' feedback data you can continually optimize your web store to provide better customer experience and increase your store conversion.
Featured Products Block
Boost your most popular products to sell even better with 'Featured Products' block.

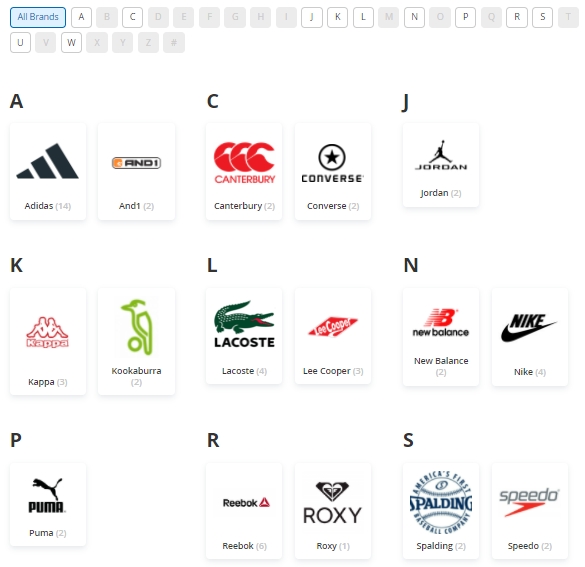
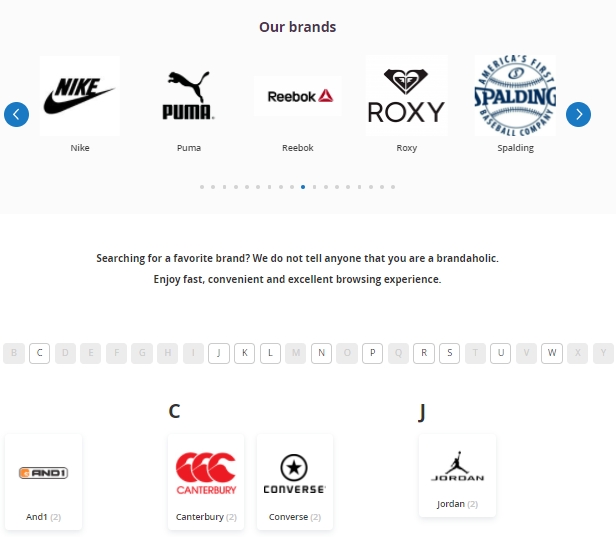
[Premium] Сonfigure the Shop by Brand module for Elastic Search Premium
Please note that this set of configurations is available out of the box for the Elastic Search Premium for Magento 2 only.
See the full guide on how to configure the Shop by Brand for Magento 2 extension here.
Alphabetical list of all brands
Brand page example
Below you'll see a brand page with a short SEO-friendly URL and custom content.

Brand tooltip
Display Tooltip - Multi-select the directories, where you would like to display a tooltip with a brand info.
Possible variants to display:
- all-brands page
- product pages
- catalog pages (listing)
Tooltip example on Luma theme:


Magento Commerce and the Multiple Wishlist extension compatibility
The Magento Commerce version of this extension provides some extra opportunities for the wishlist management in cooperation with the Magento 2 Multiple Wishlist extension.
Provide customers with the ability to choose the wishlist where to save the product, right from the autocomplete popup.
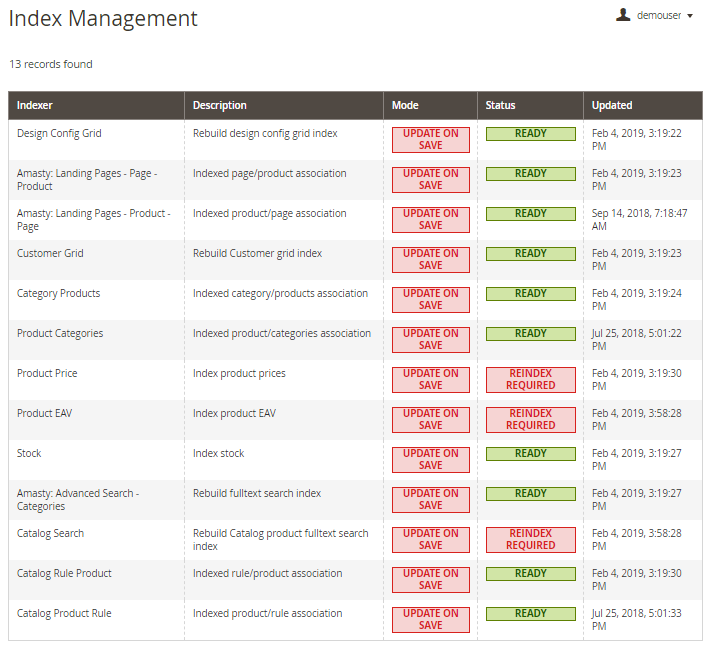
Index Management
To configure the indexing of your catalog, go to System → Tools → Index Management
Cron Tasks List
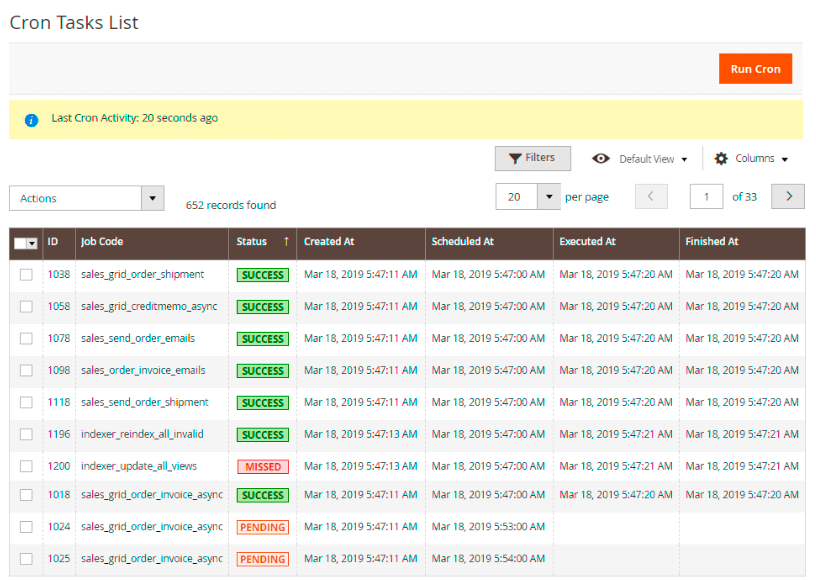
Magento 2 Elastic Search extension is preintegrated with Cron Tasks List to provide store owners with an opportunity to track and manage all cron tasks running in the website background.
To view all scheduled and executed cron tasks, go to System → Tools → Cron Schedule List
Run all cron tasks and generate their schedule by clicking the ‘Run Cron’ button. Also you can delete separate tasks in bulk, apply filtering and sorting options when it is needed.
PWA for Elastic Search (Add-On)
Provide shoppers with an outstanding cross-device experience by implementing a ready-made PWA solution to your store. Allow customers to smoothly search and quickly find what they need using the Elastic Search extension in a combination with the PWA add-on.
Please note that the PWA add-on will work correctly only if a PWA theme and the original Elastic Search extension for Magento 2 are installed to your store. Learn more on how to install PWA Studio here.
In order to correctly install a PWA add-on, please install the corresponding GraphQL system package first. For the correct name of it, please check the composer.json file of the main module. For example, the GraphQL system package name of the PWA add-on for the Blog Pro extension would be the following: amasty/blog-graphql
If the add-on is installed, the autocomplete popup of the Elastic Search extension will look on Venia the following way:
Please note that colors of the autocomplete popup on the screen below are customized through the feature 'Custom Layout' and it is not the default look.

This very PWA add-on does not support the following features of the original extension:
- ability to add searchbars via widget;
- show search results from the compatible to the original Elastic Search extensions: Blog Pro, Shop by Brand, Landing Pages, FAQ & Product Questions.
Find out more about Magento PWA integration here.
Frontend examples of the configured autocomplete popup
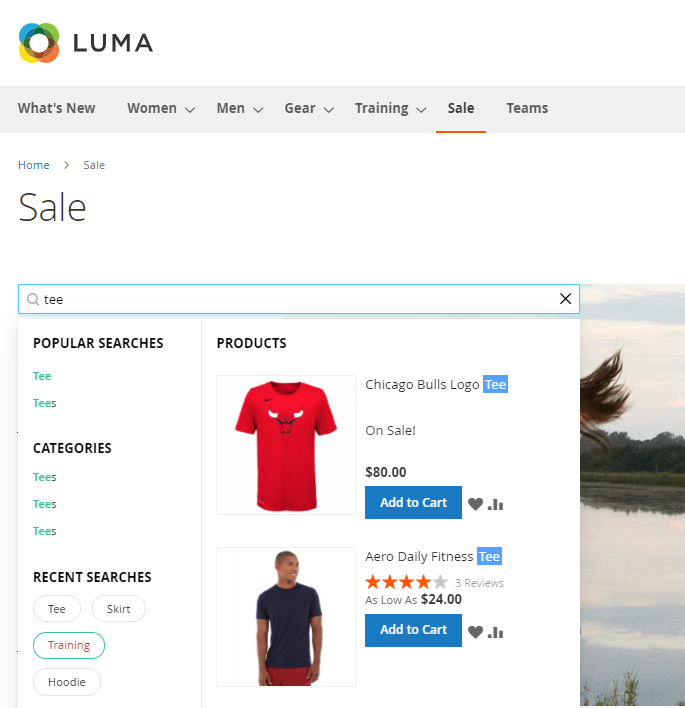
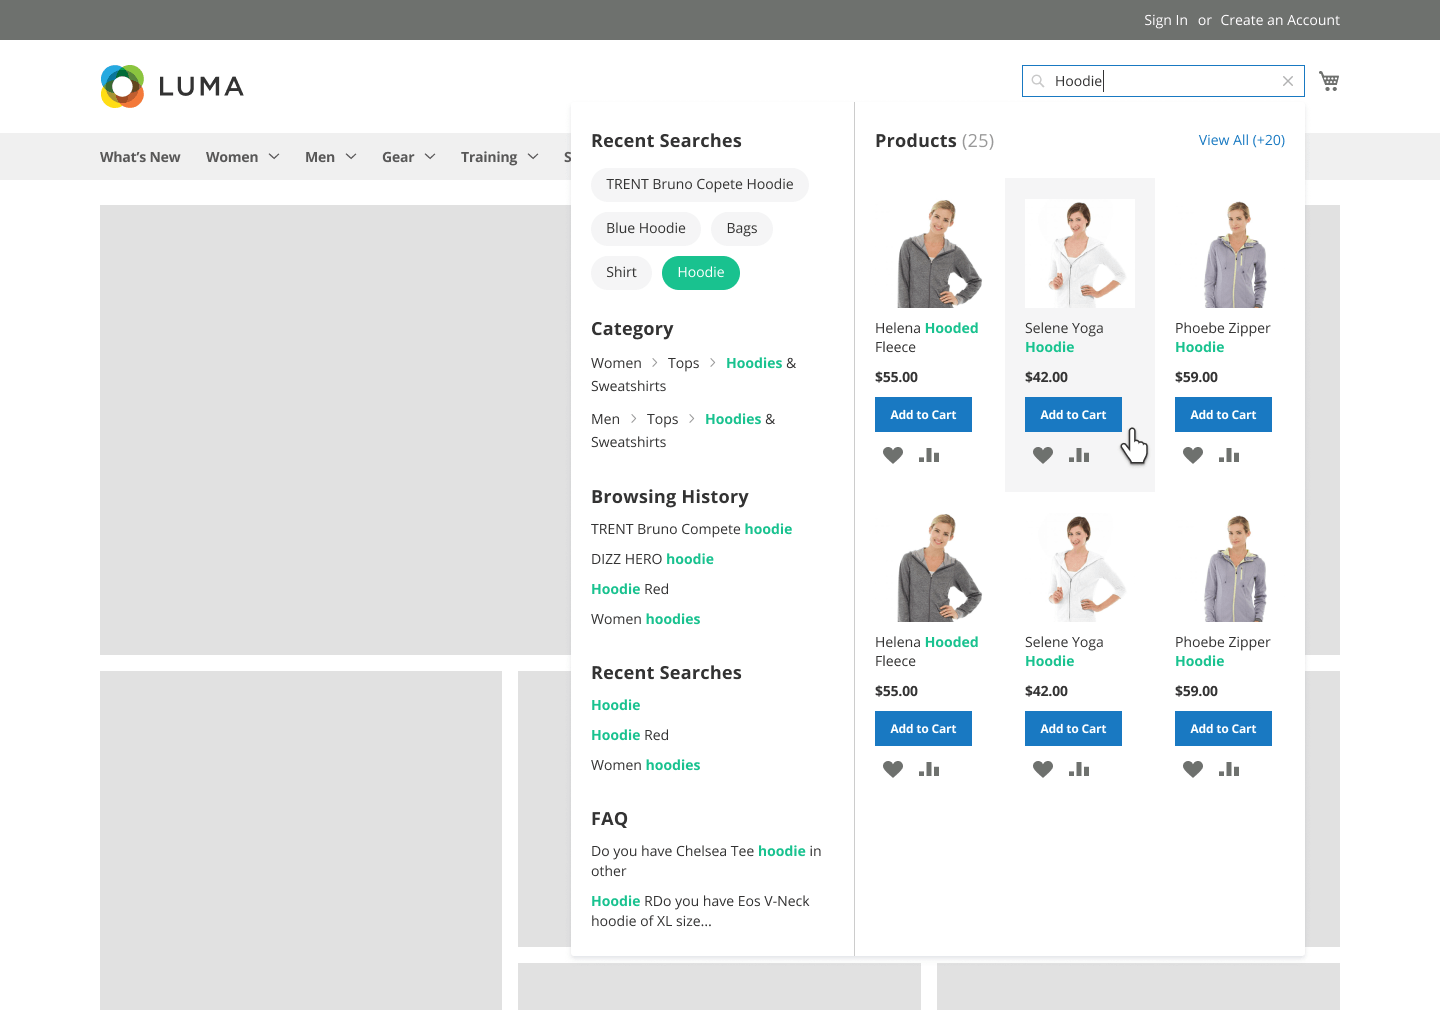
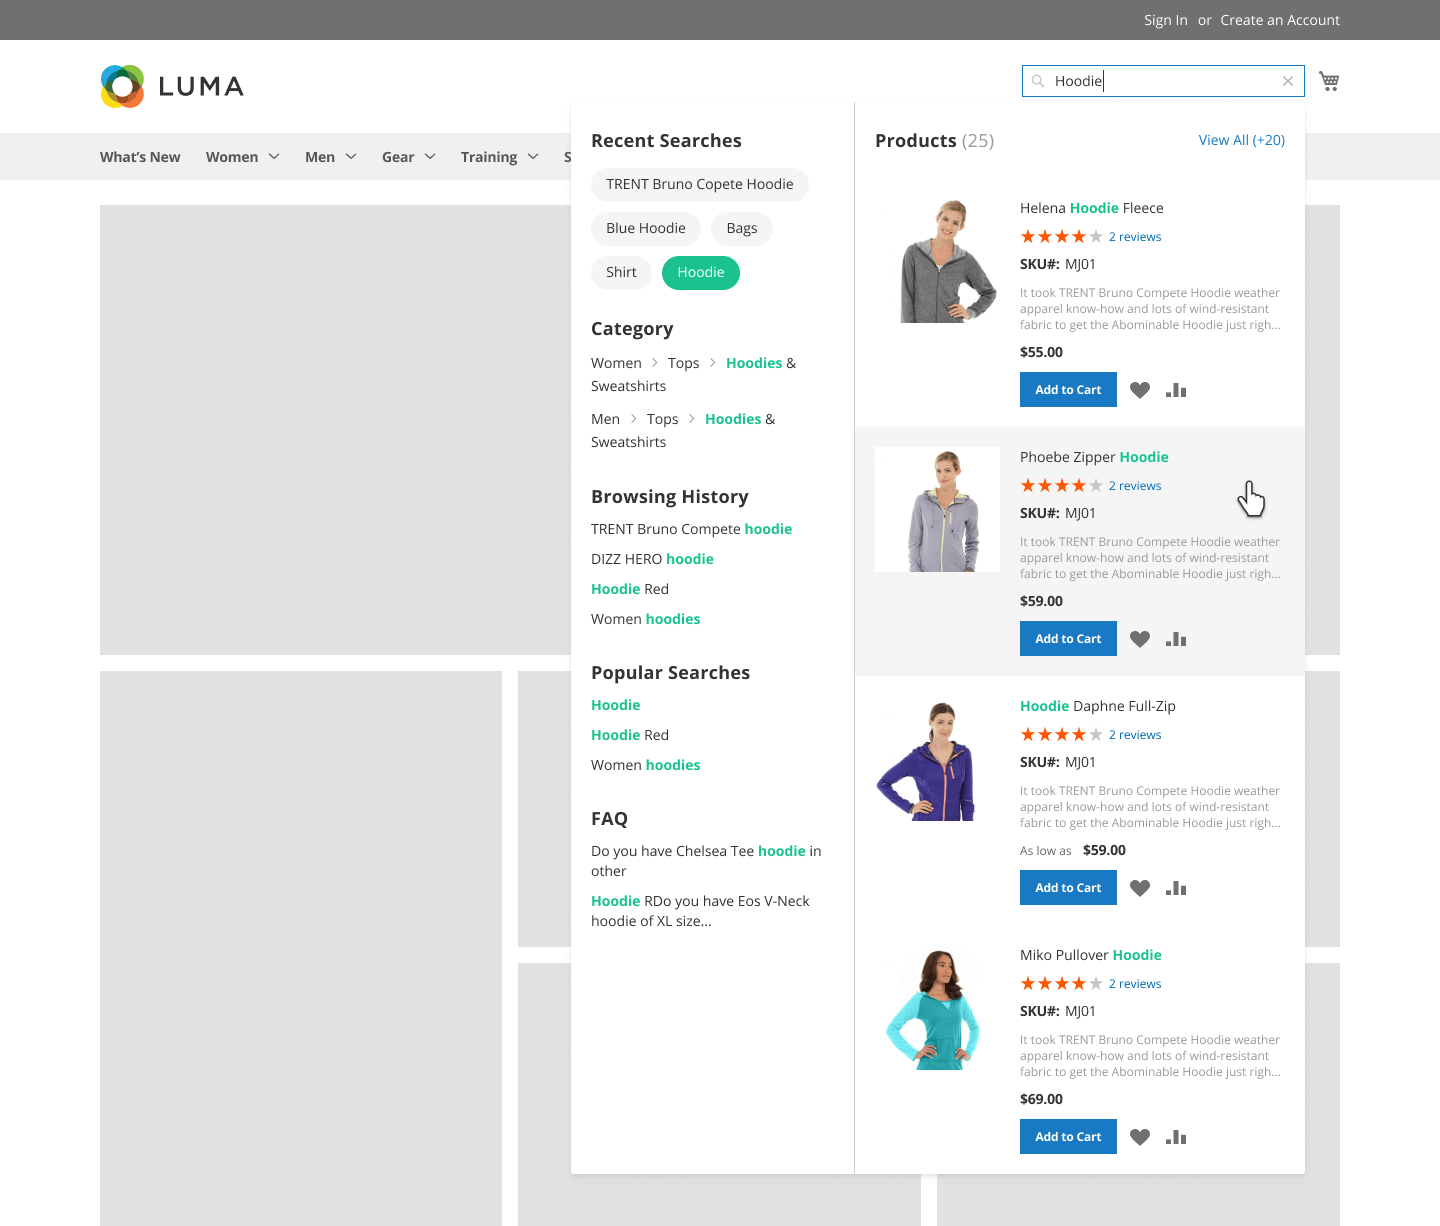
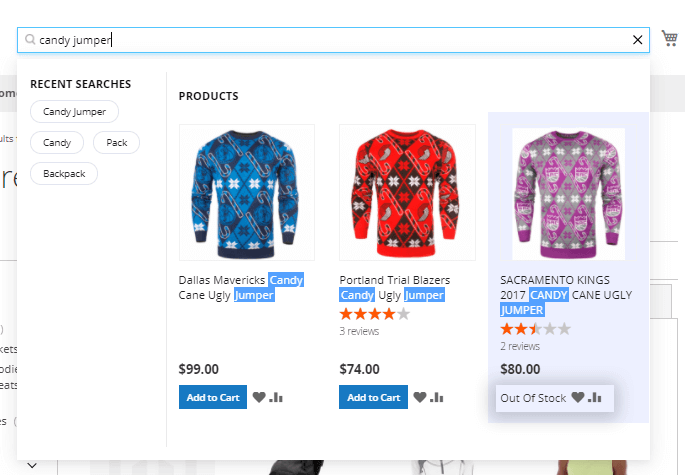
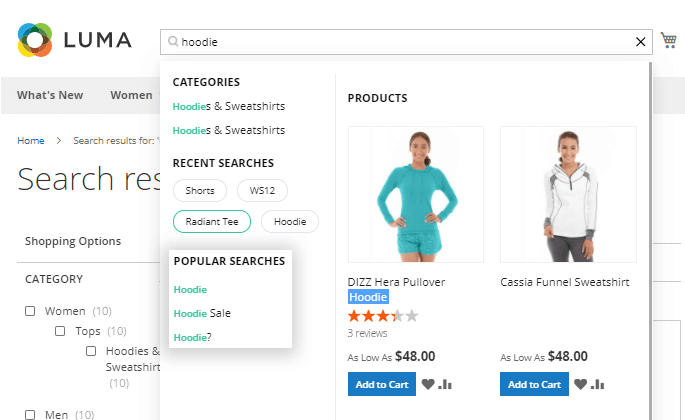
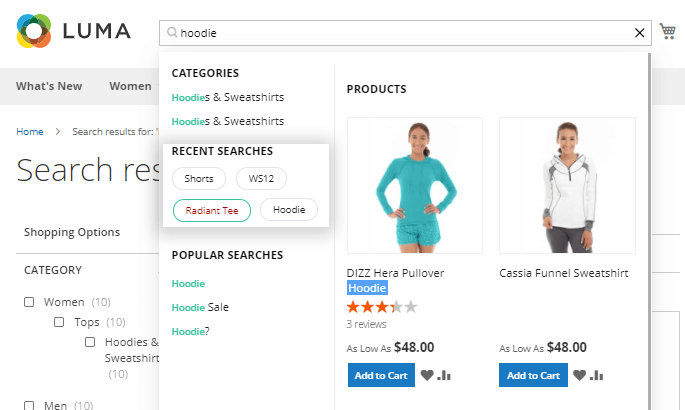
Enhance search results pop-up with additional sections. Display the ‘Add to Cart’ button and ‘View All’ link right in a search pop-up window.
Add handy search tabs to sort and easily navigate the results. Display related search terms in the search results to encourage users to search more.
The extension package contains MFTF tests aimed at quality and stability enhancement.
Additional packages (provided in composer suggestions)
To make additional functionality available, please install the suggested packages you may need.
Available for Basic, Pro and Premium tariff plans with no additional fees:
amasty/module-elastic-search- Install module-elastic-search-graphql module to activate Graphql and Elastic Search.
Available for Pro and Premium tariff plans with no additional fees:
amasty/module-meta-tags-to-elastic-search- Install meta-tags-to-elastic-search module to activate Amasty Meta Tags and Elastic Search compatibility.
amasty/module-elasticsearch-catalog-permissions- Install module-elasticsearch-catalog-permissions if you want elastic to work properly with Adobe Commerce Shared Catalogs.
Available as a part of an active product subscription or support subscription:
amasty/module-elastic-search-graphql- Install amasty/module-elastic-search-graphql module to activate Graphql and Advanced Search integration.
For Basic, Pro and Premium versions:
amasty/module-xsearch-hyva-compatibility- Install this package to insure Autocomplite popup works with Hyva Theme.
amasty/module-search-rate-limiter- Install this package in order to use the DDos guard functionality.
amasty/module-advanced-search-subscription-functionality- Install this package to set up the exclusion of categories from display in the search popup, add the ability to filter reports by date using the From - To functionality and search using the Product ID.
amasty/module-advanced-search-multi-store- Install this package for Multi-Store Search compatibility.
For Pro and Premium versions:
amasty/module-elastic-search-hyva-compatibility- Install this package to insure Elastic Search works with Hyva Theme.
amasty/module-elastic-search-pro-functionality- Install this package for Standard tokenizer compatibility.
For Premium version only:
amasty/module-improved-sorting-subscription-package - includes 3 packages:
1. amasty/module-sorting-hyva-compatibility - Install module-sorting-hyva-compatibility module to activate the integration with Hyva Theme.
2. amasty/module-sorting-by-qty - Install this package in order to use Product Salable Qty sorting.
3. amasty/module-improved-sorting-subscription-functionality - This package provides the possibility of sorting Bestsellers sales across multiple stores.
FAQ
magento_2/elastic_search.txt · Last modified: 2025/05/21 14:38 by asemenova

