Sidebar
magento_2:product_parts_finder
Table of Contents
For more details see how the Product Parts Finder for Magento 2 extension works.
Guide for Product Parts Finder for Magento 2
Enhance your store with the extended search options:
- Create year-make-model and similar filters
- Display part finders on home and category pages
- Import values for finder options
- Customize filter display
- Display compatible options
The extension is compatible with Hyvä Theme. You can find the 'amasty/module-product-parts-finder-hyva' package for installing in composer suggest. The compatibility is available as a part of an active product subscription or support subscription.
For the extension to work properly, it’s necessary to make the SKU attribute available for search. For this, please navigate to Stores → Product → Product Attributes → choose the SKU attribute → Storefront Properties tab and make sure that the ‘Used in Search’ option is set to ‘Yes’.
In Product Parts Finder FAQ you can find answers to the most popular questions about the extension functionality.
Create a new Product Parts Finder
To create a new product parts' Finder, navigate to in Catalog → Product Finders → Press Add New Item Button
Specify Title and a Number of Dropdowns.
Consider, that you can specify number of dropdowns only in this form. The other suggested fields will be available for editing afterwards as well.
Hit Save and Continue Edit to proceed.
Edit a Product Parts Finder
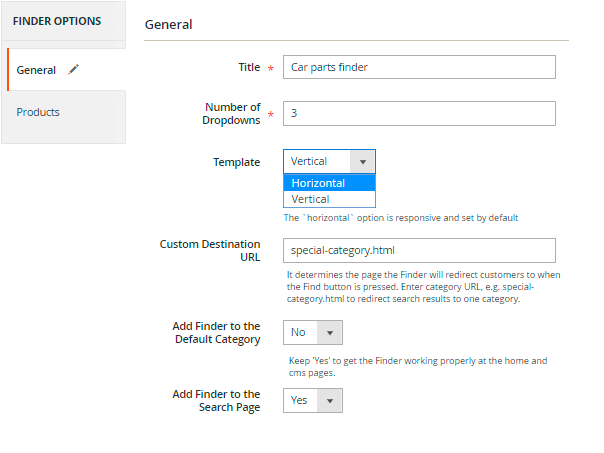
- Title - Finder block name.
- Template - Choose the Finder block layout from a dropdown. Can be set either as vertical or horizontal (which is responsive and set by default).
- Custom Destination URL - determines the page to which the Finder will redirect customers when the Find button is pressed.
- Add Finder to the Default Category - Set to Yes to manage a proper work of a finder at the home and CMS pages.
- Add Finder to the Search Page - Set to Yes to display finder on a search result page.
- Categories - Multi-select categories.
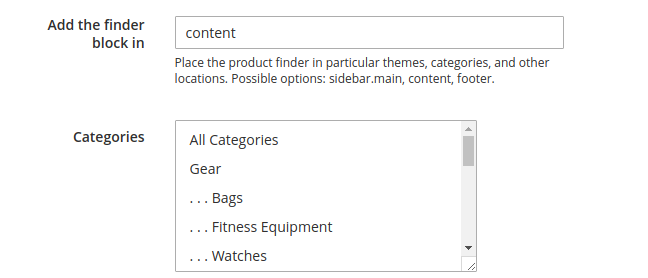
- Add the finder block in - Specify where to display a finder block: a sidebar, content, or footer.
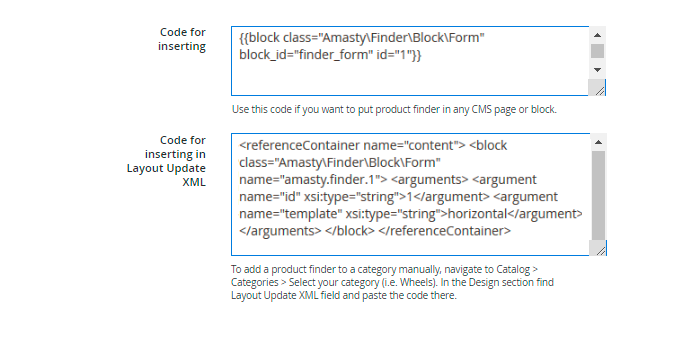
- Code for inserting - the code for inserting in CMS block, which in its turn can be added to CMS page.
- Code for inserting in Layout Update XML - the code for inserting in Layout Update XML.
Layout Update XML for Magento 2.3.4
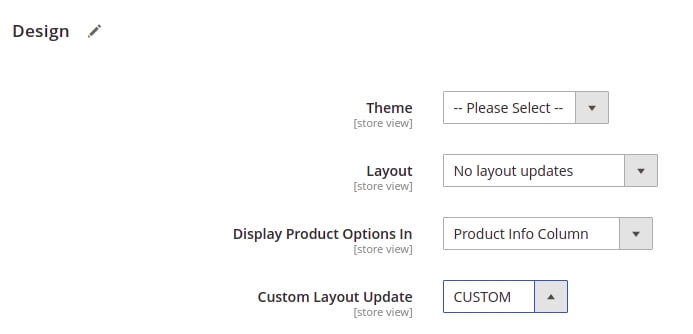
In Magento 2.3.4, there is no more the Layout Update XML field in the admin panel. Instead of it, you will find the Custom Layout Update dropdown on the CMS Page Edit, Category Edit, and Product Edit pages. It was done to increase the security level of the system.
Now, to make a custom layout, you need to create a file and place it on the server in the module or theme folder, for example, app/design/frontend/THEME/LOCALE/layout. Then you will be able to choose its name from the list in the admin panel. Magento loads all layouts and looks for those among them that meet the following conditions:
1) For product pages: catalog_product_view_selectable_PRODUCT_SKU_ANYNAME.xml
For example catalog_product_view_selectable_24-MB01_CUSTOM.xml
Check vendor/magento/module-catalog/Model/Product/Attribute/LayoutUpdateManager.php to get additional data.
2) For category pages: catalog_category_view_selectable_CATEGORYID_ANYNAME.xml
For example catalog_category_view_selectable_5_CUSTOM.xml
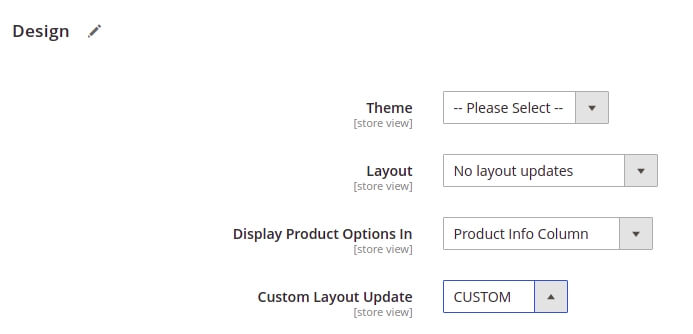
Go to vendor/magento/module-catalog/Model/Category/Attribute/LayoutUpdateManager.php for more details.
If you already had some Layout Update on the previous Magento version, you will see the Use existing option. It means your previous layout was saved, and you can use it on the frontend. If you try to add or change this Layout Update, you will get the following error:
“Custom layout update text cannot be changed, only removed”
Check the official documentation to learn about other Magento 2.3.4 changes.
Dropdowns
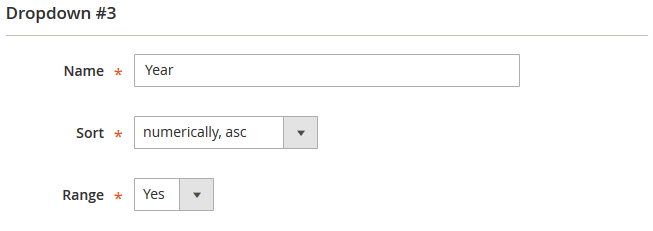
There is no limit to the number of dropdowns in a single Finder block. To configure the display of the dropdown please navigate to Catalog → Product Finders → Choose any finder → Dropdowns
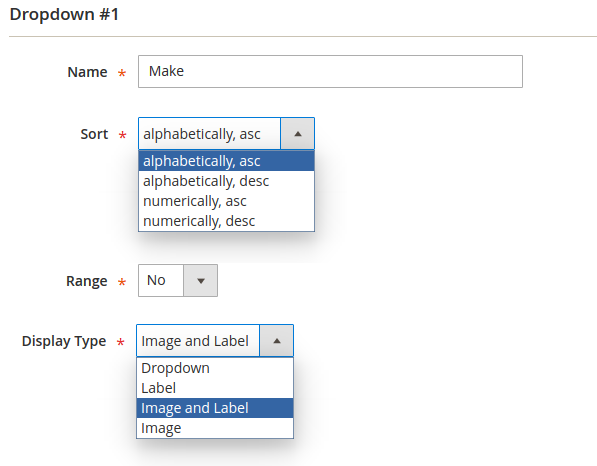
- Name - the dropdown name that will be displayed on the storefront.
- Sort - select a sorting method for data in dropdown.
- Range - if you enable this option and then import the data for this drop-down using ranges like “2006-2017” in CSV, the Finder will automatically create rows for each individual value in the range.
Please, note that Range will work for the data you import only after the Range option is enabled.
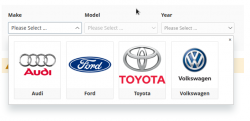
- Display Type - there are four display types to present the finder options, according to your needs.
Range
By enabling Range in the dropdown settings you'll be able to automatically generate records for numeric data, like a list of years.
Now, when you import a CSV file you can simply define a range like “2001-2017” and it will generate 17 records automatically when the file is imported.
Here's how the CSV example may look like: Make1,Model1,“2001-2017”,SKU1
The example above will create 17 records in the Finder database which will differ only by the Year value.
Add Products to a Finder
There are three ways to add products to a Finder:
Manually
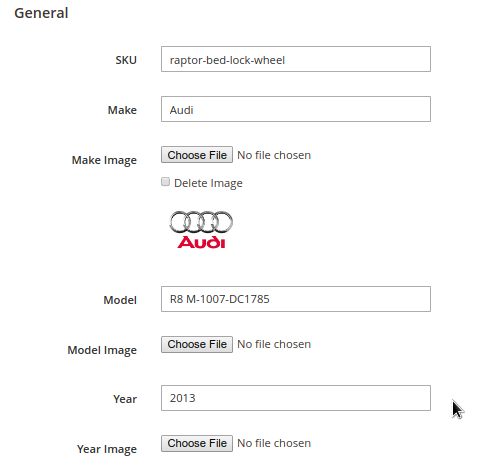
To add a new product parts' finder manually, go to Catalog → Product Finders → Edit Finder → Products

Click Add New Product button to fulfill a product form.
With Image field, that follows each option, upload images if it is needed.
Once you specify an image for a particular option while creating one product, the image will be automatically added to this option within the entire dataset, for all the products containing the option.
Import via CSV file
You can import records to the finder with CSV files.
To add a new product parts' finder via import, go to Catalog → Product Finders → Edit Finder → Import
Deciding on CSV format is very simple: count the number of dropdowns you have and add one more for the SKU column. For example, if you have three dropdowns, adding one makes it four-column CSV.
In some cases you may have several SKUs that match the same parameters. So you can indicate all the matching SKUs in one line separating them by comma. Also note that when you indicate more than one SKU in one line, the SKUs should be put inside quotation marks.
Below you can see an example CSV file with the data containing all the variations for Make, Model and Diameter and assign these variations to products in Magento Catalog.
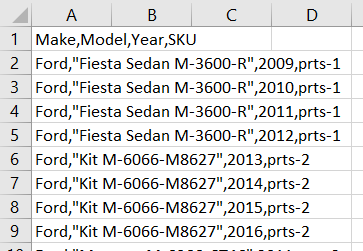

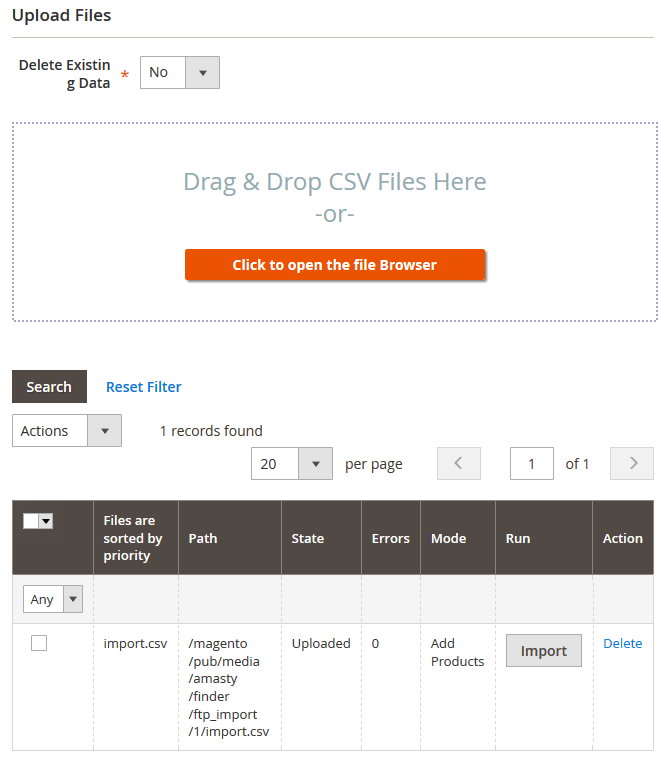
Open the Import tab, drag and drop the CSV file and hit Import. After the import is done, hit the Save and Continue Edit button.
Also, you can import Universal products for each product finder by uploading a CSV file. To do so, please navigate to Catalog → Product Finders → Edit Finder → Universal Products Import:
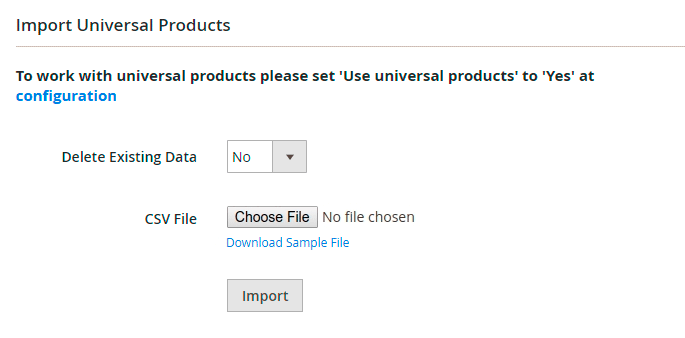
Import from the folder
This variant is useful when you want to import a large file which your web-server might not allow to upload due to size restrictions.
To import files from a folder, you should put the file to the following directory: /magento_folder/pub/media/amasty/finder/ftp_import/finder_id/
Please note that the finder_id part in the path should be replaced with the ID of the Finder you want to import the file into. After the file upload is done, open the Import tab and the file you've uploaded will appear ready to import.
Add Images To The Filter Options
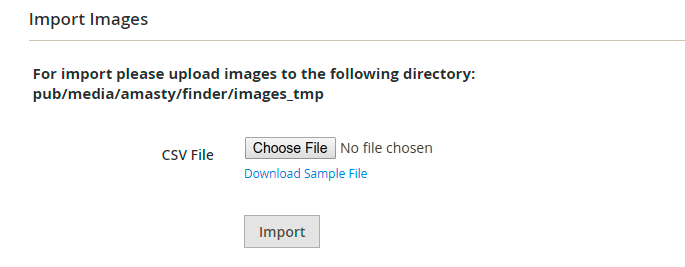
You can upload images for the options either manually or by uploading a CSV file. For the image upload, please navigate to Catalog → Product Finders → Edit Finder → Add Images To The Filter Options:
In CSV file, specify the dependency: an image name next to an option name, comma separated.


Extension Settings
You will find the settings menu at Stores → Configuration → Amasty Extensions → Product Parts Finder
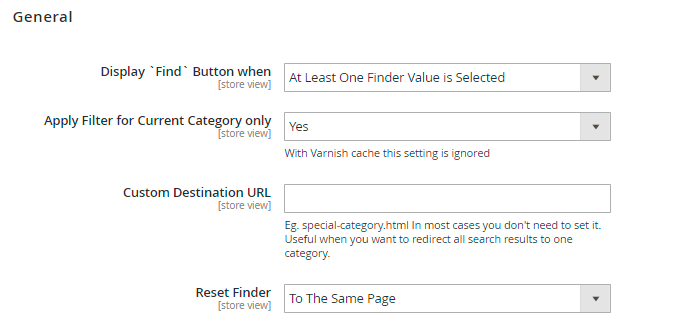
- Display `Find` button when - this setting controls when the Find button will be displayed: after picking options in all dropdowns or after picking the first.
- Apply filter for current category only - useful when you have one Finder instance across the whole store. When enabled, filtering parameters will be reset when a customer browses different categories.
- Custom Destination URL - Find button will redirect to the page specified in this setting. It can be set individually for each Finder instance.
- Reset finder - sets the destination of the Reset button. You can choose the next destinations: Home page, the same page, the result page.
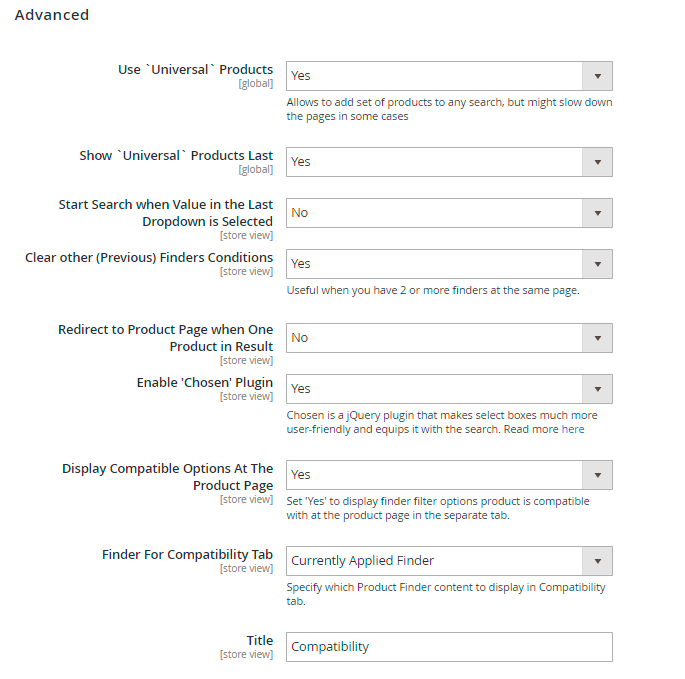
- Use `universal` products - enables and disables Universal products in one click.
- Show `universal` products last - when enabled, Universal products will be put at the end of filtered results.
- Start search when value in the last dropdown is selected - when enabled, the Finder will automatically initiate filtering once value in the last dropdown is selected.
- Clear other (previous) finders conditions - when enabled and you have more than one Finder on the page, only selection in the active instance will apply filtering, all other Finders will be reset.
- Redirect to product page when there is only one product in result - When there is only one position in the search results, it is possible to redirect straight to the product page. Instead of displaying the list with one item, you can lead the customers to a wanted product.
- Enable 'Chosen' plugin - Set to Yes to apply responsive user-friendly design for parts finder.
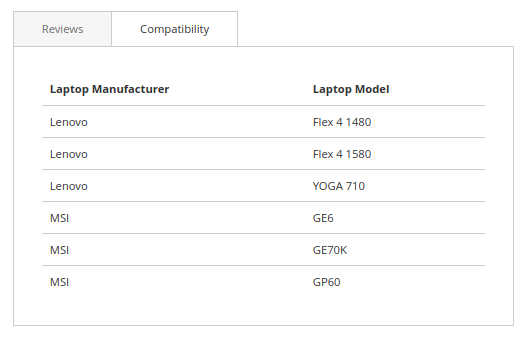
- Display Compatible Options At The Product Page - Enable the option to display finder filter options the product is compatible with, in the separate tab at the product page.
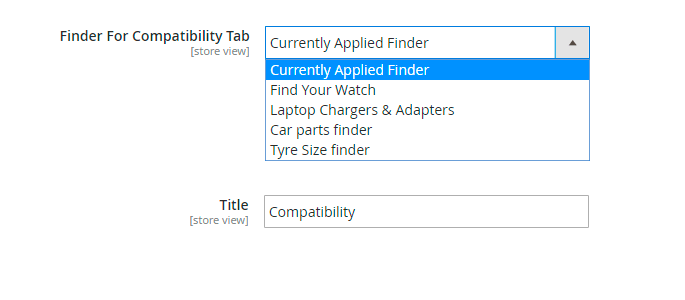
- Finder For Compatibility Tab - Choose which Product Finder content to display in the Compatibility tab on a product page (either the currently applied or any specific one). The tab displays all the finder's options, the product is compatible with. The tab is active on the product pages after a search by Finder.
- Import history lifetime (days) - sets the lifetime of import error log.
- Max rows per import - a batch size in lines which the import script will try to process during one run.
API support
API support implies that you can utilize Magento web API functionality. You can find more information on Magento site.
DropdownRepositoryInterface
- save(\Amasty\Finder\Api\Data\DropdownInterface $dropdown) - saves a dropdown;
- getById($id) - gets a dropdown by ID;
- getDropdownModel() - gets a dropdown's model;
- getByFinderId($finderId) - gets a dropdown by Finder ID;
- delete(\Amasty\Finder\Api\Data\DropdownInterface $dropdown) - deletes a dropdown;
- deleteById($id) - deletes a dropdown by ID;
- getList() - gets a list of all dropdowns.
FinderRepositoryInterface
- save(\Amasty\Finder\Api\Data\FinderInterface $finder) - saves a finder;
- isDeletable($mapId) - checks if a finder is deletable;
- getById($id) - gets a finder by ID;
- importUniversal($finder, $file) - imports Universal Products;
- getFinderModel() - gets a finder's model;
- addConditionToProductCollection($collection, $valueId,$countEmptyDropdowns, $finderId,$isUniversal,$isUniversalLast) - sets a filtration;
- getWithoutId($id) - gets all the finders without a current;
- delete(\Amasty\Finder\Api\Data\FinderInterface $finder) - deletes a finder;
- deleteByIds($ids) - deletes various finders by IDs;
- deleteById($id) - deletes a finder by ID;
- getFindersByIds($ids) - gets various finders by IDs;
- getList() - gets all the finders by the list;
- updateLinks() - updates links to dropdowns in a database;
- getFindersOnDefaultCategory() - gets finders for display on a default category;
- getFindersCategory($categoryId) - gets finder for a current category;
MapRepositoryInterface
- save(\Amasty\Finder\Api\Data\MapInterface $map) - saves a mapping;
- saveMap($valueId, $sku) - saves with updated data;
- getById($id) - gets a mapping by ID;
- getByValueId($id) - gets a mapping by value;
- delete(\Amasty\Finder\Api\Data\MapInterface $map) - deletes a mapping;
- deleteById($id) - deletes a mapping by ID;
- getList() - gets a list of all mapping;
UniversalRepositoryInterface
- save(\Amasty\Finder\Api\Data\UniversalInterface $universal) - saves a universal product;
- getById($id) - gets a universal product by ID;
- delete(\Amasty\Finder\Api\Data\UniversalInterface $universal) - deletes a universal product;
- deleteById($id) - deletes a universal product by ID;
- deleteByIds($ids) - deletes universal products by IDs;
- getList() - gets all the universal products;
ValueRepositoryInterface
- save(\Amasty\Finder\Api\Data\ValueInterface $value)
- saveValue($parentId, $dropdownId, $name)
- saveNewFinder(array $data) - saves a new finder;
- getValueModel() - gets a model;
- getById($id) - gets by ID;
- getByParentAndDropdownIds($parentId, $dropdownId)
- getByParentId($id)
- getSkuById($newId, $finderI) - gets SKU by finder's ID;
- delete(\Amasty\Finder\Api\Data\ValueInterface $value)
- deleteById($id)
- deleteOldData($finder)
- getList()
ProductRepositoryInterface
POST (/V1/amasty_finder/product/find) - gets the products collection by the finder options.
The format values are sent in the request body is:
{
"finderOptions": [
{ "dropdown_id": 1, "value": "1" }
,

{ "dropdown_id": 2, "value": "2" }
,

{ "dropdown_id": 3, "value": "3" }
]
}
- dropdown_id values should be placed in the same order (from left to right) as in the finder. All the elements should be included without skipping.
- value indicates the ID of the selected value.
Troubleshooter
- The finder block should be added to the results page. Filtering will work only when the Finder block is on the same page with the resulting products. If you don't want it to be displayed you can hide it with CSS, but you still need to place the block on the results page.
- Make sure that there are products to filter on the page which the finder uses to display results. The finder works as a product filter. If there are no products to filter on a page then the Finder won't be able to display them.
Cron Tasks List
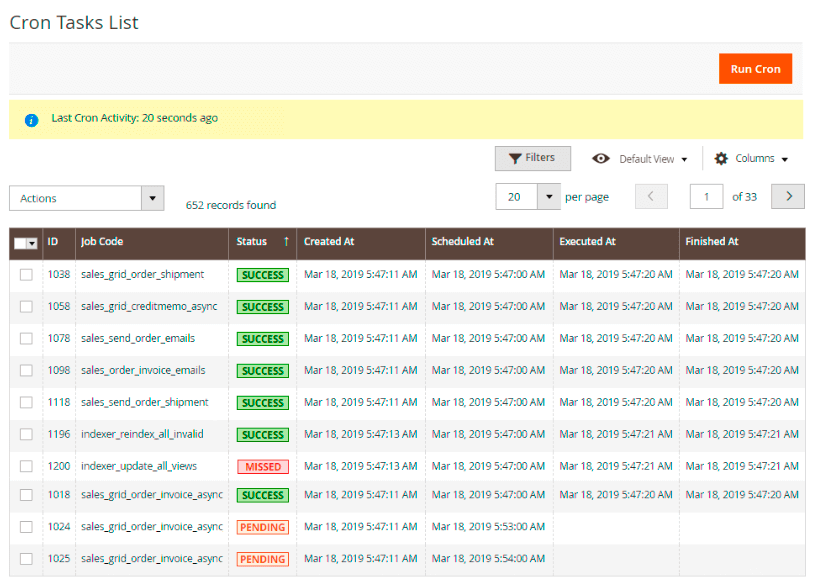
Magento 2 Product Parts Finder extension is preintegrated with Cron Tasks List to provide store owners with an opportunity to track and manage all cron tasks running in the website background.
To view all scheduled and executed cron tasks, go to System → Cron Tasks List
Run all cron tasks and generate their schedule by clicking the ‘Run Cron’ button. Also you can delete separate tasks in bulk, apply filtering and sorting options when it is needed.
Also, try our Magento 2 Improved Layered Navigation to make the shopping process even faster and simpler for visitors.
FAQ
magento_2/product_parts_finder.txt · Last modified: 2023/10/10 13:25 by asemenova


